
Whether you are looking to get into the podcast game, want to record your music, do some freelance voice work, or create an odd voiceover for a product demo or a quick explainer, you can rest assured your Mac can handle it. All you have to do is try out the various tools at your disposal and pick the ones that bring you the best results while not being too much of a hassle to handle.
Read on to see your options and find out if you’ll need to buff your setup with just the right set of apps and gear to record audio on your Mac.
Can you record audio on Mac?
You can absolutely record audio on a Mac. But to find out exactly what you need to get started, first decide what you want to record. For creating music, recording podcasts or voiceovers, you will likely need to consider getting external gear and making sure your recording room is suitable for the best sound.
Get a quality mic
Test out your Mac’s built-in mic first and see if it picks up a lot of noise and distractions, taking away from the quality of your final product. For professional-sounding audio, you are likely to require an external microphone, for casual walkthroughs or explainers you can totally get away with the built-in mic.
If you do choose to go with an external microphone, decide what audio quality you are looking for and then consider your budget. An external mic can run you between $70 and $150. Browse online best-of mic lists to pick the one that meets your specific recording needs — recording music and instruments, vocals, podcasts, and voiceovers can be vastly different in terms of what type of recording equipment to use, so tread carefully and study all the details.
Consider a USB audio interface
A USB audio interface is practically a must for musicians, but podcasters have been striving for quality and adopting the tool as well. And if you have no clue what a USB audio interface is and what it has to do with Mac recording audio, the device converts analog audio signals (the actual sound that’s occurring in the room) into digital, i.e. enabling your machine to create an audio file. So basically turning the waves in the air into 1s and 0s on your computer.
Just like with the mic, your Mac already has the tools to do the job, but the pros tend to recommend using a USB audio interface for more refined controls of various sound elements and better sound quality.
Choose your recording environment carefully
And finally, no matter what way you decide to record sound on your Macintosh, how your room’s walls, ceiling, floor, and furniture absorb and reflect sound can be crucial to the end result.
Unless you are specifically looking for an echo or reverb effect in your audio, you probably want to record your audio in a room with loads of soft furniture, carpets, curtains, and walls covered in breathable material. For more professional results, you might want to research more advanced adjustments that improve your recording space’s acoustics — wall treatments, acoustic panels, bass traps, etc.
Either way, always test out your various sound setting options and see what works best for your end product.
How to record audio on Mac
Now, let’s explore the ways you can record audio on Macintosh. You can try out the options of recording your audio with built-in apps like QuickTime Player or Voice Memos. You can also use Apple’s GarageBand. Additionally, you can try the n-Track Studio app.
We will discuss all of the above next, so buckle in.
How to record audio on Mac with Voice Memos
Here’s how to record a voice memo on Mac.
- Open Finder > Applications.
- Open Voice Memos.
- Hit the red button to start recording.
- Speak.
- Hit the bottom left button for pause, if needed. Click Done in the bottom right corner when you are finished.
With Voice Memos, you can record both compressed or lossless audio, just make sure to pick your choice in app preferences before you hit record.
You can trim or cut out pieces of your voice memos, organize them in folders, and more with this handy built-in Mac app.
Recording audio on Mac with n-Track Studio
n-Track Studio is a comprehensive multi-track music recorder that allows you to mix and edit your tracks.
This third-party app is an advanced recording app that provides a great solution for recording music, live performances, and mixing tracks. It boasts a large library of effects, drum synthesizer, step sequencer, screen keyboard, and more.
n-Track Studio allows for layered music recording for quality sound and easy editing of each part of your song.
To record a track, open the app and follow these steps:
- Look through your recording settings to the left and at the bottom of the app window and make the adjustments that fit your desired result and style of music.
- Hit the recording button at the bottom left of the app.
- Play the instrument or sing vocals for the track.
- Hit stop.
- Repeat steps 3 and 4 for the rest of your instruments, vocals, and other audio tracks.
- Move the audio bits you’ve recorded around your song’s timeline, edit the items individually as necessary.
- Add effects or change track settings.
- Save your project.
Get recording tools for Mac
Download a set of apps to record audio on Mac trouble free. Strong enough to work for podcast recording.
How to record audio on Mac with QuickTime
QuickTime Player is a built-in Mac app that helps you play videos but can be easily employed to record a quick audio.
If you need a simple Macintosh voice recorder, the app can do that nicely. Here’s a step-by-step for recording audio with this app:
- Go to Finder and open Applications.
- Spot and open QuickTime Player.
- Find File in the top Menu bar and select the option New Audio Recording.
- Select your file quality and desired mic by hitting the bottom-pointed arrow next to the red record button.
- Hit the red record button.
- Press stop to finish and save your audio.
How to record sound with GarageBand
How do I record multi-track audio on my Mac with a native Apple app, you ask? No fret, GarageBand is a solution you can try.
This tool has a lot to offer — built-in music lessons, project templates, and presets for various instruments, vocals, and genres. To record your tracks with the app, just hit the record button. Edit tracks with a plethora of tools within the app, mix, and save your end result.
Bonus tips on recording sound on Mac
For the times when you need to create a video recording of your online event or a product or flow walkthrough with a simple voiceover, you can use screen capturing app Capto.
This app is capable of taking multiple types of screenshots on your Mac, including freehand. But it also can record your screen. Just hit the Record button in the top panel of the app, select your recording area, and set the app up to get sound from your Mac mic or use computer audio. Tick Record camera option to lay over your webcam feed onto the screen recording as you create your video.
Another thing we’d recommend is creating a step-by-step plan for your recording — be it a podcast episode, product demo, or flow walkthrough, it’s important to make sure your audience is engaged. Stop yourself from wandering off the topic, skipping key points, or repeating the same thing over and over by creating a quality plan for your recording or even a detailed script.
Ulysses is a great note-taking app that is fit for the purpose and you can find it in Setapp along with Capto and n-Track Studio mentioned above.
Take notes, draft plans, and don’t skip a beat when recording your podcast or explainer!
On the other hand, if you are creating music on your Mac, you want your playback to sound as good as it possibly can to check the quality of your recording. Use Boom 3D to enhance your sound and enjoy the music more. The app boosts volume and provides an equalizer with multiple settings to fit your music preferences and enhance the output.
Run the app and flip through menu options to adjust settings to your liking and start listening!
How to record sound with Voice Recorder app on Windows 10Do you want to record a conversation or podcast? Windows 10 got you covered with the Voice Recorder app.

On Windows 10, the Voice Recorder app is a quick and convenient solution that anyone can use to record lectures, conversations, interviews, podcasts, and virtually anything else.
Although you can find many other applications with many different features, the free Voice Recorder app included on Windows 10 is simple and ships with all the necessary functionalities to record, trim, flag important moments, and share audio tracks.
In this Windows 10 guide, we will walk you through the steps to use the Voice Recorder app on your computer.
How to add Voice Recorder app on Windows 10
Voice Recorder comes installed on Windows 10, but you will have to install it manually if you don't have it.
To install the app to record voice, use these steps:Open the Windows Voice Recorder download page.
Click the Get button.

Click the Open button (if applicable).
Click the Get\Install button.
Once you complete the steps, the app will be available from the Start menu to record audio on your desktop or laptop.
How to use Voice Recorder app on Windows 10
On Windows 10, Voice Recorder is a straightforward app. You only need one of the best microphones. The one built-in on your device, the one from a webcam, or any microphone will do just fine for basic recording.
The instructions below include everything you need to get started recording, listing, and editing sound files.
Record audio
To record audio on Windows 10, make sure the microphone is connected (if applicable), and use these steps:Open Start.
Search for Video Recorder, and click the top result to open the app.
Click the Record button.

Quick tip: You can also start recording using the Ctrl + R keyboard shortcut.
(Optional) Click the Flag button to add a marker to the recording.
Quick note: This option won't interrupt the audio recording, but you can quickly jump to important parts of the recording when editing the track. You can use the marking feature while recording or listening to the audio file.
(Optional) Click the Pause button (or Alt + P keyboard shortcut) to stop recording without terminating the session. (This option will keep the recording in a single file.)
Click the Stop button to end the voice recording.

Quick note: You can also use the Spacebar, Backspace, Enter, or Esc key to stop recording.
Once you complete the steps, the audio will save automatically using a .m4a file format in the "Sound recordings" folder inside the "Documents" folder.
If you need the best microphone, we recommend the Blue Yeti Nano since it offers good quality sound and a relatively low price.
Budget friendly
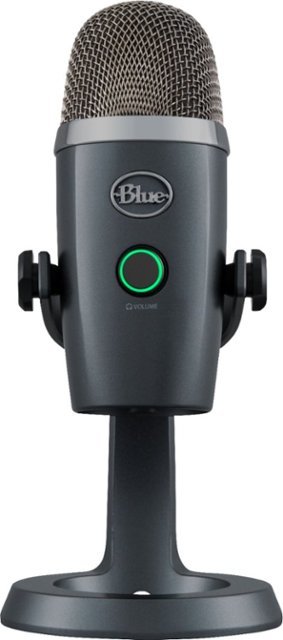
Blue Yeti Nano
The Blue Yeti Nano has impressive sound and built quality considering its price. It's a USB-powered plug-and-play device, and it features no-latency headphone output, headphone volume, and mute button.
$90 at Amazon
$90 at Walmart
Play audio recordings
To play recorded audio tracks on Windows 10, use these steps:Open Start.
Search for Video Recorder, and click the top result to open the app.
Select the track from the left pane to play the audio.

Click the Pause/Play button as necessary.
Once you complete the steps, click the Pause button to stop listening or select another recording from the playlist.
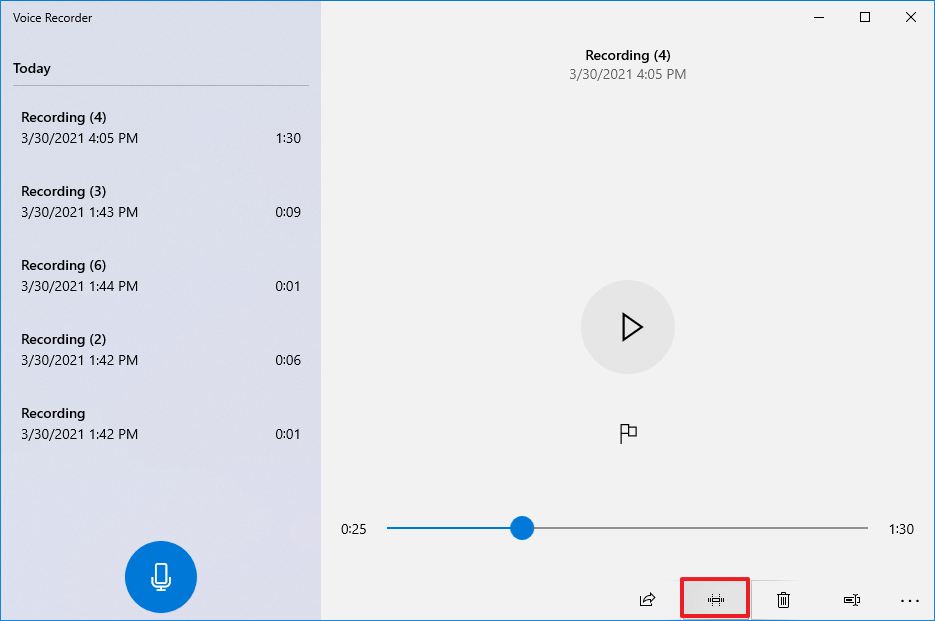
Trim audio recording
To trim an audio track after a recording session, use these steps:Open Start.
Search for Video Recorder, and click the top result to open the app.
Select the recording from the left pane.
Click the Trim button from the bottom-right corner.
 Source: Windows Central
Use the pins in the track to select the beginning and end of the recording, leaving out the parts you want to trim.
 Source: Windows Central
Click the Save (floppy) button from the bottom-right corner.
Select the Save a copy (recommended) or the Update original option.
 Source: Windows Central
After you complete the steps, you will end up with a shorter version of the file.
Rename audio files
Although the app saves every recording file automatically, it uses generic names, which are not descriptive enough to keep your recordings organized.
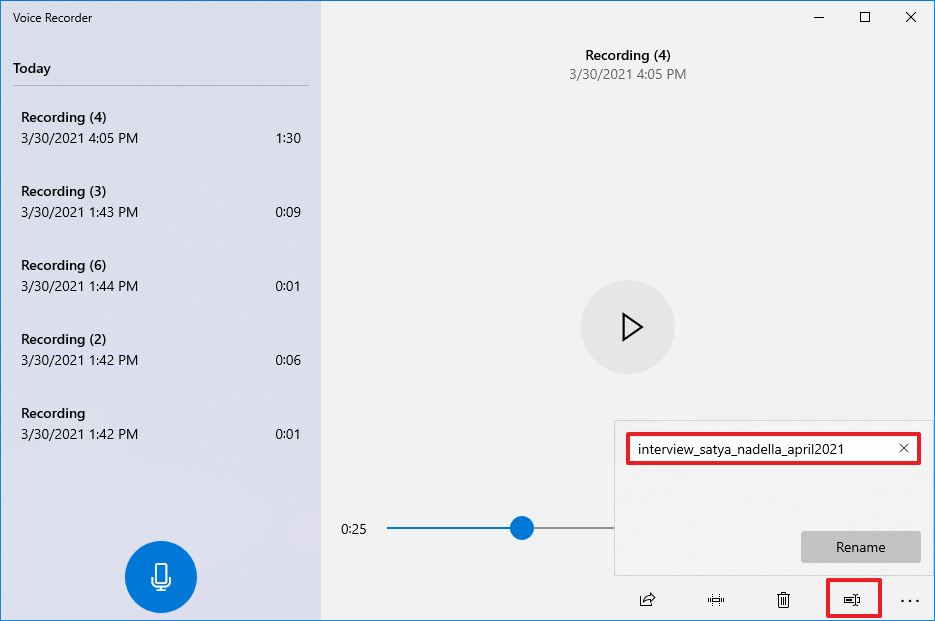
To rename a recording file on Windows 10, use these steps:Open Start.
Search for Video Recorder, and click the top result to open the app.
Select the recording from the left pane.
Click the Rename button in the bottom right corner.
Type a descriptive name for the file — for example, interview_satya_nadella_april2021.
Click the Rename button.
 Source: Windows Central
Once you complete these steps, the audio file will be saved with the name you specified in the "Sound recording" folder inside the "Documents" folder.
Share audio recording
To share a recording on social media or email, use these steps:Open Start.
Search for Video Recorder, and click the top result to open the app.
Select the recording from the left pane.
Click the Share button from the bottom-right corner.
 Source: Windows Central
Select the app to share the audio file.
Continue with the on-screen directions to share the audio file.
If you have to import the audio file into another project, you do not need to share it. Instead, copy and paste the file from the "Sound recordings" folder to your "Documents" folder or any other location.
How to fix Voice Recorder app problems on Windows 10
In the event that the app is not working, there is likely a problem with the microphone or privacy settings on Windows 10.
Fix Voice Recorder microphone access
To allow the Voice Recorder app to access the microphone, use these steps:Open Settings.
Click on Privacy.
Click on Microphone.
Under the "Allow access to the microphone on this device" section, click the Change button.
Turn on the Microphone for this device toggle switch.
Under the "Allow apps to access your microphone" section, make sure the toggle switch is in the On position.
 Source: Windows Central
Under the "Choose which Microsoft Store apps can access your microphone" section, turn on the Voice Recorder toggle switch.
 Source: Windows Central
After you complete the steps, the app should now be able to record audio from the microphone.
Fix microphone problems
If the app can't find the microphone, you can use the "Sound" troubleshooter to fix this problem.
To fix microphone problems on Windows 10, use these steps:Open Settings.
Click on Update & Security.
Click on Troubleshoot.
Click the Additional troubleshooters option.
 Source: Windows Central
Under the "Fin and fix other problems" section, select the Recording audio option.
Click the Run the troubleshooter button.
 Source: Windows Central
Select the microphone having the issue.
Click the Next button.
 Source: Windows Central
Continue with the on-screen directions to resolve the problem.
Once you complete the steps, any problems with the microphone should be resolved, and Voice Recorder should now work correctly.
If the microphone still does not work, check it is connected properly to the computer. In the case that you have multiple microphones, you can use these steps to set the system default. If it is a USB microphone, you can try a different port on the device or USB cable.
In the case that you have a Bluetooth microphone, confirm it appears on Settings > Devices > Bluetooth & other devices. Also, make sure that Bluetooth is enabled on your device from the settings page. You can learn more about using Bluetooth in this comprehensive guide.
Conclusion
Now that you know how to record audio on Mac and that your options are much wider than just voice recorder apps for Macs, you can pick the right set of tools that fit your specific tasks for audio recording on your machine. Whether you want to create music and record your instruments, vocals, and live performances, or you plan to run a podcast, or maybe you just need to record audio for your product walkthrough or demo, you can find a solution for each of these.


0 Comments