
To understand the meaning of tech stack, let us find out the intent behind creating a web application.
The application you build should be fast and provide an interactive browsing experience to users. If users seek more information, the application must be able to quickly fetch and organize the information in an easy-to-view manner. Further, as your application grows in popularity, it should scale well, without adding any performance overhead to the application ecosystem.
For this to happen, you must have the right technologies and infrastructure that:
- are cost-effective.
- give a seamless frontend experience to users.
- provide application developers with a fast and smooth development experience.
- scale up and out when required.
The set of technologies that you choose to use to build an end-to-end web application, mobile application, IoT, or similar application forms the technology stack. The MEAN stack is a trending technology stack example.
What is a tech stack?

A stack is an arrangement of “things” kept in order one over the other. A technology stack is a set of technologies that are stacked together to build any application. Popularly known as a technology infrastructure or solutions stack, technology stack has become essential for building easy-to-maintain, scalable web applications.
Technology stack determines the type of applications you can build, the level of customizations you can perform, and the resources you need to develop your application.
For example, a web tech stack typically looks like:
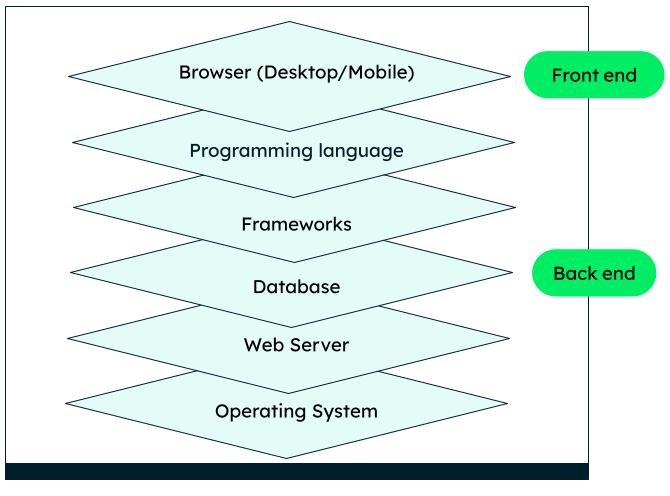
Example tech stack for a web application
Most tech stacks are a combination of frontend and backend technologies like JavaScript (user interface), Python (programming language), MongoDB (database), and Apache (server).
What is a modern tech stack?
A modern tech stack has many more components, because of the increase in the number of devices from which users can access applications and the huge volumes of events and data processing. It might include tools for containerization, performance monitoring, business intelligence, event processing, data lakes, cloud services, microservices, and analytics. You should choose the technology stack you want to use based on your project needs and other factors, which we will discuss later in this article.
What is an example of a tech stack?
One of the most popular and easiest examples of a technology stack is the MEAN stack. MEAN stands for MongoDB-Express-Angular-Node.js. You can replace Angular and use React, as in the MERN stack, since React is becoming equally popular, especially for single page web applications.
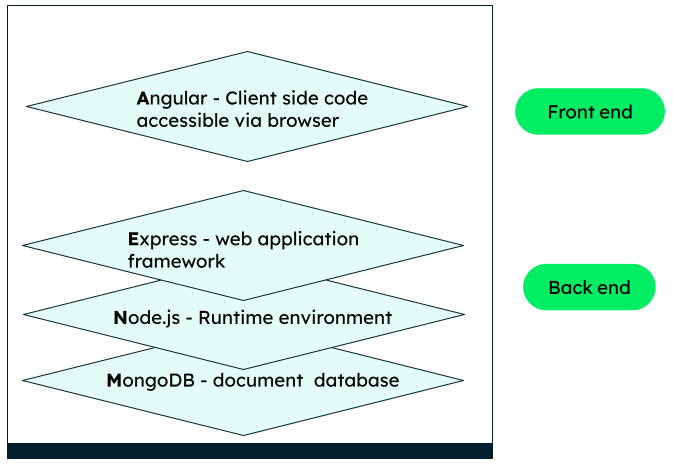
MEAN stack components
In the above diagram, Node.js is the runtime for the web applications, Angular provides the user interface, Express is a web framework built over Node.js, and MongoDB is the data platform or data stack that has the ability to transform data into a more usable form.
The MEAN and MERN stacks are trending tech stacks for web development. Many full-stack developers find these stacks easy to learn and implement because of the common technology used throughout the stack: JavaScript. You can learn more about the MEAN stack in our detailed tutorial.
Another popular tech stack example is the LAMP, which stands for Linux, Apache, MySQL and PHP.
In general, a tech stack can be a frontend tech stack, backend tech stack, or a mix of both—i.e., a full stack.

Frontend tech stack
For most of the web applications, the choice of frontend remains similar. Modern web applications are based on HTML, CSS, JavaScript, TypeScript, or frameworks based on JS, like React, Vue, and Express.
HTML
HTML (Hypertext Markup Language) defines the basic layout and structure of your pages. For example, the sections, bulleted points, and tables are created using HTML tags.
CSS
All the styling that’s applied to the web pages comes from CSS—for example, the green theme of the MongoDB pages.
JavaScript
The dynamic elements of the page come from the JavaScript code written by developers. For example, what happens when you hover your mouse over an image, or when you click on a submit, like, or comment button is decided by JavaScript events in the code.
There are many other frameworks and libraries—like Bootstrap, Vue, React, Angular, and jQuery—that are built on JavaScript and provide additional functionalities and common use cases, making a developer’s life much easier.
Backend tech stack
The backend or server-side tech stack consists of many components, like database, server, framework, and operating system. You have to choose the server-side frameworks and tools carefully, because some technologies are lightweight, fast, and suitable for basic purposes, whereas some are loaded with features that only a complex application might need.
Full stack tech stack
This is the most common type of stack used in desktop web applications. It consists of both frontend and backend technologies—for example, Angular for the UI, a framework like Django for the application logic, and a database like MongoDB for managing data.
Tech stack components explained
Let’s now take a look at the main components of a technology stack.
User interface
You can use markup like HTML and CSS stylesheets, or frameworks like Bootstrap or Tailwind, depending on the styling needs of the project.
Programming languages
Programming languages take care of the important business logic that your applications need. Some top programming languages are JavaScript, TypeScript, Java, Python, Ruby, Scala, PHP, and C#.
Frameworks
Frameworks provide a structure to the application and have common utilities so that you don’t have to write every piece of logic from scratch. Some popular web frameworks are Express, Spring, Django, Laravel, Rails, and .NET.
Runtime environment
Runtime environment is the software in which an application is run. Runtime provides cross-platform compatibility. Java Runtime Environment (JRE), Node.js, and Common Language Runtime (CLR) are examples of runtime environments.
Servers
A web server takes in requests (http) from the client (example, browser), passes it on to the database for the requested information, and handles the response. Apache httpd and Nginx are commonly used robust web servers.
Databases
Databases are an integral part of a tech stack. Whether your application is simple or has many workflows, you need a place to store all your information. Some popular databases are MongoDB and MySQL. Modern data platforms like MongoDB further enhance the functionality of a database by providing intelligent querying, aggregation, and transformation features, in addition to data storage and retrieval.
There are many other components—like APIs, analytics tools, BI tools, cloud services, and microservices—that can enhance the functions of an application.
Advantages of a tech stack
So, why do you even need a tech stack?
Firstly, you are more likely to build an application that can be used by a large number of people. If you choose frameworks and databases that scale well, during the planning phase itself, you will be saved from the horizontal and vertical scaling issues as your user base grows.
Also, a proper technology stack will help speed up the development process as you can hire full-stack developers or experts in individual technologies. You can also pick a specific tech stack to leverage your current team’s expertise. Additionally, it becomes easier for developers to communicate about the functioning of the application.
Planning a technology stack ahead means you will already know the resources, infrastructure, automation, hardware, and other project requirements, thus saving both cost and time.
Lastly, since you know the objective and size of the project/web application you are going to build, you can decide on the complexity of the stack and avoid using technologies and operations that are really not required for your project, and avoid bulky resources.
How to choose/build a tech stack
There is no one “right” technology stack. Building the tech stack is individual to an application. Here are a few factors you should consider while choosing/building your tech stack.

How to choose the right tech stack for your application
Purpose of the application
Ask yourself, “What do you want your web application to do?” Is it going to interact with a lot of other systems or need frequent database interactions? Is it a page that displays a lot of static organized content and so on?
If your application is a single page application, you can go for easy and light-weight technologies like React, whereas if you have a whole lot of functionalities, you need more sophisticated tools and frameworks for different workflows and integration between various systems. It is also wise to choose technologies that support mobile development, as those are being widely adopted.
Design and user experience
A good user experience is the key to attracting more traffic. Choose the tools that will serve the purpose of your user interface in the most effective way and justify the expectations of the design team. If your website is content-driven, choose a technology that supports server-side rendering.
Time to production
Your goal is to put your application live as early as possible. Go for technologies that provide utilities and solutions for common use cases and functionalities. Further, if a technology has good community support, it is helpful to bring new functionalities faster, especially if you have few resources working on the project. Finally, go for technologies that developers can easily learn and test.
Cost
Using cloud technologies (like MongoDB Atlas or AWS) in your tech stack can help you reduce deployment and maintenance costs. Also, choose technologies that integrate well. If you go for more specialized or advanced technologies, you have to spend more on the developer salary as well as maintaining the software needs. Choosing technologies that are easy to learn, or that your team already knows, can speed up the development time and reduce overall project costs.
Scalability
In reality, scalability is difficult to achieve. Most of the time, it is the database system or the queries that are hard to scale and optimize. Modern NoSQL databases like MongoDB provide many scaling options, which makes it a good choice, especially for data-intensive applications. Similarly, a good framework design (like the Model-View-Controller) helps write the code in the right way, making it easy to expand in future.
Security
While no technology can guarantee 100% security, always go with technologies that follow a set of best practices to ensure maximum security of data and transactions and minimize vulnerabilities.
Some technologies used for building the front end and back end of an application are:
| Tech stack components | Technologies |
|---|---|
| Frontend UI | JavaScript, HTML, CSS |
| Frontend frameworks | Vue, React, Angular |
| Frontend styling | Bootstrap, Tailwind |
| Programming languages | Node, Java, Python, PHP |
| Web application frameworks | Spring, Django |
| Database | NoSQL - MongoDB, CouchDB SQL - Oracle, MySQL |
| Event and messaging | Kafka |
| Infrastructure (Cloud) | Azure, AWS, Google Cloud |
| Virtualization | Kubernetes, Docker |
| Mobile applications | Android: Java iOS: Swift |
For example, you can build a custom tech stack base like below for an application that has many user interactions, database interactions, and a global presence:
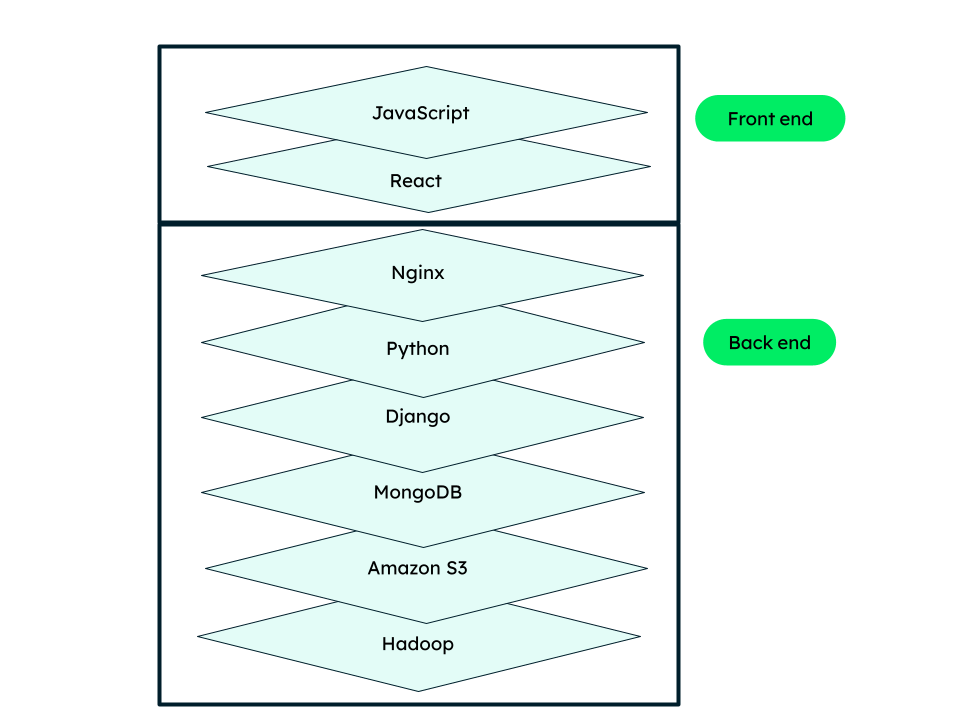
Custom tech-stack
Note that you can use any combination of technologies, as long as they are compatible and meet your project and budget requirements.
What Is the MEAN Stack?
What is the MEAN stack?
The MEAN stack is a JavaScript-based framework for developing web applications. MEAN is named after MongoDB, Express, Angular, and Node, the four key technologies that make up the layers of the stack.
- MongoDB — document database
- Express(.js) — Node.js web framework
- Angular(.js) — a client-side JavaScript framework
- Node(.js) — the premier JavaScript web server
There are variations to the MEAN stack such as MERN (replacing Angular.js with React.js) and MEVN (using Vue.js). The MEAN stack is one of the most popular technology concepts for building web applications.
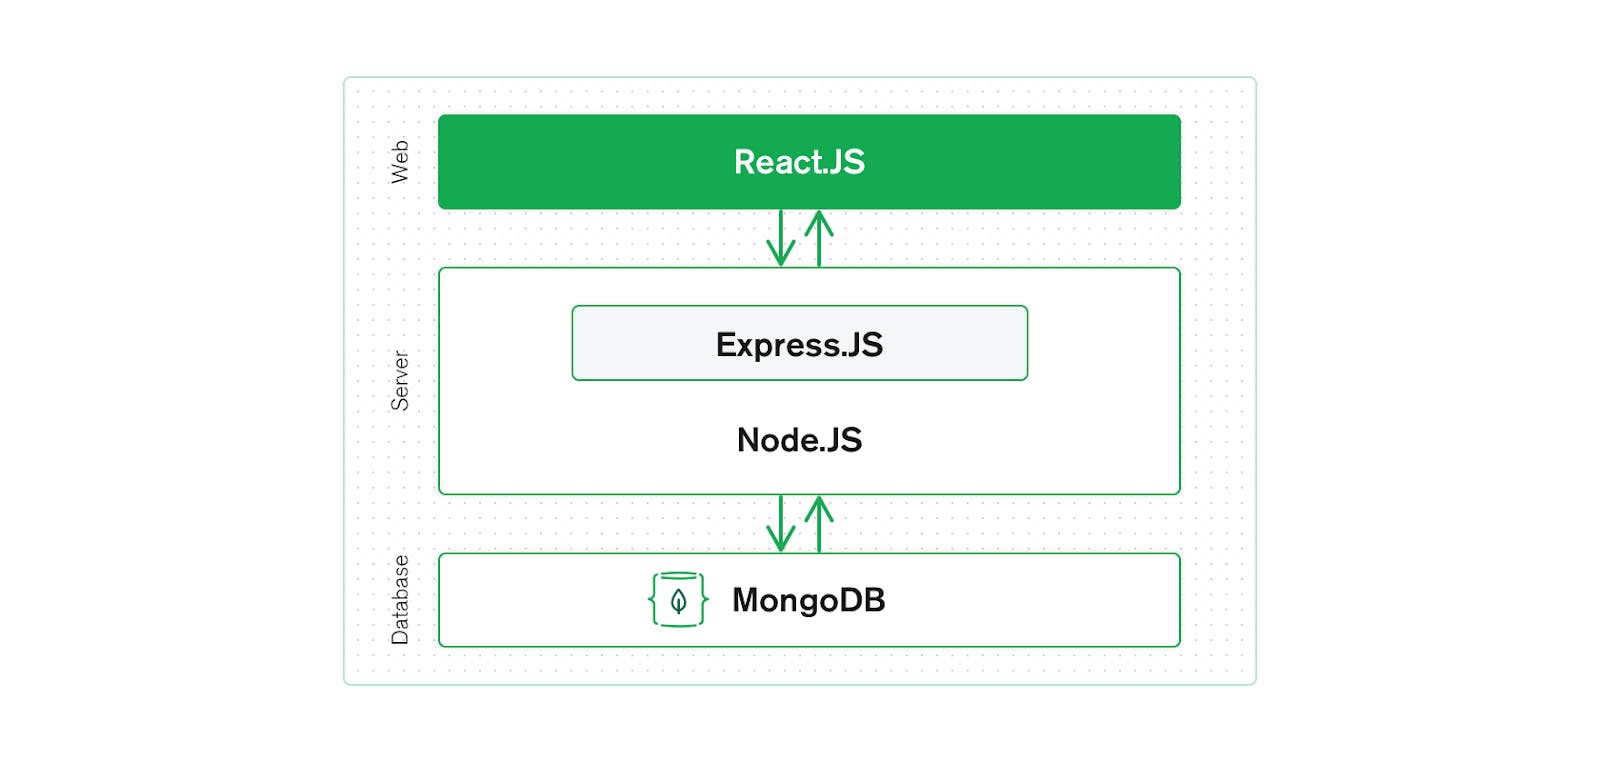
How does the MEAN stack work?
MEAN stack architecture
The MEAN architecture is designed to make building web applications in JavaScript and handling JSON incredibly easy.

MEAN stack components
Angular.js front end
At the very top of the MEAN stack is Angular.js, the self-styled “JavaScript MVW Framework” (MVW stands for “Model View and Whatever”).
Angular.js allows you to extend your HTML tags with metadata in order to create dynamic, interactive web experiences much more powerfully than, say, building them yourself with static HTML and JavaScript (or jQuery).
Angular has all of the bells and whistles you’d expect from a front-end JavaScript framework, including form validation, localization, and communication with your back-end service.
Express.js and Node.js server tier
The next level down is Express.js, running on a Node.js server. Express.js calls itself a “fast, unopinionated, minimalist web framework for Node.js,” and that is indeed exactly what it is.
Express.js has powerful models for URL routing (matching an incoming URL with a server function), and handling HTTP requests and responses. By making XML HTTP requests (XHRs), GETs, or POSTs from your Angular.js front end, you can connect to Express.js functions that power your application.
Those functions, in turn, use MongoDB’s Node.js drivers, either via callbacks or using promises, to access and update data in your MongoDB database.
MongoDB database tier
If your application stores any data (user profiles, content, comments, uploads, events, etc.), then you’re going to want a database that’s just as easy to work with as Angular, Express, and Node.
That’s where MongoDB comes in: JSON documents created in your Angular.js front end can be sent to the Express.js server, where they can be processed and (assuming they’re valid) stored directly in MongoDB for later retrieval.
Again, if you want to easily get the best of MongoDB, you’ll want to look at MongoDB Atlas. This will allow you built-in full database security and cross-cloud scalability with the click of a button. More on that later on this page.
Advantages of the MEAN stack
MEAN applications can be used in many ways with a cross-platform write-once approach. While MEAN is particularly suited to real-time applications, particularly those running natively in the cloud and single-page (dynamic) web applications built in Angular.js, it can be used for other use cases such as:
- Workflow management tools
- News aggregation sites
- Todo and calendar applications
- Interactive forums
There are many more uses for the MEAN stack, as well.
Since all the components are based on JavaScript and JSON, the integration between the components of the stack is intuitive and straightforward.
Additionally, the E and A of MEAN (Express and Angular) are two of the most popular and well-supported JavaScript frameworks for back-end and front-end development, respectively. Express makes routing and managing HTTP requests and responses super easy, and includes great support for middleware to handle JSON endpoints and form posts. Angular is a powerful tool for building dynamic HTML pages that communicate with a back-end server.
Whether you’re building a high-throughput API, a simple web application, or a microservice, MEAN is the ideal stack for building Node.js applications.
All of the MEAN stack components are open source in nature and therefore allow a generous, free-of-charge opportunity for developers.
Disadvantages of the MEAN stack
JavaScript is a great modern language, but it wasn’t initially designed to build back-end servers. Since the foundation of the MEAN stack is JavaScript, including the back-end server, it might come with concurrency and performance problems at scale due to JavaScript nature.
Additionally, since the development opportunity is so rapid, business and server logic might suffer from poor isolation, making potential spaghetti code and bad practices a reality along the way.
Finally, although there are many guides and tutorials out there, they generally will not include concrete JS coding guidelines appropriate for this stack. Therefore, something that worked really well for one application might surface issues for another.
When can the MEAN stack be used?
MEAN follows the traditional three-tier stack pattern, including the display tier (Angular.js), application tier (Express.js and Node.js), and database tier (MongoDB).
If you’re building a JavaScript application, particularly in Node.js, then you should give MEAN a serious look.
MongoDB stores data in a JSON-like format (BSON, a binary JSON extension), the MongoDB Query Language (MQL) is defined in JSON, and its command line interface (CLI) is a JavaScript interpreter. Not only is MongoDB essentially a JavaScript/JSON data store, but it’s full of advanced features like indexing and querying deep into JSON documents, has powerful native Node.js drivers, and is designed for horizontal scale-out. It’s even easier to develop apps in the cloud using MongoDB Atlas, the cloud-native database as a service from the creators of MongoDB.
Whether you’re building a high-throughput API, a simple web application, or a microservice, MEAN is the ideal stack for building Node.js applications.
Using MEAN stack with MongoDB Atlas
The MongoDB Node.js driver makes working with MongoDB from inside a Node.js script simple and intuitive for developers — saving developers time and increasing their productivity.
Next, you'll need a MongoDB database. The easiest way to get started with MongoDB is to create a free cluster in MongoDB Atlas, MongoDB's fully managed, multi-cloud document database as a service.
Atlas databases are easily deployed and scaled, providing you with a consistent URI to connect. See the official MongoDB documentation on connecting to a cluster.
Along the way, Atlas connections come with built-in username/password and TLS end-to-end encryption by default. Additionally, these connections allow you to utilize advanced MongoDB security features such as certificate/IAM authentication, LDAP, Encryption-at-rest, and Auditing with the click of a button.
Moreover, an Atlas project can utilize the Atlas App Services applications platform to easily integrate many authentication providers such as Google, Facebook, JWT, and custom authentication.
Scaling and managing Atlas is very easy; its biggest benefit is th
at it supports and secures the MEAN stack's most valuable layer: the data layer.
How secure is the MEAN stack?
We recommend using the MEAN stack with MongoDB Atlas, since Atlas has built-in credentials, a firewall, and end-to-end encryption, which is the best foundation for securing your MongoDB.
Additionally, the MEAN stack has a concrete three-tier separation which, if used with best practices and correct network isolation, should prevent your end users from having access to the business logic and, moreover, to your database layer. Therefore, your application is by default designed to avoid malicious user interaction from putting your application at risk (query injection, code manipulation, port spoofing, etc.).
How to Use MERN Stack: A Complete Guide
You
will need access to the MongoDB Atlas database for this tutorial. If
you don't have an account you can sign up free to follow along.This
tutorial will show you how to build a full-stack MERN application—in
this case, an employee database—with the most current tools available.
Before you begin, make sure that you are familiar with Node.js and
React.js basics and have Node and Create React App installed. You will also need access to the MongoDB Atlas database for this tutorial. The full code is available on this GitHub repo.
This tutorial will show you how to build a full-stack MERN application—in this case, an employee database—with the most current tools available. Before you begin, make sure that you are familiar with Node.js and React.js basics and have Node and Create React App installed. You will also need access to the MongoDB Atlas database for this tutorial. The full code is available on this GitHub repo.
What is the MERN Stack?
The MERN stack
is a web development framework made up of the stack of MongoDB,
Express.js, React.js, and Nodejs. It is one of the several variants of
the MEAN stack.
 When you use the MERN stack, you work with React to implement the
presentation layer, Express and Node to make up the middle or
application layer, and MongoDB to create the database layer.
When you use the MERN stack, you work with React to implement the
presentation layer, Express and Node to make up the middle or
application layer, and MongoDB to create the database layer.
In
this MERN stack tutorial, we will utilize these four technologies to
develop a basic application that is able to record the information of
employees and then display it using a React.
The MERN stack
is a web development framework made up of the stack of MongoDB,
Express.js, React.js, and Nodejs. It is one of the several variants of
the MEAN stack.
When you use the MERN stack, you work with React to implement the
presentation layer, Express and Node to make up the middle or
application layer, and MongoDB to create the database layer.
In this MERN stack tutorial, we will utilize these four technologies to develop a basic application that is able to record the information of employees and then display it using a React.
How to Get Started with the MERN Stack
To get started, you will need to do the following:
Install Node
To install Node, go to https://nodejs.org/en/ and download either the LTS version or the current version.
Have or Install a Code Editor
You
can use any code editor of your choice for this tutorial. However, for
the sake of demonstration, we will be using VS Code editor with the
plugin prettier and vscode icons.
To get started, you will need to do the following:
Install Node
To install Node, go to https://nodejs.org/en/ and download either the LTS version or the current version.Have or Install a Code Editor
You can use any code editor of your choice for this tutorial. However, for the sake of demonstration, we will be using VS Code editor with the plugin prettier and vscode icons.
Setting Up the Project
(Feel free to code along or to download the full code from this GitHub repo.)
MERN
lets us create full-stack solutions. So, to leverage its full
potential, we will be creating a MERN stack project. For this project,
we will create both a back end and a front end. The front end will be
implemented with React and the back end will be implemented with
MongoDB, Node, and Express. We will call the front end client and the back end server.
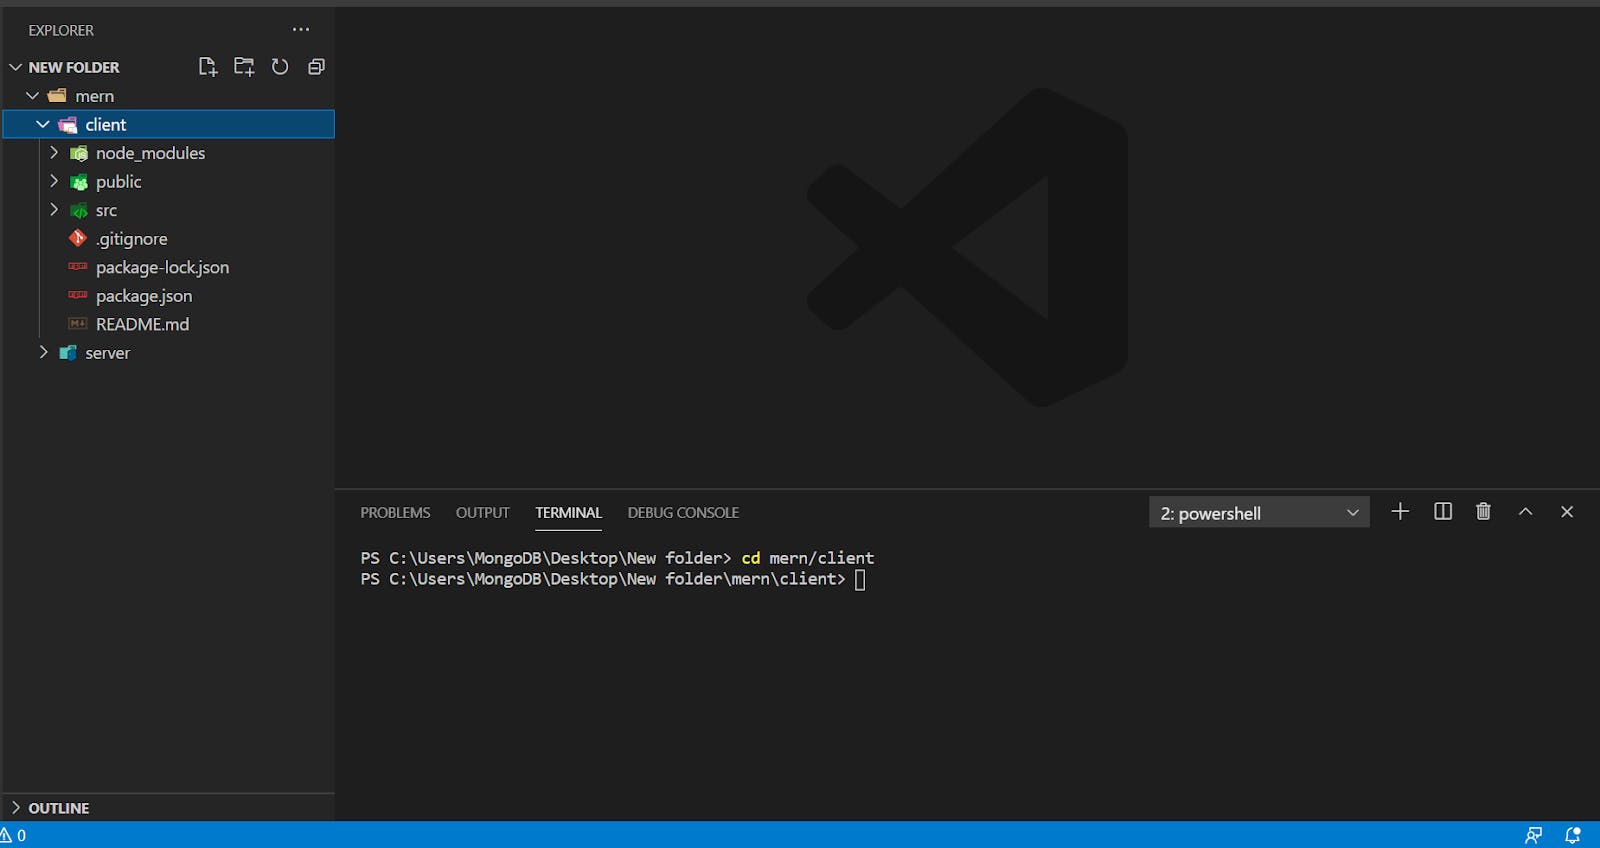
Let’s start by creating an empty directory: mern. This folder will hold all our files after we create a new project. Then we will create a React app—client—in it.
mkdir mern
cd mern
npx create-react-app client
Then, we create a folder for the back end and name it server.
mkdir serverWe will jump into the server folder that we created previously and create the server. Then, we will initialize package.json using npm init.
cd server
npm init -y
We will also install the dependencies.
npm install mongodb express cors dotenvThe command above uses a couple of keywords:
- mongodb command installs MongoDB database driver that allows your Node.js applications to connect to the database and work with data.
- express installs the web framework for Node.js. (It will make our life easier.)
- cors installs a Node.js package that allows cross origin resource sharing.
- dotenv
installs the module that loads environment variables from a .env file
into process.env file. This lets you separate configuration files from
the code.
We can check out installed dependencies using the package.json file. It should list the packages along with their versions.
After we have ensured that dependencies were installed successfully, we create a file called server.js with the following code.:
mern/server/server.js
const express = require("express");
const app = express();
const cors = require("cors");
require("dotenv").config({ path: "./config.env" });
const port = process.env.PORT || 5000;
app.use(cors());
app.use(express.json());
app.use(require("./routes/record"));
// get driver connection
const dbo = require("./db/conn");

app.listen(port, () => {
  // perform a database connection when server starts
  dbo.connectToServer(function (err) {
    if (err) console.error(err);

  });
  console.log(`Server is running on port: ${port}`);
});
Here, we are requiring express and cors to be used.
const port process.env.port will access the port variable from the
config.env we required.
(Feel free to code along or to download the full code from this GitHub repo.)
MERN lets us create full-stack solutions. So, to leverage its full potential, we will be creating a MERN stack project. For this project, we will create both a back end and a front end. The front end will be implemented with React and the back end will be implemented with MongoDB, Node, and Express. We will call the front end client and the back end server.
Let’s start by creating an empty directory: mern. This folder will hold all our files after we create a new project. Then we will create a React app—client—in it.
mkdir mern
cd mern
npx create-react-app clientThen, we create a folder for the back end and name it server.
mkdir serverWe will jump into the server folder that we created previously and create the server. Then, we will initialize package.json using npm init.
cd server
npm init -yWe will also install the dependencies.
npm install mongodb express cors dotenvThe command above uses a couple of keywords:
- mongodb command installs MongoDB database driver that allows your Node.js applications to connect to the database and work with data.
- express installs the web framework for Node.js. (It will make our life easier.)
- cors installs a Node.js package that allows cross origin resource sharing.
- dotenv installs the module that loads environment variables from a .env file into process.env file. This lets you separate configuration files from the code.
We can check out installed dependencies using the package.json file. It should list the packages along with their versions.
After we have ensured that dependencies were installed successfully, we create a file called server.js with the following code.:
mern/server/server.js
const express = require("express");
const app = express();
const cors = require("cors");
require("dotenv").config({ path: "./config.env" });
const port = process.env.PORT || 5000;
app.use(cors());
app.use(express.json());
app.use(require("./routes/record"));
// get driver connection
const dbo = require("./db/conn");
app.listen(port, () => {
// perform a database connection when server starts
dbo.connectToServer(function (err) {
if (err) console.error(err);
});
console.log(`Server is running on port: ${port}`);
});Here, we are requiring express and cors to be used. const port process.env.port will access the port variable from the config.env we required.
Connecting to MongoDB Atlas
It’s time to connect our server to the database. We will use MongoDB
Atlas as the database. MongoDB Atlas is a cloud-based database service
that provides robust data security and reliability. MongoDB Atlas
provides a free tier cluster that never expires and lets you access a
subset of Atlas features and functionality.
Follow the Get Started with Atlas guide to create an account, deploy your first cluster, and locate your cluster’s connection string.
Now that you have the connection string, go back to the ‘server’ directory and create a ‘config.env’ file. There, assign the connection string to a new ATLAS_URI variable. Once done, your file should look similar to the one below. Replace <username> and the <password> with your database username and password.
mern/server/config.env
ATLAS_URI=mongodb+srv://<username>:<password>@sandbox.jadwj.mongodb.net/employees?retryWrites=true&w=majority
PORT=5000
Create a folder under the server directory—db—and inside it, a file—conn.js. There we can add the following code to connect to our database.
mern/server/db/conn.js
const { MongoClient } = require("mongodb");
const Db = process.env.ATLAS_URI;
const client = new MongoClient(Db, {
  useNewUrlParser: true,
  useUnifiedTopology: true,
});

var _db;

module.exports = {
  connectToServer: function (callback) {
    client.connect(function (err, db) {
      // Verify we got a good "db" object
      if (db)
      {
        _db = db.db("employees");
        console.log("Successfully connected to MongoDB.");
      }
      return callback(err);
         });
  },

  getDb: function () {
    return _db;
  },
};
It’s time to connect our server to the database. We will use MongoDB Atlas as the database. MongoDB Atlas is a cloud-based database service that provides robust data security and reliability. MongoDB Atlas provides a free tier cluster that never expires and lets you access a subset of Atlas features and functionality.
Follow the Get Started with Atlas guide to create an account, deploy your first cluster, and locate your cluster’s connection string.
Now that you have the connection string, go back to the ‘server’ directory and create a ‘config.env’ file. There, assign the connection string to a new ATLAS_URI variable. Once done, your file should look similar to the one below. Replace <username> and the <password> with your database username and password.
mern/server/config.env
ATLAS_URI=mongodb+srv://<username>:<password>@sandbox.jadwj.mongodb.net/employees?retryWrites=true&w=majority
PORT=5000Create a folder under the server directory—db—and inside it, a file—conn.js. There we can add the following code to connect to our database.
mern/server/db/conn.js
const { MongoClient } = require("mongodb");
const Db = process.env.ATLAS_URI;
const client = new MongoClient(Db, {
useNewUrlParser: true,
useUnifiedTopology: true,
});
var _db;
module.exports = {
connectToServer: function (callback) {
client.connect(function (err, db) {
// Verify we got a good "db" object
if (db)
{
_db = db.db("employees");
console.log("Successfully connected to MongoDB.");
}
return callback(err);
});
},
getDb: function () {
return _db;
},
};Server API Endpoints
Database
done. Server done. Now it's time for the Server API endpoint. Let's
start by creating a routes folder and adding record.js in it. Navigate
back to your “server” directory and create the new directory and file:
cd ../server
mkdir routes
touch routes/record.js
The routes/record.js file will also have the following lines of code in it.
mern/server/routes/record.js
const express = require("express");

// recordRoutes is an instance of the express router.
// We use it to define our routes.
// The router will be added as a middleware and will take control of requests starting with path /record.
const recordRoutes = express.Router();

// This will help us connect to the database
const dbo = require("../db/conn");

// This help convert the id from string to ObjectId for the _id.
const ObjectId = require("mongodb").ObjectId;


// This section will help you get a list of all the records.
recordRoutes.route("/record").get(function (req, res) {
 let db_connect = dbo.getDb("employees");
 db_connect
   .collection("records")
   .find({})
   .toArray(function (err, result) {
     if (err) throw err;
     res.json(result);
   });
});

// This section will help you get a single record by id
recordRoutes.route("/record/:id").get(function (req, res) {
 let db_connect = dbo.getDb();
 let myquery = { _id: ObjectId(req.params.id) };
 db_connect
   .collection("records")
   .findOne(myquery, function (err, result) {
     if (err) throw err;
     res.json(result);
   });
});

// This section will help you create a new record.
recordRoutes.route("/record/add").post(function (req, response) {
 let db_connect = dbo.getDb();
 let myobj = {
   name: req.body.name,
   position: req.body.position,
   level: req.body.level,
 };
 db_connect.collection("records").insertOne(myobj, function (err, res) {
   if (err) throw err;
   response.json(res);
 });
});

// This section will help you update a record by id.
recordRoutes.route("/update/:id").post(function (req, response) {
 let db_connect = dbo.getDb();
 let myquery = { _id: ObjectId(req.params.id) };
 let newvalues = {
   $set: {
     name: req.body.name,
     position: req.body.position,
     level: req.body.level,
   },
 };
 db_connect
   .collection("records")
   .updateOne(myquery, newvalues, function (err, res) {
     if (err) throw err;
     console.log("1 document updated");
     response.json(res);
   });
});

// This section will help you delete a record
recordRoutes.route("/:id").delete((req, response) => {
 let db_connect = dbo.getDb();
 let myquery = { _id: ObjectId(req.params.id) };
 db_connect.collection("records").deleteOne(myquery, function (err, obj) {
   if (err) throw err;
   console.log("1 document deleted");
   response.json(obj);
 });
});

module.exports = recordRoutes;
If you run the application at this point, you will get the following message in your terminal as the connection establishes.
> node server.js

Server is running on port: 5000
Successfully connected to MongoDB.
That’s it for the back end. Now, we will start working on the front end.
Database done. Server done. Now it's time for the Server API endpoint. Let's start by creating a routes folder and adding record.js in it. Navigate back to your “server” directory and create the new directory and file:
cd ../server
mkdir routes
touch routes/record.jsThe routes/record.js file will also have the following lines of code in it.
mern/server/routes/record.js
const express = require("express");
// recordRoutes is an instance of the express router.
// We use it to define our routes.
// The router will be added as a middleware and will take control of requests starting with path /record.
const recordRoutes = express.Router();
// This will help us connect to the database
const dbo = require("../db/conn");
// This help convert the id from string to ObjectId for the _id.
const ObjectId = require("mongodb").ObjectId;
// This section will help you get a list of all the records.
recordRoutes.route("/record").get(function (req, res) {
let db_connect = dbo.getDb("employees");
db_connect
.collection("records")
.find({})
.toArray(function (err, result) {
if (err) throw err;
res.json(result);
});
});
// This section will help you get a single record by id
recordRoutes.route("/record/:id").get(function (req, res) {
let db_connect = dbo.getDb();
let myquery = { _id: ObjectId(req.params.id) };
db_connect
.collection("records")
.findOne(myquery, function (err, result) {
if (err) throw err;
res.json(result);
});
});
// This section will help you create a new record.
recordRoutes.route("/record/add").post(function (req, response) {
let db_connect = dbo.getDb();
let myobj = {
name: req.body.name,
position: req.body.position,
level: req.body.level,
};
db_connect.collection("records").insertOne(myobj, function (err, res) {
if (err) throw err;
response.json(res);
});
});
// This section will help you update a record by id.
recordRoutes.route("/update/:id").post(function (req, response) {
let db_connect = dbo.getDb();
let myquery = { _id: ObjectId(req.params.id) };
let newvalues = {
$set: {
name: req.body.name,
position: req.body.position,
level: req.body.level,
},
};
db_connect
.collection("records")
.updateOne(myquery, newvalues, function (err, res) {
if (err) throw err;
console.log("1 document updated");
response.json(res);
});
});
// This section will help you delete a record
recordRoutes.route("/:id").delete((req, response) => {
let db_connect = dbo.getDb();
let myquery = { _id: ObjectId(req.params.id) };
db_connect.collection("records").deleteOne(myquery, function (err, obj) {
if (err) throw err;
console.log("1 document deleted");
response.json(obj);
});
});
module.exports = recordRoutes;If you run the application at this point, you will get the following message in your terminal as the connection establishes.
> node server.js
Server is running on port: 5000
Successfully connected to MongoDB.That’s it for the back end. Now, we will start working on the front end.
Setting Up the React Application
As
we have already set up our React application using the create-react-app
command, we can navigate to the client folder and check our React
application code.
Let’s
flesh out the application, but before we do, we need to install two
additional dependencies that will be used in our project. Open a new
terminal emulator, navigate to the “client” directory, and install bootstrap and react-router-dom.
npm install bootstrap react-router-dombootstrap
lets you quickly deploy a template and components for your new web
application without having to do everything from scratch. And, the react-router-dom installs React router components for web applications. Make sure your server application is still running!
Setting Up the React Router
Let's start by emptying the src folder and adding two new files in it: index.js and App.js.
rm src/**/*
touch src/index.js src/App.js
Inside src/index.js, we add the following code:
mern/client/src/index.js
import React from "react";
import ReactDOM from "react-dom";
import App from "./App";
import { BrowserRouter } from "react-router-dom";

ReactDOM.render(
  <React.StrictMode>
    <BrowserRouter>
      <App />
    </BrowserRouter>
  </React.StrictMode>,
  document.getElementById("root")
);
We have used BrowserRouter to keep our UI
in sync with the URL. BrowserRouter helps with seamless transitions
while switching between components. Basically, it will only
reload/refresh the component that needs to be changed instead of
refreshing/reloading the entire page. Though BrowserRouter is not a
necessity, it is a must if you want your app to be responsive.
Let's start by emptying the src folder and adding two new files in it: index.js and App.js.
rm src/**/*
touch src/index.js src/App.jsInside src/index.js, we add the following code:
mern/client/src/index.js
import React from "react";
import ReactDOM from "react-dom";
import App from "./App";
import { BrowserRouter } from "react-router-dom";
ReactDOM.render(
<React.StrictMode>
<BrowserRouter>
<App />
</BrowserRouter>
</React.StrictMode>,
document.getElementById("root")
);We have used BrowserRouter to keep our UI
in sync with the URL. BrowserRouter helps with seamless transitions
while switching between components. Basically, it will only
reload/refresh the component that needs to be changed instead of
refreshing/reloading the entire page. Though BrowserRouter is not a
necessity, it is a must if you want your app to be responsive.
Creating Components
After adding the code to index.js files, we will create a components folder inside src. For each component we create, we will add a new .js file inside the components folder. In this case, we will add create.js, edit.js, navbar.js, and recordList.js.
mkdir src/components
(cd src/components &&
touch create.js edit.js navbar.js recordList.js)
A snapshot of each file would look like the following.
After adding the code to index.js files, we will create a components folder inside src. For each component we create, we will add a new .js file inside the components folder. In this case, we will add create.js, edit.js, navbar.js, and recordList.js.
mkdir src/components
(cd src/components &&
touch create.js edit.js navbar.js recordList.js)A snapshot of each file would look like the following.
create.js
The
following code will serve as a creating component for our records.
Using this component, users can create a new record. This component will
submit a create command to our server.
mern/client/src/components/create.js
import React, { useState } from "react";
import { useNavigate } from "react-router";

export default function Create() {
 const [form, setForm] = useState({
   name: "",
   position: "",
   level: "",
 });
 const navigate = useNavigate();

 // These methods will update the state properties.
 function updateForm(value) {
   return setForm((prev) => {
     return { ...prev, ...value };
   });
 }

 // This function will handle the submission.
 async function onSubmit(e) {
   e.preventDefault();

   // When a post request is sent to the create url, we'll add a new record to the database.
   const newPerson = { ...form };

   await fetch("http://localhost:5000/record/add", {
     method: "POST",
     headers: {
       "Content-Type": "application/json",
     },
     body: JSON.stringify(newPerson),
   })
   .catch(error => {
     window.alert(error);
     return;
   });

   setForm({ name: "", position: "", level: "" });
   navigate("/");
 }

 // This following section will display the form that takes the input from the user.
 return (
   <div>
     <h3>Create New Record</h3>
     <form onSubmit={onSubmit}>
       <div className="form-group">
         <label htmlFor="name">Name</label>
         <input
           type="text"
           className="form-control"
           id="name"
           value={form.name}
           onChange={(e) => updateForm({ name: e.target.value })}
         />
       </div>
       <div className="form-group">
         <label htmlFor="position">Position</label>
         <input
           type="text"
           className="form-control"
           id="position"
           value={form.position}
           onChange={(e) => updateForm({ position: e.target.value })}
         />
       </div>
       <div className="form-group">
         <div className="form-check form-check-inline">
           <input
             className="form-check-input"
             type="radio"
             name="positionOptions"
             id="positionIntern"
             value="Intern"
             checked={form.level === "Intern"}
             onChange={(e) => updateForm({ level: e.target.value })}
           />
           <label htmlFor="positionIntern" className="form-check-label">Intern</label>
         </div>
         <div className="form-check form-check-inline">
           <input
             className="form-check-input"
             type="radio"
             name="positionOptions"
             id="positionJunior"
             value="Junior"
             checked={form.level === "Junior"}
             onChange={(e) => updateForm({ level: e.target.value })}
           />
           <label htmlFor="positionJunior" className="form-check-label">Junior</label>
         </div>
         <div className="form-check form-check-inline">
           <input
             className="form-check-input"
             type="radio"
             name="positionOptions"
             id="positionSenior"
             value="Senior"
             checked={form.level === "Senior"}
             onChange={(e) => updateForm({ level: e.target.value })}
           />
           <label htmlFor="positionSenior" className="form-check-label">Senior</label>
         </div>
       </div>
       <div className="form-group">
         <input
           type="submit"
           value="Create person"
           className="btn btn-primary"
         />
       </div>
     </form>
   </div>
 );
}
The following code will serve as a creating component for our records. Using this component, users can create a new record. This component will submit a create command to our server.
mern/client/src/components/create.js
import React, { useState } from "react";
import { useNavigate } from "react-router";
export default function Create() {
const [form, setForm] = useState({
name: "",
position: "",
level: "",
});
const navigate = useNavigate();
// These methods will update the state properties.
function updateForm(value) {
return setForm((prev) => {
return { ...prev, ...value };
});
}
// This function will handle the submission.
async function onSubmit(e) {
e.preventDefault();
// When a post request is sent to the create url, we'll add a new record to the database.
const newPerson = { ...form };
await fetch("http://localhost:5000/record/add", {
method: "POST",
headers: {
"Content-Type": "application/json",
},
body: JSON.stringify(newPerson),
})
.catch(error => {
window.alert(error);
return;
});
setForm({ name: "", position: "", level: "" });
navigate("/");
}
// This following section will display the form that takes the input from the user.
return (
<div>
<h3>Create New Record</h3>
<form onSubmit={onSubmit}>
<div className="form-group">
<label htmlFor="name">Name</label>
<input
type="text"
className="form-control"
id="name"
value={form.name}
onChange={(e) => updateForm({ name: e.target.value })}
/>
</div>
<div className="form-group">
<label htmlFor="position">Position</label>
<input
type="text"
className="form-control"
id="position"
value={form.position}
onChange={(e) => updateForm({ position: e.target.value })}
/>
</div>
<div className="form-group">
<div className="form-check form-check-inline">
<input
className="form-check-input"
type="radio"
name="positionOptions"
id="positionIntern"
value="Intern"
checked={form.level === "Intern"}
onChange={(e) => updateForm({ level: e.target.value })}
/>
<label htmlFor="positionIntern" className="form-check-label">Intern</label>
</div>
<div className="form-check form-check-inline">
<input
className="form-check-input"
type="radio"
name="positionOptions"
id="positionJunior"
value="Junior"
checked={form.level === "Junior"}
onChange={(e) => updateForm({ level: e.target.value })}
/>
<label htmlFor="positionJunior" className="form-check-label">Junior</label>
</div>
<div className="form-check form-check-inline">
<input
className="form-check-input"
type="radio"
name="positionOptions"
id="positionSenior"
value="Senior"
checked={form.level === "Senior"}
onChange={(e) => updateForm({ level: e.target.value })}
/>
<label htmlFor="positionSenior" className="form-check-label">Senior</label>
</div>
</div>
<div className="form-group">
<input
type="submit"
value="Create person"
className="btn btn-primary"
/>
</div>
</form>
</div>
);
}edit.js
The following code will
serve as an editing component for our records. It will use a similar
layout to the create component and will eventually submit an update
command to our server.
mern/client/src/components/edit.js
import React, { useState, useEffect } from "react";
import { useParams, useNavigate } from "react-router";

export default function Edit() {
 const [form, setForm] = useState({
   name: "",
   position: "",
   level: "",
   records: [],
 });
 const params = useParams();
 const navigate = useNavigate();

 useEffect(() => {
   async function fetchData() {
     const id = params.id.toString();
     const response = await fetch(`http://localhost:5000/record/${params.id.toString()}`);

     if (!response.ok) {
       const message = `An error has occurred: ${response.statusText}`;
       window.alert(message);
       return;
     }

     const record = await response.json();
     if (!record) {
       window.alert(`Record with id ${id} not found`);
       navigate("/");
       return;
     }

     setForm(record);
   }

   fetchData();

   return;
 }, [params.id, navigate]);

 // These methods will update the state properties.
 function updateForm(value) {
   return setForm((prev) => {
     return { ...prev, ...value };
   });
 }

 async function onSubmit(e) {
   e.preventDefault();
   const editedPerson = {
     name: form.name,
     position: form.position,
     level: form.level,
   };

   // This will send a post request to update the data in the database.
   await fetch(`http://localhost:5000/update/${params.id}`, {
     method: "POST",
     body: JSON.stringify(editedPerson),
     headers: {
       'Content-Type': 'application/json'
     },
   });

   navigate("/");
 }

 // This following section will display the form that takes input from the user to update the data.
 return (
   <div>
     <h3>Update Record</h3>
     <form onSubmit={onSubmit}>
       <div className="form-group">
         <label htmlFor="name">Name: </label>
         <input
           type="text"
           className="form-control"
           id="name"
           value={form.name}
           onChange={(e) => updateForm({ name: e.target.value })}
         />
       </div>
       <div className="form-group">
         <label htmlFor="position">Position: </label>
         <input
           type="text"
           className="form-control"
           id="position"
           value={form.position}
           onChange={(e) => updateForm({ position: e.target.value })}
         />
       </div>
       <div className="form-group">
         <div className="form-check form-check-inline">
           <input
             className="form-check-input"
             type="radio"
             name="positionOptions"
             id="positionIntern"
             value="Intern"
             checked={form.level === "Intern"}
             onChange={(e) => updateForm({ level: e.target.value })}
           />
           <label htmlFor="positionIntern" className="form-check-label">Intern</label>
         </div>
         <div className="form-check form-check-inline">
           <input
             className="form-check-input"
             type="radio"
             name="positionOptions"
             id="positionJunior"
             value="Junior"
             checked={form.level === "Junior"}
             onChange={(e) => updateForm({ level: e.target.value })}
           />
           <label htmlFor="positionJunior" className="form-check-label">Junior</label>
         </div>
         <div className="form-check form-check-inline">
           <input
             className="form-check-input"
             type="radio"
             name="positionOptions"
             id="positionSenior"
             value="Senior"
             checked={form.level === "Senior"}
             onChange={(e) => updateForm({ level: e.target.value })}
           />
           <label htmlFor="positionSenior" className="form-check-label">Senior</label>
       </div>
       </div>
       <br />

       <div className="form-group">
         <input
           type="submit"
           value="Update Record"
           className="btn btn-primary"
         />
       </div>
     </form>
   </div>
 );
}
The following code will serve as an editing component for our records. It will use a similar layout to the create component and will eventually submit an update command to our server.
mern/client/src/components/edit.js
import React, { useState, useEffect } from "react";
import { useParams, useNavigate } from "react-router";
export default function Edit() {
const [form, setForm] = useState({
name: "",
position: "",
level: "",
records: [],
});
const params = useParams();
const navigate = useNavigate();
useEffect(() => {
async function fetchData() {
const id = params.id.toString();
const response = await fetch(`http://localhost:5000/record/${params.id.toString()}`);
if (!response.ok) {
const message = `An error has occurred: ${response.statusText}`;
window.alert(message);
return;
}
const record = await response.json();
if (!record) {
window.alert(`Record with id ${id} not found`);
navigate("/");
return;
}
setForm(record);
}
fetchData();
return;
}, [params.id, navigate]);
// These methods will update the state properties.
function updateForm(value) {
return setForm((prev) => {
return { ...prev, ...value };
});
}
async function onSubmit(e) {
e.preventDefault();
const editedPerson = {
name: form.name,
position: form.position,
level: form.level,
};
// This will send a post request to update the data in the database.
await fetch(`http://localhost:5000/update/${params.id}`, {
method: "POST",
body: JSON.stringify(editedPerson),
headers: {
'Content-Type': 'application/json'
},
});
navigate("/");
}
// This following section will display the form that takes input from the user to update the data.
return (
<div>
<h3>Update Record</h3>
<form onSubmit={onSubmit}>
<div className="form-group">
<label htmlFor="name">Name: </label>
<input
type="text"
className="form-control"
id="name"
value={form.name}
onChange={(e) => updateForm({ name: e.target.value })}
/>
</div>
<div className="form-group">
<label htmlFor="position">Position: </label>
<input
type="text"
className="form-control"
id="position"
value={form.position}
onChange={(e) => updateForm({ position: e.target.value })}
/>
</div>
<div className="form-group">
<div className="form-check form-check-inline">
<input
className="form-check-input"
type="radio"
name="positionOptions"
id="positionIntern"
value="Intern"
checked={form.level === "Intern"}
onChange={(e) => updateForm({ level: e.target.value })}
/>
<label htmlFor="positionIntern" className="form-check-label">Intern</label>
</div>
<div className="form-check form-check-inline">
<input
className="form-check-input"
type="radio"
name="positionOptions"
id="positionJunior"
value="Junior"
checked={form.level === "Junior"}
onChange={(e) => updateForm({ level: e.target.value })}
/>
<label htmlFor="positionJunior" className="form-check-label">Junior</label>
</div>
<div className="form-check form-check-inline">
<input
className="form-check-input"
type="radio"
name="positionOptions"
id="positionSenior"
value="Senior"
checked={form.level === "Senior"}
onChange={(e) => updateForm({ level: e.target.value })}
/>
<label htmlFor="positionSenior" className="form-check-label">Senior</label>
</div>
</div>
<br />
<div className="form-group">
<input
type="submit"
value="Update Record"
className="btn btn-primary"
/>
</div>
</form>
</div>
);
}recordList.js
The following
code will serve as a viewing component for our records. It will fetch
all the records in our database through a GET method.
mern/client/src/components/recordList.js
import React, { useEffect, useState } from "react";
import { Link } from "react-router-dom";

const Record = (props) => (
 <tr>
   <td>{props.record.name}</td>
   <td>{props.record.position}</td>
   <td>{props.record.level}</td>
   <td>
     <Link className="btn btn-link" to={`/edit/${props.record._id}`}>Edit</Link> |
     <button className="btn btn-link"
       onClick={() => {
         props.deleteRecord(props.record._id);
       }}
     >
       Delete
     </button>
   </td>
 </tr>
);

export default function RecordList() {
 const [records, setRecords] = useState([]);

 // This method fetches the records from the database.
 useEffect(() => {
   async function getRecords() {
     const response = await fetch(`http://localhost:5000/record/`);

     if (!response.ok) {
       const message = `An error occurred: ${response.statusText}`;
       window.alert(message);
       return;
     }

     const records = await response.json();
     setRecords(records);
   }

   getRecords();

   return;
 }, [records.length]);

 // This method will delete a record
 async function deleteRecord(id) {
   await fetch(`http://localhost:5000/${id}`, {
     method: "DELETE"
   });

   const newRecords = records.filter((el) => el._id !== id);
   setRecords(newRecords);
 }

 // This method will map out the records on the table
 function recordList() {
   return records.map((record) => {
     return (
       <Record
         record={record}
         deleteRecord={() => deleteRecord(record._id)}
         key={record._id}
       />
     );
   });
 }

 // This following section will display the table with the records of individuals.
 return (
   <div>
     <h3>Record List</h3>
     <table className="table table-striped" style={{ marginTop: 20 }}>
       <thead>
         <tr>
           <th>Name</th>
           <th>Position</th>
           <th>Level</th>
           <th>Action</th>
         </tr>
       </thead>
       <tbody>{recordList()}</tbody>
     </table>
   </div>
 );
}
The following code will serve as a viewing component for our records. It will fetch all the records in our database through a GET method.
mern/client/src/components/recordList.js
import React, { useEffect, useState } from "react";
import { Link } from "react-router-dom";
const Record = (props) => (
<tr>
<td>{props.record.name}</td>
<td>{props.record.position}</td>
<td>{props.record.level}</td>
<td>
<Link className="btn btn-link" to={`/edit/${props.record._id}`}>Edit</Link> |
<button className="btn btn-link"
onClick={() => {
props.deleteRecord(props.record._id);
}}
>
Delete
</button>
</td>
</tr>
);
export default function RecordList() {
const [records, setRecords] = useState([]);
// This method fetches the records from the database.
useEffect(() => {
async function getRecords() {
const response = await fetch(`http://localhost:5000/record/`);
if (!response.ok) {
const message = `An error occurred: ${response.statusText}`;
window.alert(message);
return;
}
const records = await response.json();
setRecords(records);
}
getRecords();
return;
}, [records.length]);
// This method will delete a record
async function deleteRecord(id) {
await fetch(`http://localhost:5000/${id}`, {
method: "DELETE"
});
const newRecords = records.filter((el) => el._id !== id);
setRecords(newRecords);
}
// This method will map out the records on the table
function recordList() {
return records.map((record) => {
return (
<Record
record={record}
deleteRecord={() => deleteRecord(record._id)}
key={record._id}
/>
);
});
}
// This following section will display the table with the records of individuals.
return (
<div>
<h3>Record List</h3>
<table className="table table-striped" style={{ marginTop: 20 }}>
<thead>
<tr>
<th>Name</th>
<th>Position</th>
<th>Level</th>
<th>Action</th>
</tr>
</thead>
<tbody>{recordList()}</tbody>
</table>
</div>
);
}navbar.js
In the navbar.js component, we will create a navigation bar that will
link us to the required components using the following code.
mern/client/src/components/navbar.js
import React from "react";

// We import bootstrap to make our application look better.
import "bootstrap/dist/css/bootstrap.css";

// We import NavLink to utilize the react router.
import { NavLink } from "react-router-dom";

// Here, we display our Navbar
export default function Navbar() {
 return (
   <div>
     <nav className="navbar navbar-expand-lg navbar-light bg-light">
       <NavLink className="navbar-brand" to="/">
       <img style={{"width" : 25 + '%'}} src="https://d3cy9zhslanhfa.cloudfront.net/media/3800C044-6298-4575-A05D5C6B7623EE37/4B45D0EC-3482-4759-82DA37D8EA07D229/webimage-8A27671A-8A53-45DC-89D7BF8537F15A0D.png"></img>
       </NavLink>
       <button
         className="navbar-toggler"
         type="button"
         data-toggle="collapse"
         data-target="#navbarSupportedContent"
         aria-controls="navbarSupportedContent"
         aria-expanded="false"
         aria-label="Toggle navigation"
       >
         <span className="navbar-toggler-icon"></span>
       </button>

       <div className="collapse navbar-collapse" id="navbarSupportedContent">
         <ul className="navbar-nav ml-auto">
           <li className="nav-item">
             <NavLink className="nav-link" to="/create">
               Create Record
             </NavLink>
           </li>
         </ul>
       </div>
     </nav>
   </div>
 );
}
Now, we add the following to the src/App.js file we created earlier.
mern/client/src/App.js
import React from "react";

// We use Route in order to define the different routes of our application
import { Route, Routes } from "react-router-dom";

// We import all the components we need in our app
import Navbar from "./components/navbar";
import RecordList from "./components/recordList";
import Edit from "./components/edit";
import Create from "./components/create";

const App = () => {
 return (
   <div>
     <Navbar />
     <Routes>
       <Route exact path="/" element={<RecordList />} />
       <Route path="/edit/:id" element={<Edit />} />
       <Route path="/create" element={<Create />} />
     </Routes>
   </div>
 );
};

export default App;
In the navbar.js component, we will create a navigation bar that will link us to the required components using the following code.
mern/client/src/components/navbar.js
import React from "react";
// We import bootstrap to make our application look better.
import "bootstrap/dist/css/bootstrap.css";
// We import NavLink to utilize the react router.
import { NavLink } from "react-router-dom";
// Here, we display our Navbar
export default function Navbar() {
return (
<div>
<nav className="navbar navbar-expand-lg navbar-light bg-light">
<NavLink className="navbar-brand" to="/">
<img style={{"width" : 25 + '%'}} src="https://d3cy9zhslanhfa.cloudfront.net/media/3800C044-6298-4575-A05D5C6B7623EE37/4B45D0EC-3482-4759-82DA37D8EA07D229/webimage-8A27671A-8A53-45DC-89D7BF8537F15A0D.png"></img>
</NavLink>
<button
className="navbar-toggler"
type="button"
data-toggle="collapse"
data-target="#navbarSupportedContent"
aria-controls="navbarSupportedContent"
aria-expanded="false"
aria-label="Toggle navigation"
>
<span className="navbar-toggler-icon"></span>
</button>
<div className="collapse navbar-collapse" id="navbarSupportedContent">
<ul className="navbar-nav ml-auto">
<li className="nav-item">
<NavLink className="nav-link" to="/create">
Create Record
</NavLink>
</li>
</ul>
</div>
</nav>
</div>
);
}Now, we add the following to the src/App.js file we created earlier.
mern/client/src/App.js
import React from "react";
// We use Route in order to define the different routes of our application
import { Route, Routes } from "react-router-dom";
// We import all the components we need in our app
import Navbar from "./components/navbar";
import RecordList from "./components/recordList";
import Edit from "./components/edit";
import Create from "./components/create";
const App = () => {
return (
<div>
<Navbar />
<Routes>
<Route exact path="/" element={<RecordList />} />
<Route path="/edit/:id" element={<Edit />} />
<Route path="/create" element={<Create />} />
</Routes>
</div>
);
};
export default App;Connecting the Front End to the Back End
We have completed creating components. We also connected our React app to the back end using fetch.
fetch provides cleaner and easier ways to handle http requests. fetch
is used in create.js, edit.js, and recordList.js as they handle http
requests. In create.js, we appended the following code to the
onSubmit(e) block. When a POST request is sent to the create URL, fetch
will add a new record to the database.
// This function will handle the submission.
 async function onSubmit(e) {
   e.preventDefault();

   // When a post request is sent to the create url, we'll add a new record to the database.
   const newPerson = { ...form };

   await fetch("http://localhost:5000/record/add", {
     method: "POST",
     headers: {
       "Content-Type": "application/json",
     },
     body: JSON.stringify(newPerson),
   })
   .catch(error => {
     window.alert(error);
     return;
   });

   setForm({ name: "", position: "", level: "" });
   navigate("/");
 }
Similarly, in edit.js, we appended the following code to the onSubmit(e) block.
async function onSubmit(e) {
   e.preventDefault();
   const editedPerson = {
     name: form.name,
     position: form.position,
     level: form.level,
   };

   // This will send a post request to update the data in the database.
   await fetch(`http://localhost:5000/update/${params.id}`, {
     method: "POST",
     body: JSON.stringify(editedPerson),
     headers: {
       'Content-Type': 'application/json'
     },
   });

   navigate("/");
 }
We also placed the following block of code to edit.js beneath the constructor block.
useEffect(() => {
   async function fetchData() {
     const id = params.id.toString();
     const response = await fetch(`http://localhost:5000/record/${params.id.toString()}`);

     if (!response.ok) {
       const message = `An error has occurred: ${response.statusText}`;
       window.alert(message);
       return;
     }

     const record = await response.json();
     if (!record) {
       window.alert(`Record with id ${id} not found`);
       navigate("/");
       return;
     }

     setForm(record);
   }

   fetchData();

   return;
 }, [params.id, navigate]);
Lastly, we have recordList.js. recordList.js
fetches the records from the database, so we will be using fetch's get
method to retrieve records from the database. To achieve this, we added
the following lines of code above the recordList() function in recordList.js.
useEffect(() => {
   async function getRecords() {
     const response = await fetch(`http://localhost:5000/record/`);

     if (!response.ok) {
       const message = `An error occurred: ${response.statusText}`;
       window.alert(message);
       return;
     }

     const records = await response.json();
     setRecords(records);
   }

   getRecords();

   return;
 }, [records.length]);

 // This method will delete a record
 async function deleteRecord(id) {
   await fetch(`http://localhost:5000/${id}`, {
     method: "DELETE"
   });

   const newRecords = records.filter((el) => el._id !== id);
   setRecords(newRecords);
 }
After closing everything, to start the app, follow these steps.
- Ensure that the server app is still running. If it’s not, start by executing the following command in the server/ directory:
node server.js
- Go back to the client directory and run the command:
npm start
This
is what the landing page of the record component will look like after
we added two records for “Richard” and “Billy” via the “Create Record”
button.
This is what the screen that lets you add an employee will look like.
We have completed creating components. We also connected our React app to the back end using fetch.
fetch provides cleaner and easier ways to handle http requests. fetch
is used in create.js, edit.js, and recordList.js as they handle http
requests. In create.js, we appended the following code to the
onSubmit(e) block. When a POST request is sent to the create URL, fetch
will add a new record to the database.
// This function will handle the submission.
async function onSubmit(e) {
e.preventDefault();
// When a post request is sent to the create url, we'll add a new record to the database.
const newPerson = { ...form };
await fetch("http://localhost:5000/record/add", {
method: "POST",
headers: {
"Content-Type": "application/json",
},
body: JSON.stringify(newPerson),
})
.catch(error => {
window.alert(error);
return;
});
setForm({ name: "", position: "", level: "" });
navigate("/");
}Similarly, in edit.js, we appended the following code to the onSubmit(e) block.
async function onSubmit(e) {
e.preventDefault();
const editedPerson = {
name: form.name,
position: form.position,
level: form.level,
};
// This will send a post request to update the data in the database.
await fetch(`http://localhost:5000/update/${params.id}`, {
method: "POST",
body: JSON.stringify(editedPerson),
headers: {
'Content-Type': 'application/json'
},
});
navigate("/");
}We also placed the following block of code to edit.js beneath the constructor block.
useEffect(() => {
async function fetchData() {
const id = params.id.toString();
const response = await fetch(`http://localhost:5000/record/${params.id.toString()}`);
if (!response.ok) {
const message = `An error has occurred: ${response.statusText}`;
window.alert(message);
return;
}
const record = await response.json();
if (!record) {
window.alert(`Record with id ${id} not found`);
navigate("/");
return;
}
setForm(record);
}
fetchData();
return;
}, [params.id, navigate]);Lastly, we have recordList.js. recordList.js fetches the records from the database, so we will be using fetch's get method to retrieve records from the database. To achieve this, we added the following lines of code above the recordList() function in recordList.js.
useEffect(() => {
async function getRecords() {
const response = await fetch(`http://localhost:5000/record/`);
if (!response.ok) {
const message = `An error occurred: ${response.statusText}`;
window.alert(message);
return;
}
const records = await response.json();
setRecords(records);
}
getRecords();
return;
}, [records.length]);
// This method will delete a record
async function deleteRecord(id) {
await fetch(`http://localhost:5000/${id}`, {
method: "DELETE"
});
const newRecords = records.filter((el) => el._id !== id);
setRecords(newRecords);
}After closing everything, to start the app, follow these steps.
- Ensure that the server app is still running. If it’s not, start by executing the following command in the server/ directory:
node server.js
- Go back to the client directory and run the command:
npm start
This
is what the landing page of the record component will look like after
we added two records for “Richard” and “Billy” via the “Create Record”
button.
This is what the screen that lets you add an employee will look like.
MEAN Stack is a variation of a full stack in that it has:
- A front end
- A back end
- A database
Although a MEAN stack developer should focus their expertise on the building blocks specific to MongoDB, Express, Angular, and Node, a general full stack developer might need other or more skill sets.


0 Comments