Introduction

You can perform most command-line-based disk management tasks in Windows XP and Windows Server 2003 using the Diskpart utility. Diskpart is a text-based command interpreter that runs on its own under the Windows command shell. You can use this utility either on a local computer or on a remote computer on the network. Whether you want to create a partition, assign it a drive letter, or perform a complex and advanced task such as managing fault-tolerant volumes, Diskpart is the utility of choice if you love to work at the command line. It does not matter whether you work with individual commands or create scripts to manage repeated tasks, the Diskpart utility allows you to work in whatever way you feel comfortable. This chapter introduces the Diskpart utility and discusses how you can use it to perform everyday disk management tasks.
Storage
Identifying low storage capacity
Low free space on disk drives can be identified in many ways such as through Windows Explorer, Disk Management, Windows Powershell, WMI, and performance counters.
The LogicalDisk performance counters % Free Space and Free Megabytes can help determine if the disk is low on free space. The thresholds for these counters are relative to the expected needs of your applications or services. % Free Space measures the percentage of total usable space of a logical disk drive. A disk with less than 10% free space might not be significant when working with large capacity disks or RAID sets, so consider the Free Megabytes counter can provide a more precise value. Also, keep in mind that tools such as the disk defragmenter might require a specific percentage of free space (Figure 3.9).
Storage Configuration
Considering the replication process during the storage design is important. The volume used to store the passive database must be a local disk from the disk management perspective, but can be located on a central storage array utilizing iSCSI or Fibre Channel connectivity. It is not possible to host the passive database and log files on a network share.
You can use the same disk volume that is used by the production database and log files for the passive database and log files. However, this a disadvantage: If you lose this volume, you lose the production and the replica database at the same time. For recovery purposes, you should use separate disk volumes for your databases and log files. Otherwise, a failed disk volume means data loss, because you cannot use your last backup and the new transaction logs to recover your Exchange database to the point of failure. Based on these best practices, you need at least five disk volumes for a LCR deployment with a single database! Use of separate disk volumes for the operating system and the Exchange binaries are even recommended. This has advantages for certain disaster recovery scenarios.
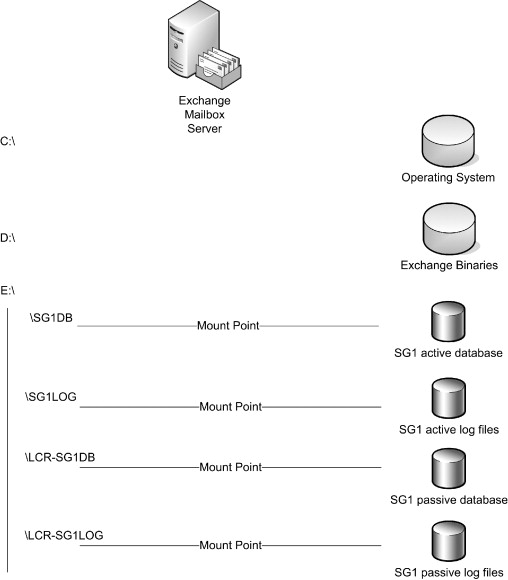
With Exchange Server 2007, it is possible to create 50 storage groups. Based on the previously provided recommendation, 202 disk volumes would be required! Is this a manageable configuration? Is the maximum storage group configuration exploited frequently? With the increased maximum value of storage groups, it is easy to surpass the drive letter limitation. You can solve this problem by using mount points. Figure 7-32 shows an example configuration. Mount points provide another very important advantage. You can easily swap the disk mounted at a mount point, which makes the recovery process easier when you want to swap the production and replica database. Note, however, that your operations staff needs time to become accustomed to the mount point concept. Additional information about mount points is available in Chapter 4.
If you prefer a recovery procedure that modifies the path of the active database to point to the former replica database, you should use a good naming convention for the file system directories and database files. Otherwise, it can be difficult to determine which database is active and which database file is the passive one.
The performance requirements for LCR have to be considered if you are using a modern storage array that lets you carve out individual disk volumes from a fixed set of physical disk spindles. This shared set of spindles has to provide enough performance for the active database and the passive database if you carve out both volumes from the same set of disk spindles. This approach has a disadvantage: If you lose this set of physical disks, you have lost your production data and your first line of defense, the CR-created passive database, at the same time. Another option is to use separate sets of physical disk spindles for the active and passive database volumes.
The next consideration is, “What happens after a recovery?” After a production database failure, you must manually activate the replica database. You have to ensure that the volume hosting the replica database is capable of handling the production load from a performance point of view.
Additionally, if you host your second copy on disks with lower Mean Time Between Failure (MTBF) characteristics, then there is a higher likelihood of a disk failure on the volume now hosting the production data! Therefore, you have to carefully consider the consequences of using low-cost disks for your LCR deployment because of performance and reliability reasons.
If you are using Direct Attached Storage (DAS), then you should think about using separate storage controllers to access the disk volumes hosting your active database and your replica database. You should even consider using separate storage cabinets. Otherwise, if you lose your single storage controller, you lose access to both databases at the same time. Using separate controllers isolates one database from being affected by a controller failure. The configuration comprising two storage controllers is comparable to a no single point of failure configuration using two Fibre Channel host bus adapters in a SAN environment.
Managing Basic and Dynamic Disks
Throughout the years, storage requirements and drive sizes have changed, increasing in both cases. In the early ‘90s, it was nearly unheard of for personal computers to use more than one physical hard drive. Now it doesn’t seem so strange. Requirements such as fault tolerance, multiple partitions, and quick accessibility are some of the necessities today. In years past, no one would have ever thought more than 50 to 100 MB would be needed on a hard drive. Now we see laptops alone with close to 200GB drives. With these new requirements and drive sizes comes the need to better manage data storage.
Since Windows 2000, we’ve had two different disk types: basic disks and dynamic disks. A basic disk is one that can be accessed by MS-DOS and previous versions of Windows, depending on the file system installed. Basic disks use the same structure as previous versions of Windows, so if you have a system that’s a multiboot system with an older version of Windows NT 4.0, you will want to have a basic disk. Basic disks can contain up to four primary partitions, or three primaries and one extended. Partitions on a basic disk cannot share or split data with other partitions.
Dynamic disks offer options not available on basic disks. They allow greater flexibility than basic disks because they use a hidden database to track information about dynamic volumes on the physical disk, as well as information about other dynamic disks on the system. Since each dynamic disk in a PC stores a replica of the dynamic disk database, Windows Vista can repair a corrupted database on one dynamic disk by using the database on another dynamic disk. The location of the database is determined by the partition style chosen (we will cover this later). Dynamic disks can contain an unlimited number of dynamic volumes that behave like primary partitions on basic disks. One of the biggest differences between basic disks and dynamic disks is that dynamic disks can split or share data across two or more dynamic hard disks on a computer. Disk management is accessed by going to Start Button | Control Panel | Administrative Tools | Computer Management | Storage | Disk Management. Once in Disk Management, you can see the disk drives on your system, which should be similar to Figure 4.1. Table 4.1 shows a comparison between basic and dynamic disks.

Shortcut…
A Quicker Way to Access Computer Management
A quicker way to get to Computer Management is to click the Start button, right-click computer, and then select Manage.
Basic disks can be converted into dynamic disks by going into Disk Management under Storage within Computer Management, and then right-clicking the disk you want converted and choosing Convert to Dynamic Disk…, as shown in Figure 4.2.

Note
Laptop computers are not allowed to convert basic disks to dynamic. This is further explained in the Microsoft Knowledge Base article located at http://support.microsoft.com/default.aspx/kb/232463.You also have the option of using the command line to convert a basic disk to a dynamic disk. The utility you would use is diskpart.exe. DiskPart can do everything Disk Management can in the user interface. This command can be invaluable to administrators who use scripts. Figure 4.3 displays the DiskPart prompt, along with the convert /? command, showing the options available in creating disk types.
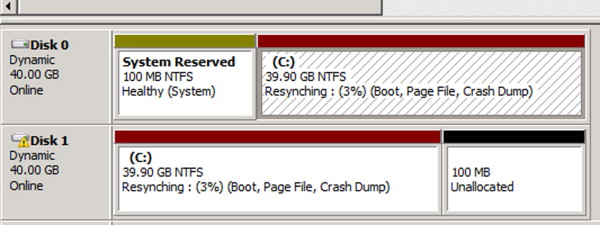
 In Figure 4.4, we’ve converted Disk 1 from basic to dynamic using the diskpart command. Once we started diskpart, we selected disk 1 (which you saw in Figure 4.2 as being a basic disk), and then we issued the convert command to convert it from a basic disk to a dynamic disk.
 Going to Disk Management in the user interface, you can see that indeed Disk 1 (as seen in Figure 4.5) has been converted to a dynamic disk
Best Practices According To Microsoft
Microsoft recommends ALL administrators become familiar with diskpart.exe. If you are ever in a situation where you are in the Windows Recovery Environment (WinRE), the only way you’ll be able to manage the disks is by using diskpart.exe.
Some Independent Advice
Practice using diskpart.exe in a controlled environment (such as a lab) and test it in a simulated WinRE situation. By doing so, you will not find yourself being forced to learn how to use the command while trying to troubleshoot a serious problem for a user. This will save you and the user a great deal of time and make your efforts look more professional. As a result, users’ confidence in your skills will increase.
Now that we know the differences between a basic and dynamic disk, and two ways of conducting a conversion, we must understand the different file systems available, the partition types and styles, and volumes.
Installing and configuring Windows Server 2008 R2
Creating a mirrored volume
Creating a mirrored volume is a fairly easy process. The first step you will need to complete is to add a second physical disk drive to the server. This disk drive will need to be at least of the same size as the first disk in the server. In the following example, we will configure a mirrored disk of the first disk drive which contains our OS installation. To create the mirrored volume, perform the following:1.Log on to the server and open Server Manager, and then expand Disk Management.2.
Locate the newly inserted disk. The disk will probably appear as disk 1, as the primary disk is already known as disk 0. Right click on the disk drive and select Initialize Disk as seen in Figure 2.15.
 3.
3.The Initialize Disk window will open. Choose either MBR or GPT partition tables, and then click OK. When formatting disk drives, you must select a partition table format. Windows Server 2008 R2 offers the use of either the legacy Master Boot Record (MBR) or the newer GUID Partition Table (GPT) partition table formats. The newer GPT format offers a few advantages, such as providing redundancy in the partition table to help protect the table from corruption as well as the ability to have partitions larger than 2 Terabytes. For volumes or partitions smaller than 2 terabytes, you can use either MBR or GPT, but for larger volumes you must use the GPT format.4.
Next, you will need to convert both disks to dynamic. Right click on the disk drive and choose Convert to Dynamic Disk… as seen in Figure 2.16. You will need to perform this for both the disk drives to be included in the virrored volume.

After the disks have been converted to dynamic, you are ready to add the mirror. Right click the original volume on Disk 0 and select Add Mirror (see Figure 2.17)

The Add Mirror window will appear. Select the disk drive to be used as the mirrored drive and click on the Add Mirror button.7.
The mirrored volume has now been established. The mirror will appear in a warning state as seen in Figure 2.18 until the two drives are synchronized. You can see the percentage of completion of the sync process in the disk management console.
Managing the Windows 7 Desktop Environment
Resize a Volume
Sometimes, when you create a volume, you will later be faced with the need to change the size of that volume. Luckily, once you have created a volume with a certain size, you are not limited to that size. You can either extend or shrink a volume, if necessary.To extend a volume, do the following:1.
Open the Disk Management MMC snap-in.2.
Right-click on the volume to be extended. Select Extend Volume.3.
The Extend Volume wizard appears. Click Next.4.
The Select Disks screen appears. You can choose to extend the volume on the current disk or extend it to another disk.5.
Click Next.6.
Click Finish. The volume is extended and maintains the same file system as the original volume.
Warning
If you choose to extend a volume to another disk, a spanned volume will be created. If the disk is a basic disk, it will be converted to a dynamic disk.
To shrink a volume, do the following:1.
Open the Disk Management MMC snap-in.2.
Right-click on the volume to be shrunk. Select Shrink Volume.3.
As seen in Figure 5.36, the Shrink Volume window appears. Enter the amount of space by which you would like to shrink the volume.4.
Click Shrink. The volume is shrunk and the freed up space is seen as unallocated space.

MCSA/MCSE 70-294: Ensuring Active Directory Availability
RAID-1
RAID-1 is more commonly referred to as disk mirroring or disk duplexing, and involves the use of two disk drives. It can be implemented through hardware, or through software using the disk management features built into Windows Server 2003. A RAID-1 volume created using the Windows software is referred to as a mirrored volume. With RAID-1, each drive is a “mirror image” of the other. Disk duplexing refers to mirroring when each drive is attached to its own separate controller or communication channel.Note
Fault tolerant software RAID (RAID-1 and RAID-5) can only be implemented in Windows Server 2003 on disks that have been converted from basic to dynamic status. Dynamic disks offer more flexibility in management options, but cannot be accessed locally by operating systems prior to Windows 2000. Because it is recommended that production servers not be installed in a dual boot configuration, this should not be an issue with your DCs.
Duplexing can improve both read and write performance. In a duplexed environment, both disks can be read from or written to simultaneously. In a mirrored environment, only one of the drives can be read from or written to at a time. Because data must be written to both drives, write performance can be slightly degraded in a mirrored environment. For the reasons stated previously, this is less true in a duplexed environment. Data can be read from either disk in a mirrored environment and from both disks simultaneously in a duplexed environment, thereby increasing read performance. Fault tolerance is enhanced because if one of the drives malfunctions in a mirrored environment, or one of the drives, controllers, or communications channels malfunctions in a duplex environment, the server remains functional using the other hardware in mirrored configuration.
A duplexed volume appears to the operating system as a mirrored volume. The difference is in the hardware configuration; the software does not recognize any difference between mirrored and duplexed volumes. If a disk in a RAID-1 volume fails, you should break the mirror, add a new disk, and recreate the mirror to restore fault tolerance.
Test Day Tip
When using software RAID, the Windows Server 2003 boot and system files can only exist on a RAID-1 (mirrored or duplexed) volume. You cannot use a Windows RAID-5 volume for disks that hold the boot or system volumes. This limitation does not exist when using hardware RAID, in addition, hardware RAID offers higher performance and is preferred if the extra cost is acceptable to the organization.
Windows Server 2008 R2 high-availability and recovery features
Add primary storage to cluster
Now that we have successfully created our cluster with a quorum disk, we need to bring the primary disk to be used for file shares online. To do this, perform the following:1.
Open Server Manager and select the Disk Management console.2.
Bring the disk online and initialize it. Then create a new simple volume.3.
After creating a new usable volume, expand the cluster node and select Storage as seen in Figure 9.25. You will notice that the quorum disk is already online.

Right click the Storage node and select Add Disk.5.
Select the newly created disk in the Add Disks to Cluster window and click OK.
You should now see the newly added disk appear in the Storage node as seen in Figure 9.26.

Basic Concepts of I/O Systems
Software-based implementation versus hardware-based implementationWindows Server dynamic disks allow the building of software-based stripe sets, which could include distributed parity (RAID5) or mirror sets that protect the volume by duplicating data between any two dynamic disks. Furthermore, you can use this technology across many disks and partitions, thereby creating load balancing at the system level as opposed to the storage subsystem level. This is especially important if you wish to take advantage of multiple independent controllers that would otherwise present independent logical units (and therefore partitions and drives).
By default, any new device discovered by Windows Server is defined as a basic disk. You need to upgrade the basic disk to a “dynamic” disk in order to use the advanced volume management tools available from the Disk Management MMC snap-in. You can access the disk management snap-in by right-clicking on the My Computer desktop item and selecting the Manage option. From there, you can select the Disk Management component under the Storage container. Figure 2-16 shows how to upgrade a basic disk to a dynamic disk.
 Then you can create your host-based RAID implementation using the Disk Management MMC snap-in from Windows (Figure 2-17). Volume P is a software-based RAID5 volume.
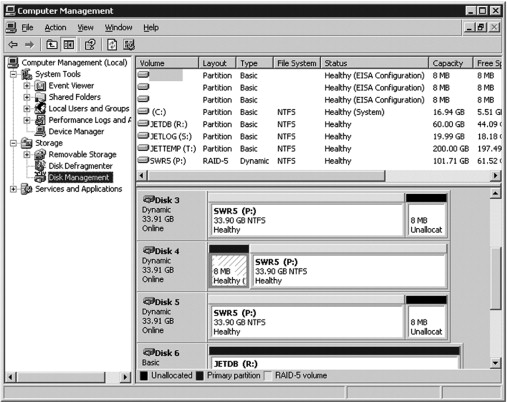
The issue concerning software-based RAID implementations is twofold. First, you are soliciting the CPU of the system to perform tasks around block device management (simple striping of disks can be addressed with low overhead, but striping with distributed parity requires CPU cycles to compute the parity blocks during a write operation). Second, the recovery steps required should a dynamic disk fail are more complex, manual, and typically prone to operation mistakes. This action typically requires unavailability and service downtime, which are not in line with the goal of increasing volume and data availability by the means of RAID. To this effect, the majority, if not all, of the deployments of Microsoft Exchange, use hardware RAID, which can be implemented with added features such as hot-swap and hot-spare device management, independently and transparently from the operation system and the application.
There are situations in which host-based striping provides an effective advantage, such as in the example where the target storage array has limited striping capabilities in favor of high availability and resiliency (e.g., HP StorageWorks XP 12000 array, based on Hitachi Japan Ltd. technology). While this approach generates a little more complexity, the return is the benefit of a super-scaling solution that can deal with the highest workloads, provided that you have effectively at leveled the resource utilization, comprised of the host port interface and cache and back-end disk buses and units.
All in all, you should take advantage of RAID and the volume management functions offered by PCI-based RAID controllers, as well as the external, possibly shared, storage enclosures that will offload the CPU resources from the parity calculation and disk block management and offer advanced features. The declining prices of entry-level PCI-based RAID arrays should definitely decide you to go that way. Note also that this practice is becoming more and more common; some computer vendors (e.g., HP) are embedding on their motherboard design a RAID-on-chip logic (ROC) that provides basic RAID management (mirroring, read cache, no writeback cache), without the need to use a PCI slot for a back-plane RAID controller. This is a common practice in high-density server environments, where 1-U servers, such as the HP ProLiant servers, include this ROC chipset and allow building a RAID1 mirror set for the system disk volumes at no additional hardware cost. Blade servers go a level beyond and propose a special slot for a mezzanine card that sits on top of the motherboard (in the same plane), and provides excellent performance for local system disk requirements (Figure 2-18).

High Availability for Exchange 2007 Mailbox Servers
Switching to the Passive Storage Group Copy When Disaster StrikesWhen disaster strikes and the database or log files in the active copy of the storage group have become corrupted and have shut down, you have the option to recover database availability by switching to the LCR copy (the passive copy of the storage group).
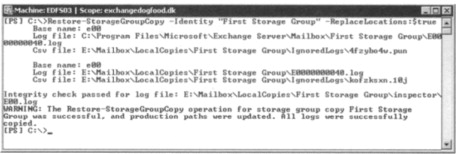
You can recover from corruption of either one or more log files or the database using a variety of methods, depending on whether you use mount points or not. One method is to run the Restore-StorageGroupCopy CMDlet with the ReplaceLocations parameter, which will activate the LCR copy as the active storage group copy in one step. To activate the LCR copy as the active storage group, you first need to make sure that the active database is dismounted, which should already be the case if it's corrupted. If this is not the case, you should dismount it now. When you have done so, we're ready to run the Restore-StorageGroupCopy CMDlet, which in the case of this example is done for the First Storage Group. So the command to run in the EMS is:
An integrity check will now be passed for the log files, and if it's completed without errors, the storage group copy switch will be completed and the production paths will be updated, as shown in Figure 8.10.
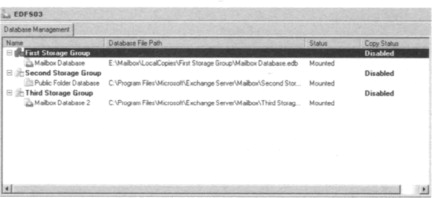
All there is to do now is to mount the database using either the EMC or the EMS. Now notice that the Database File Path will have changed, as shown in Figure 8.11.
NOTE
When you have run the Restore-StorageGroupCopy CMDlet against a storage group, LCR for the respective storage group will be disabled. So remember to re-enable LCR for the particular storage group after you perform a switch to the LCR copy.
Although this method is straightforward and fully supported, Microsoft actually recommends that instead you use a method whereby you run the Restore-StorageGroupCopy
CMDlet without the Replace Locations parameter, to activate the copy in its current location, and then either move the files manually, change drive letters, or use mount point assignments to have the copy files reflected under the respective production paths so that the production database is maintained in the expected location. Following this method means that the active storage group copy will continue to have meaningful filenames that represent that they indeed are active production copies. Why is this the preferred method? Because Microsoft believes that using the Restore-StorageGroupCopy CMDlet with the ReplaceLocations parameter could lead to future confusion in distinguishing the active copy of the data from the passive copy of the data, and to be honest, we agree. That said, we cannot see why you shouldn't use the ReplaceLocations parameter if you know what you're doing; just make sure that you switch back to the original disk set again.
Let's examine an example of how you would use the recommend method. First, make sure that the production database is dismounted. Then open the EMS and type Restore-StorageGroupCopy –Identity “First Storage Group”.
This command will activate the copy and leave the path for the production storage group intact. Now you can choose between either moving the LCR copy files to the location of the original production database manually using Windows Explorer or using Xcopy or a similar tool. Just be sure to move or delete the files in the folder you move the files to first. When the files have been moved, you simply need to mount the database again, and that's it.
The second option available when using the Restore-StorageGroupCopy CMDlet without the ReplaceLocations parameter is to change the drive letter for the partition holding the LCR copy to the drive letter used by the production storage group. This can be done using either the Disk Management MMC snap-in or the Diskpart tool.1.
To do so using the MMC snap–in, click Start | Run and type Diskmgmt.msc. This will bring up the MMC snap–in shown in Figure 8.12. Now right–click the partition holding the production storage group and its database, then select Change drive letter and paths in the context menu.

2. In the Change Drive Letter and Paths For window, click Change, then specify an unallocated drive letter and click OK, as shown in Figure 8.13.

Click OK to the confirmation message and click OK to close the Change Drive Letter and Paths window.4.
Now change the drive letter for the partition holding your LCR copy to the drive letter that originally was assigned the partition that holds the production storage group, which in this example is E:.
It's important that the partition for which you change the drive letter for doesn't contain any other data used by other applications. If it does, you will most likely destroy functionality for the respective applications!
When you have changed the drive letter, all there is to do is to mount the database again, but remember, the paths for the active and passive storage groups must be the same on each partition.
NOTE
A restart of the server might be required for you to be able to assign the E: drive to the partition holding the LCR copy.
The last option available involves the use of mount points. A mount point is a feature with which you can surpass the 26-drive-letter limitation that exists in Windows 2003 Server. Using volume mount points, you can graft, or mount, a target partition into a folder on another physical disk. Since volume mount points are transparent to Exchange 2007 as well as most other programs, they are pretty popular, especially in deploying Exchange 2000/2003 cluster environments.
To use mount points to switch LCR storage group copies, you must already have configured the partitions holding the storage group copies to use them. If you haven't done so, the mount point option cannot be used. In this example, the Third Storage Group's folder as well as the LCR copy for this storage group, which is called Third Storage Group, point to an NTFS volume mount point.
You can see whether a particular folder in Windows Explorer is a mount point because the icon is represented as a disk and not the normal yellow folder icon (see Figure 8.14).

1. As is the case with the options we have covered, the first thing you should do before switching the storage group copies using NTFS volume mount points is to make sure that the database is in a dismounted state. If this is not the case, you should dismount it manually now. The next step is to open the EMS and type Restore-StorageGroupCopy –Identity “Third Storage Group” (which is the storage group used in this example).2.
Next open the Disk Management MMC snap-in, right-click the partition that is used as the NTFS volume mount point by the production storage group, then select Change Drive Letter or Paths in the context menu. In the Change Drive Letter and Paths window, remove the existing path by highlighting it, then click the Remove button (see Figure 8.15).

You now need to confirm that you want to remove the path. Click Yes.4.
Now remove the mount point for the partition used for the LCR copy, using the same steps. This is required to be able to use the LCR copy path as a mount point for the Production Storage Group copy.5.
We're now ready to mount the LCR copy to the Production Storage Group. We do so by right-clicking the partition that was used for the LCR copy, then choosing Change Drive Letter or Paths in the context menu. Now click Add and select Mount in the following empty NTFS folder. Click Browse and specify the path to the production storage group (see Figure 8.16). Finally, click OK twice and close the Disk Management MMC snap-in.

Now verify that the folder within Windows Explorer contains the expected data, and then mount the database again.


0 Comments