
Installing Microsoft Windows 1.0x in DOSBox-X

Overview
Editions this applies to
Windows 1.01
Initial US release version
Windows 1.02
International release
Support for international keyboards
Support for regional settings like time and date format
Support for A4 paper
Windows 1.03
Additional drivers
Adds support for Tandy graphics
Windows 1.04
Adds support for the IBM PS/2 (but no support for PS/2 mouse or VGA)
Windows 1.0x was the first versions of the Microsoft Windows line, available as both Retail and OEM editions. A runtime edition was also included with some applications.
Limitations
According to Microsoft: Windows 1.0 required a minimum of 256 kilobyte, two double-sided disk drives and a graphics adapter. A hard disk and 512KB memory are recommended for running multiple programs or when using DOS 3.0 or higher.
In actuality, it also needs at least DOS 2.0 (but lower than 4.0), and the two disk drives are not mandatory if there is a harddisk. It only supports up to 640KB base memory (no support for EMS/XMS/UMB memory).
The retail release of Windows 1.04 adds support for the IBM PS/2 but did not add support for the IBM PS/2 Mouse, or the newer VGA, MCGA or 8514/A video adapters. IBM distributed a special OEM version of Windows 1.04 as part of "Personal Publishing System" and "Collegiate Kit" bundles, which does have support for those features.
Unless this special IBM OEM version of Windows 1.04 is used, you must enable the serial mouse emulation in DOSBox-X and tell Windows during installation to configure a serial mouse. And likewise, you will be limited to EGA graphics.
DOSBox-X config file
It is recommended that you create a custom DOSBox-X config file for running Windows 1.0x. e.g.:
[sdl]
autolock=true

[dosbox]
title=Windows 1.0x

[dos]
ver=3.4

[parallel]
parallel1=printer

[printer]
multipage=true
timeout=5000

[render]
scaler=none

[autoexec]
@ECHO OFF
MOUNT C /home/users/myuser/winroot
C:
SET PATH=%PATH%;C:\WINDOWS;
IF EXIST C:\WINDOWS\IBMMOUSE.DRV GOTO WINDOWS.IBM
IF EXIST C:\WINDOWS\WIN.COM      GOTO WINDOWS
ECHO No Windows installation found
GOTO END

:WINDOWS
ECHO Starting Windows 1.0x with serial mouse
CONFIG -SET SERIAL SERIAL1=serialmouse
C:\WINDOWS\WIN.COM
GOTO END

:WINDOWS.IBM
ECHO Starting Windows 1.04 IBM OEM Release
C:\WINDOWS\WIN.COM
GOTO END

:END
EXIT
Copy the above config and save it as win1x.conf. If you don’t want DOSBox-X to close when exiting Windows 1.0x, remove the EXIT command.
Obviously adjust the MOUNT command to mount an appropriate path for your host system. This path will become the C: drive for the Windows 1.0x installation.
It is recommended that you create a custom DOSBox-X config file for running Windows 1.0x. e.g.:
[sdl]
autolock=true
[dosbox]
title=Windows 1.0x
[dos]
ver=3.4
[parallel]
parallel1=printer
[printer]
multipage=true
timeout=5000
[render]
scaler=none
[autoexec]
@ECHO OFF
MOUNT C /home/users/myuser/winroot
C:
SET PATH=%PATH%;C:\WINDOWS;
IF EXIST C:\WINDOWS\IBMMOUSE.DRV GOTO WINDOWS.IBM
IF EXIST C:\WINDOWS\WIN.COM GOTO WINDOWS
ECHO No Windows installation found
GOTO END
:WINDOWS
ECHO Starting Windows 1.0x with serial mouse
CONFIG -SET SERIAL SERIAL1=serialmouse
C:\WINDOWS\WIN.COM
GOTO END
:WINDOWS.IBM
ECHO Starting Windows 1.04 IBM OEM Release
C:\WINDOWS\WIN.COM
GOTO END
:END
EXITCopy the above config and save it as win1x.conf. If you don’t want DOSBox-X to close when exiting Windows 1.0x, remove the EXIT command.
Obviously adjust the MOUNT command to mount an appropriate path for your host system. This path will become the C: drive for the Windows 1.0x installation.
Preparing for installation
The installation will be into a mounted folder, and Windows 1.0x will run from the integrated DOS that DOSBox-X provides. You can optionally install real DOS into DOSBox-X and install Windows 1.0x in that, but there is no known advantage to doing so.
Start by creating a directory on your system that you’re going to use (mount) as your Windows 1.0x C: drive. Valid examples:
For Windows hosts
C:\winroot
C:\users\myuser\win1x
For Linux hosts
/home/myuser/winroot
/home/myuser/windows/win1x
NOTE For users running Windows on their host computer, do NOT mount the root of your C: drive as the DOSBox-X C: drive! (e.g., MOUNT C: C:\ should NOT be done)
All Windows 1.0x versions were shipped on diskettes, requiring anywhere between 3 and 7 disks, depending on media-type and Windows version. And while it is possible to install Windows 1.0x from floppy images in DOSBox-X, the disk-swap process for this is rather tedious for substantial number of disks. As such it is recommended to make a directory such as "INSTALL" and copy the contents of ALL the diskettes into this directory. This way there is no need to swap disks during the installation process.
The installation will be into a mounted folder, and Windows 1.0x will run from the integrated DOS that DOSBox-X provides. You can optionally install real DOS into DOSBox-X and install Windows 1.0x in that, but there is no known advantage to doing so.
Start by creating a directory on your system that you’re going to use (mount) as your Windows 1.0x C: drive. Valid examples:
For Windows hosts
C:\winroot
C:\users\myuser\win1x
For Linux hosts
/home/myuser/winroot
/home/myuser/windows/win1x
NOTE | For users running Windows on their host computer, do NOT mount the root of your C: drive as the DOSBox-X C: drive! (e.g., MOUNT C: C:\ should NOT be done) |
All Windows 1.0x versions were shipped on diskettes, requiring anywhere between 3 and 7 disks, depending on media-type and Windows version. And while it is possible to install Windows 1.0x from floppy images in DOSBox-X, the disk-swap process for this is rather tedious for substantial number of disks. As such it is recommended to make a directory such as "INSTALL" and copy the contents of ALL the diskettes into this directory. This way there is no need to swap disks during the installation process.
Example of extracting files from disk images
There are several ways to extract the contents of disk images, such as 7zip on Windows or "Disk Image Mounter" on Linux. In this example, DOSBox-X itself is used to mount a disk image, copy its contents into a folder, unmount the disk image and do the next.
MOUNT C /home/myuser/winroot
C:
MD INSTALL
IMGMOUNT A DISK01.IMG -U
XCOPY A:\. C:\INSTALL /S /Y
IMGMOUNT A DISK02.IMG -U
XCOPY A:\. C:\INSTALL /S /Y
IMGMOUNT A DISK03.IMG -U
XCOPY A:\. C:\INSTALL /S /Y
IMGMOUNT A DISK04.IMG -U
XCOPY A:\. C:\INSTALL /S /Y
IMGMOUNT A DISK05.IMG -U
XCOPY A:\. C:\INSTALL /S /Y
IMGMOUNT A -U
Your new INSTALL directory now holds the contents of all 5 floppy disks.
There are several ways to extract the contents of disk images, such as 7zip on Windows or "Disk Image Mounter" on Linux. In this example, DOSBox-X itself is used to mount a disk image, copy its contents into a folder, unmount the disk image and do the next.
MOUNT C /home/myuser/winroot
C:
MD INSTALL
IMGMOUNT A DISK01.IMG -U
XCOPY A:\. C:\INSTALL /S /Y
IMGMOUNT A DISK02.IMG -U
XCOPY A:\. C:\INSTALL /S /Y
IMGMOUNT A DISK03.IMG -U
XCOPY A:\. C:\INSTALL /S /Y
IMGMOUNT A DISK04.IMG -U
XCOPY A:\. C:\INSTALL /S /Y
IMGMOUNT A DISK05.IMG -U
XCOPY A:\. C:\INSTALL /S /Y
IMGMOUNT A -UYour new INSTALL directory now holds the contents of all 5 floppy disks.
Installing in a mounted folder
You’re now ready to start DOSBox-X from the command-line, using the newly created win1x.conf config file. This assumes that the dosbox-x program is in your path and win1x.conf is in your current directory.
dosbox-x -conf win1x.conf
You now need to mount your new folder as the C: drive in DOSBox-X, and use SUBST to make the contents of the "C:\INSTALL" directory available on A: and start the installation.
MOUNT C /home/myuser/winroot
SUBST A C:\INSTALL
A:
SETUP
Adjust the path for mounting the C: drive as needed.
NOTE If your path has spaces, you need to enclose it in quotes. e.g., MOUNT C "C:\Users\John Doe\winroot"
The Windows installation will now take place. See the Windows 1.0x setup program section below.
You’re now ready to start DOSBox-X from the command-line, using the newly created win1x.conf config file. This assumes that the dosbox-x program is in your path and win1x.conf is in your current directory.
dosbox-x -conf win1x.confYou now need to mount your new folder as the C: drive in DOSBox-X, and use SUBST to make the contents of the "C:\INSTALL" directory available on A: and start the installation.
MOUNT C /home/myuser/winroot
SUBST A C:\INSTALL
A:
SETUPAdjust the path for mounting the C: drive as needed.
NOTE | If your path has spaces, you need to enclose it in quotes. e.g., MOUNT C "C:\Users\John Doe\winroot" |
The Windows installation will now take place. See the Windows 1.0x setup program section below.
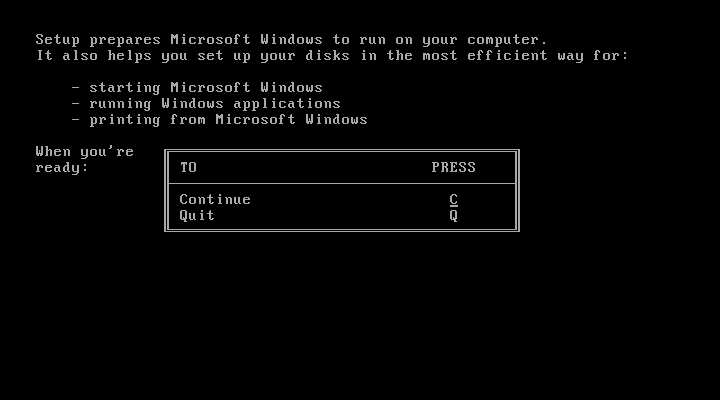
Windows 1.0x setup program
The setup program will ask several question relating to mouse, display and printer. If you have v1.02 or newer it will also ask you about the keyboard layout.
Note: Unless otherwise noted, the below screenshots are from the retail Windows 1.01 release, other releases can vary. In particular, OEM or Runtime versions may have a different number of disks and present other options.
Simply press Enter, or "C" to continue as prompted.
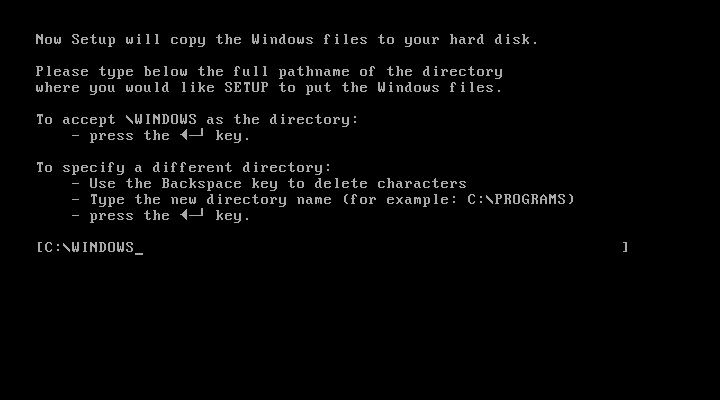
Installation directory
You can optionally specify a different directory to install Windows into.
Simply press Enter to continue as prompted.
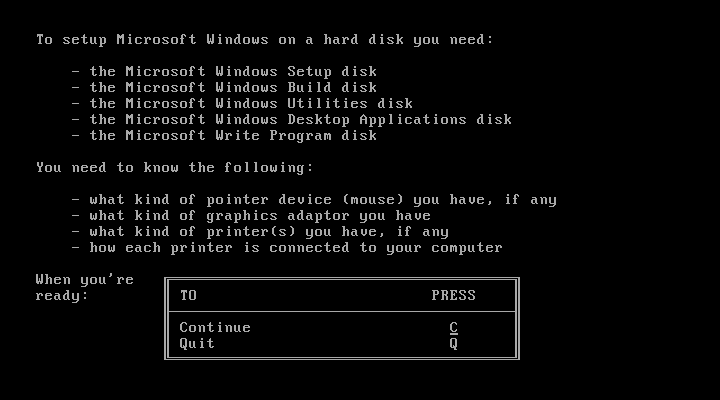
This screen will vary depending on the release version, OEM and if it is a runtime version.
Simply press Enter, or "C" to continue as prompted.
Keyboard selection
If you have version 1.02 or later, SETUP will ask for your keyboard layout.

Mouse selection
If you have the special IBM OEM version of Windows 1.04, as shown below, you can select option 8 "IBM Personal System/2 Mouse" for PS/2 mouse. In which case you need to disable the serialmouse option in your DOSBox-X config file.
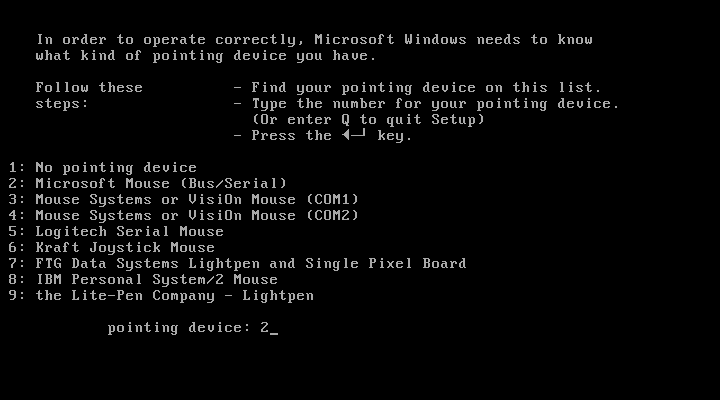
Otherwise, select option 2 "Microsoft Mouse (Bus/Serial)" and press Enter to continue as prompted.

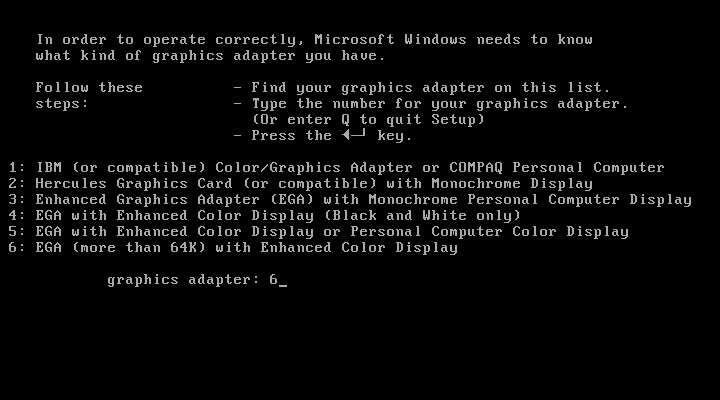
Graphics Adapter selection
If you have the special IBM OEM version of Windows 1.04, as show below, you can select option 2 "IBM Personal System/2 Model 50, 60, 80" for VGA.
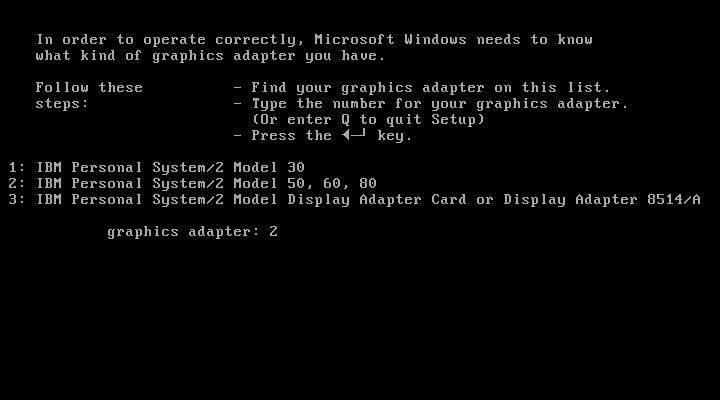
Otherwise, select option 6 "EGA (more than 64K) with Enhanced Color Display" as shown below, and press Enter to continue as prompted.
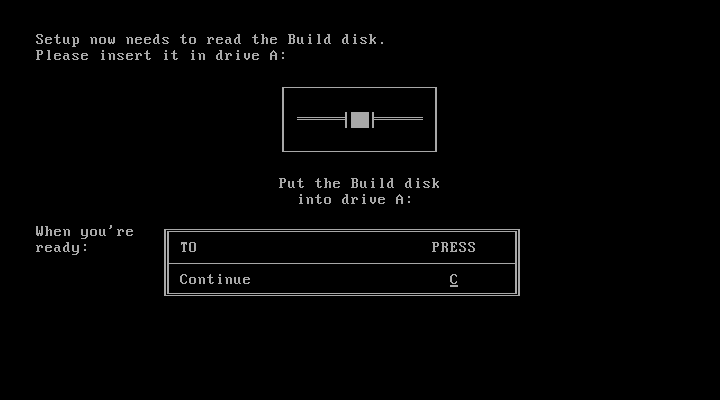
Build disk
SETUP now asks for the Build disk.
If you’re following the folder installation method, you can simply press Enter.
If you’re using disk images to install Windows, you need to now swap the disk using the menu item "DOS" followed by "Swap floppy". And then press enter.
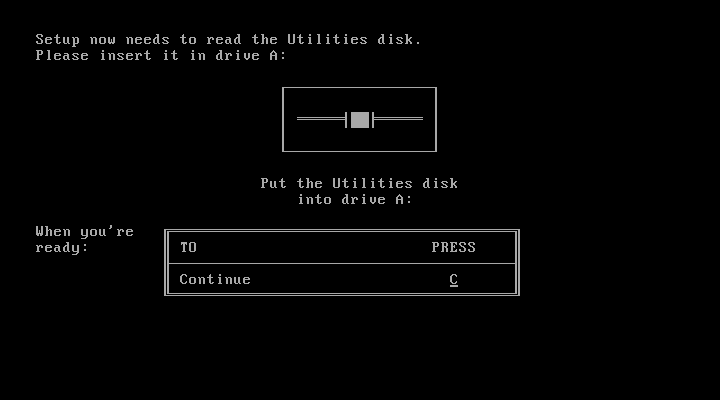
Utilities disk
SETUP now asks for the Utilities disk.
If you’re following the folder installation method, you can simply press Enter.
If you’re using disk images to install Windows, you need to now swap the disk using the menu item "DOS" followed by "Swap floppy". And then press enter.
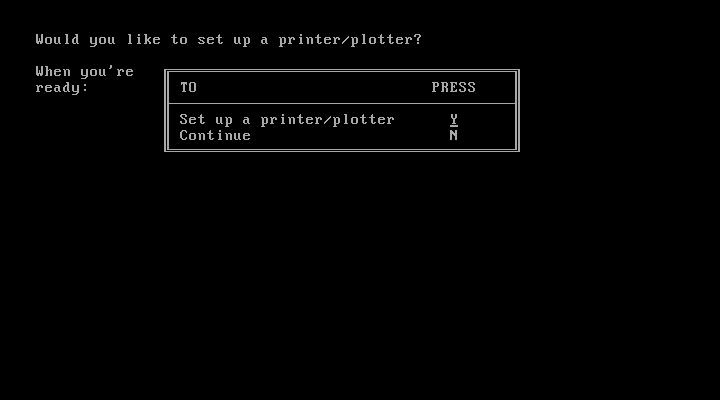
Printer setup
SETUP now asks if you want to set up a printer. You can press enter or "Y" to confirm, or you can press "N" to skip this step.
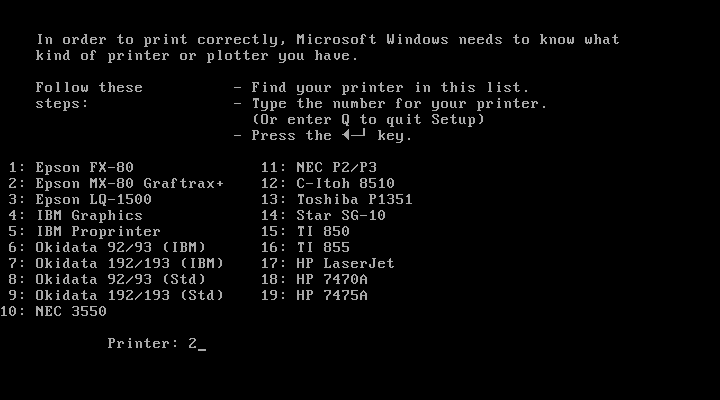
Printer setup - select model
If you indicated wanting to set up a printer, SETUP now asks you which model.
For this guide we use option 2, the "Epson LQ-1500", and press Enter.
Later releases may have more options, such as a "Generic / Text Only" printer which can also be used.
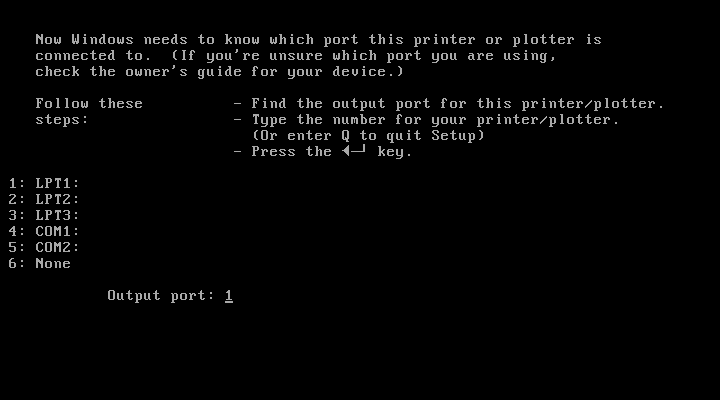
Printer setup - port select
If you indicated wanting to set up a printer, SETUP now asks you which port the printer is connected to.
Select the number for the "LPT1:" port and press Enter.
NOTE In the version shown, it is option 1, but in some other releases it is option 2.
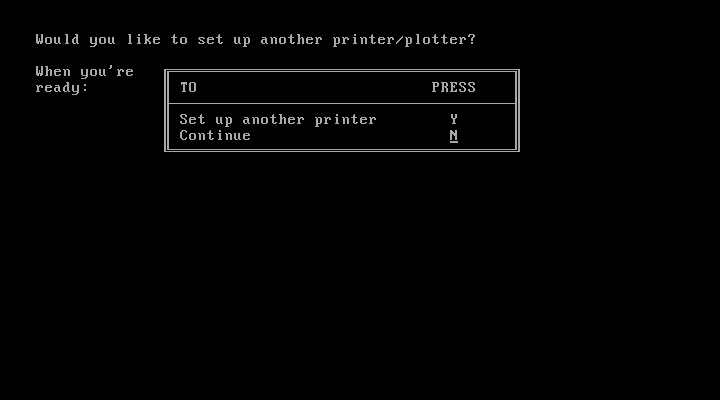
Printer setup - another printer
SETUP now asks if you want to set up another printer.
Press Enter to continue without setting up another printer.
You can always change the installed printers afterwards by running CONTROL.EXE from within Windows 1.0x.
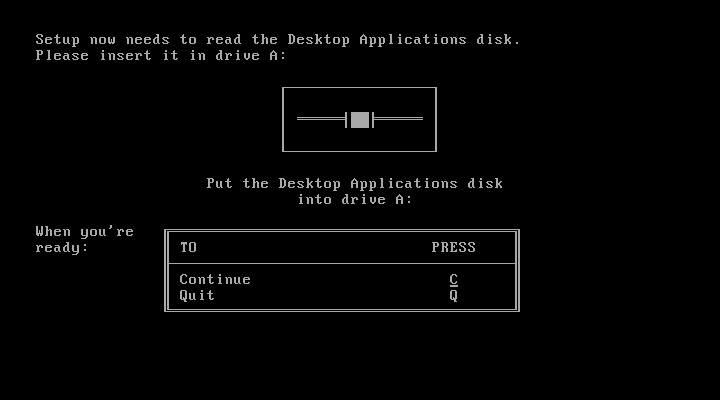
Desktop Applications disk
SETUP now asks for the Desktop Applications disk.
If you’re following the folder installation method, you can simply press Enter.
If you’re using disk images to install Windows, you need to now swap the disk using the menu item "DOS" followed by "Swap floppy". And then press enter.
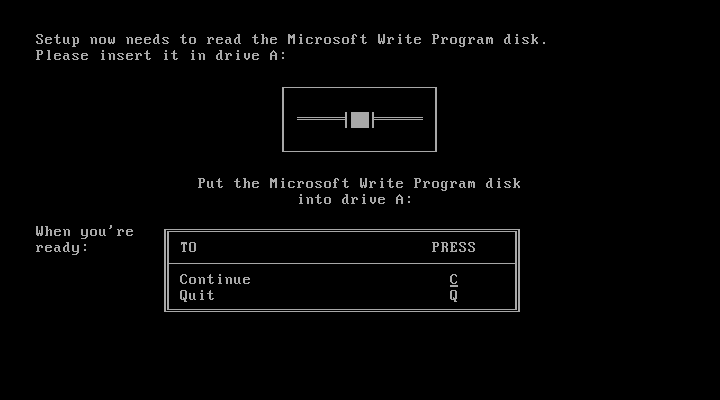
Microsoft Write Program disk
SETUP now asks for the Microsoft Write Program disk.
If you’re following the folder installation method, you can simply press Enter.
If you’re using disk images to install Windows, you need to now swap the disk using the menu item "DOS" followed by "Swap floppy". And then press enter.
SETUP completed
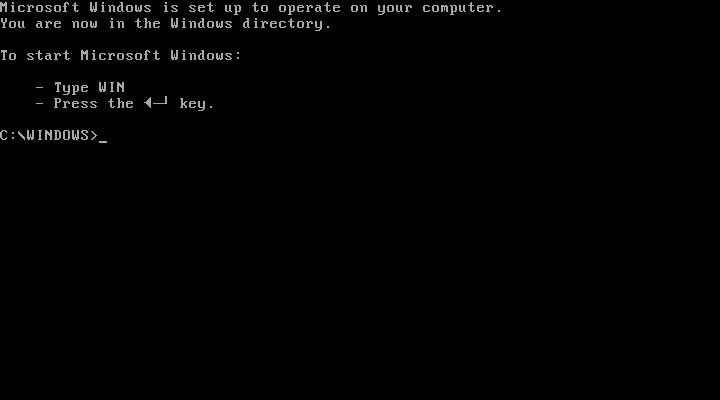
The setup program is now finished, and you’re ready to start Windows 1.0x.
But first type EXIT to close DOSBox-X.
The setup program will ask several question relating to mouse, display and printer. If you have v1.02 or newer it will also ask you about the keyboard layout.
Note: Unless otherwise noted, the below screenshots are from the retail Windows 1.01 release, other releases can vary. In particular, OEM or Runtime versions may have a different number of disks and present other options.
Simply press Enter, or "C" to continue as prompted.
Installation directory
You can optionally specify a different directory to install Windows into.
Simply press Enter to continue as prompted.
This screen will vary depending on the release version, OEM and if it is a runtime version.
Simply press Enter, or "C" to continue as prompted.
Keyboard selection
If you have version 1.02 or later, SETUP will ask for your keyboard layout.
Mouse selection
If you have the special IBM OEM version of Windows 1.04, as shown below, you can select option 8 "IBM Personal System/2 Mouse" for PS/2 mouse. In which case you need to disable the serialmouse option in your DOSBox-X config file.
Otherwise, select option 2 "Microsoft Mouse (Bus/Serial)" and press Enter to continue as prompted.
Graphics Adapter selection
If you have the special IBM OEM version of Windows 1.04, as show below, you can select option 2 "IBM Personal System/2 Model 50, 60, 80" for VGA.
Otherwise, select option 6 "EGA (more than 64K) with Enhanced Color Display" as shown below, and press Enter to continue as prompted.
Build disk
SETUP now asks for the Build disk.
If you’re following the folder installation method, you can simply press Enter.
If you’re using disk images to install Windows, you need to now swap the disk using the menu item "DOS" followed by "Swap floppy". And then press enter.
Utilities disk
SETUP now asks for the Utilities disk.
If you’re following the folder installation method, you can simply press Enter.
If you’re using disk images to install Windows, you need to now swap the disk using the menu item "DOS" followed by "Swap floppy". And then press enter.
Printer setup
SETUP now asks if you want to set up a printer. You can press enter or "Y" to confirm, or you can press "N" to skip this step.
Printer setup - select model
If you indicated wanting to set up a printer, SETUP now asks you which model.
For this guide we use option 2, the "Epson LQ-1500", and press Enter.
Later releases may have more options, such as a "Generic / Text Only" printer which can also be used.
Printer setup - port select
If you indicated wanting to set up a printer, SETUP now asks you which port the printer is connected to.
Select the number for the "LPT1:" port and press Enter.
NOTE | In the version shown, it is option 1, but in some other releases it is option 2. |
Printer setup - another printer
SETUP now asks if you want to set up another printer.
Press Enter to continue without setting up another printer.
You can always change the installed printers afterwards by running CONTROL.EXE from within Windows 1.0x.
Desktop Applications disk
SETUP now asks for the Desktop Applications disk.
If you’re following the folder installation method, you can simply press Enter.
If you’re using disk images to install Windows, you need to now swap the disk using the menu item "DOS" followed by "Swap floppy". And then press enter.
Microsoft Write Program disk
SETUP now asks for the Microsoft Write Program disk.
If you’re following the folder installation method, you can simply press Enter.
If you’re using disk images to install Windows, you need to now swap the disk using the menu item "DOS" followed by "Swap floppy". And then press enter.
SETUP completed
The setup program is now finished, and you’re ready to start Windows 1.0x.
But first type EXIT to close DOSBox-X.
Starting Windows 1.0x after installation
After the installation is finished, you can start Windows 1.0x from the command-prompt with the following command:
dosbox-x -conf win1x.conf
You can optionally create a shortcut on your desktop to start Windows 1.0x directly.
After the installation is finished, you can start Windows 1.0x from the command-prompt with the following command:
dosbox-x -conf win1x.confYou can optionally create a shortcut on your desktop to start Windows 1.0x directly.
Video
By default, the best possible video option that DOSBox-X can offer is: - VGA 640x480 in 16 colours for the IBM OEM release of Windows 1.04 - EGA 640x350 in 16 colours for all other Windows 1.0x releases
While there are no Windows 1.0x drivers for any of the SVGA adapters that DOSBox-X emulates, there is a [patch available](http://www.seasip.info/DOS/Win1/vga.html) that can convert the Windows 1.0x EGA driver to VESA 800x600 in 16 colours. But note that this does not work with the IBM OEM release of Windows 1.04, as that release does not include the EGA drivers.
Mouse
Windows 1.0x does not use the DOS mouse driver that DOSBox-X provides. Instead it uses its own mouse driver, which must be selected during Windows SETUP. This has the effect that by default you will need to click in the DOSBox window to lock the mouse to the window area.
There is however experimental support in DOSBox-X for such seamless integration. To get this working take the following steps:
Go to doslib releases and download the latest binary release of doslib. Unpack the archive, and you will find a Windows 1.0 mouse driver with installation instructions in the windrv/dosboxpi/bin/win10 directory.
Follow the installation instructions, and in addition, set the following options in your DOSBox-X config file:
[sdl]
mouse emulation=integration

[cpu]
integration device=true
Now when you run Windows 1.0, you should have seamless mouse support.
NOTE These old windows versions had no support for mice with scroll wheels. By default, DOSBox-X will simulate cursor up/down keypresses when you use the scroll wheel. This can be controlled by the mouse_wheel_key= setting in the [sdl] section of your DOSBox-X config file.
Windows 1.0x does not use the DOS mouse driver that DOSBox-X provides. Instead it uses its own mouse driver, which must be selected during Windows SETUP. This has the effect that by default you will need to click in the DOSBox window to lock the mouse to the window area.
There is however experimental support in DOSBox-X for such seamless integration. To get this working take the following steps:
Go to doslib releases and download the latest binary release of doslib. Unpack the archive, and you will find a Windows 1.0 mouse driver with installation instructions in the windrv/dosboxpi/bin/win10 directory.
Follow the installation instructions, and in addition, set the following options in your DOSBox-X config file:
[sdl]
mouse emulation=integration
[cpu]
integration device=trueNow when you run Windows 1.0, you should have seamless mouse support.
NOTE | These old windows versions had no support for mice with scroll wheels. By default, DOSBox-X will simulate cursor up/down keypresses when you use the scroll wheel. This can be controlled by the mouse_wheel_key= setting in the [sdl] section of your DOSBox-X config file. |
How to install Windows 1.0 on a modern PC
Windows 1.0 was released in the fall of 1985. Due to the retro-compatibility of the x86 architecture, it can also be installed on a state-of-the-art system. The newest configuration I ran Windows 1.0 in real mode is a Ryzen 3900x , on a motherboard with X470 chipset, 32GB DDR4 @ 3200 RAM and an RTX 2070 Super video card.

Going back to the mid-80s, Windows 1.0 made a so-so impression and that’s about it, it wasn’t taken very seriously, as evidenced by not many programs and games developed for Windows 1.x and 2.x. The main advantage of Windows 1, namely the possibility of using a mouse, was in a period when ordinary PCs were not generally equipped with a mouse. Windows 3.x is at a completely different level and is really a system with which you can do interesting things, especially since you have Office, Photoshop, Premiere and hundreds of other titles available. With Windows 3.11 you can connect to the Internet using TCP / IP. Not surprisingly, despite its limitations, Microsoft effectively withdrew Windows 3.11 from the market in 2008 .
To be or not to be… an operating system
Because Windows 1.0 seems to be more of a graphical interface for MS-DOS, the question has arisen as to whether it is really an operating system. We must keep in mind that Windows 1.0 works with its own hardware drivers, which is far above the level of a simple graphical interface.


Stanger Things
Due to the mega-popularity of the Stranger Things series , which pays homage to the ’80s, and which last season reached the era of Windows 1.0, Microsoft did a little advertising last year. Season 4, which takes place in 1986, when the Chernobyl event also takes place, and which integrates perfectly into the story of Stranger Things.
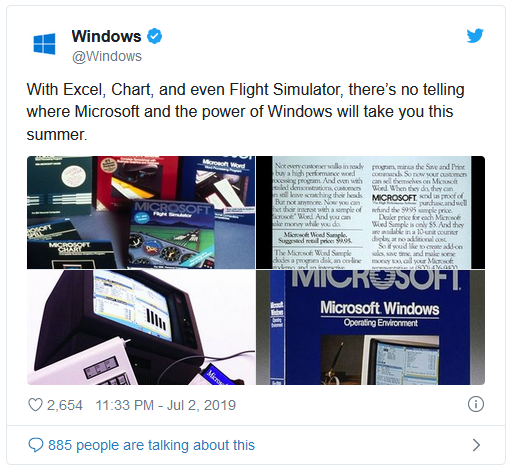
Where do we get Windows 1.0?
Obviously not from Microsoft. Not anymore. For retro operating systems, there is only one reference site, and this is called winworldpc.com. In case winworld fails, I will put a download link at the end of the article.

Once we get to the download page, we should also download Windows 2.0 because we need the mouse driver, respectively the mouse.drv file. Windows 1.0 will not work with our mouse on PS / 2. (In 1985 the standard was not even invented).
I don’t have a floppy drive anymore, what do I do?
No problem, no one has. After downloading the installation kit – which is a .7z file of 528KB – we will use 7zip to extract the installation kit.
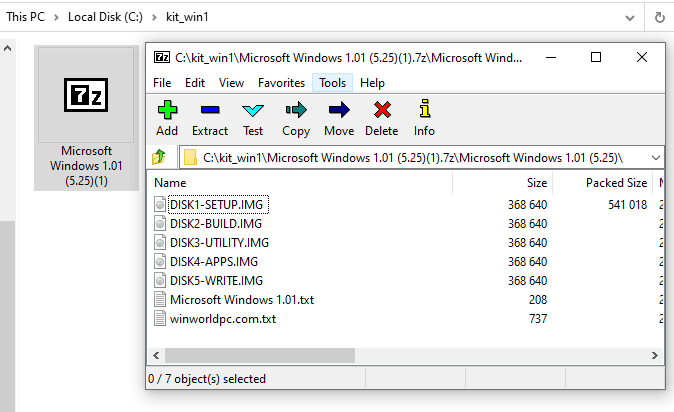
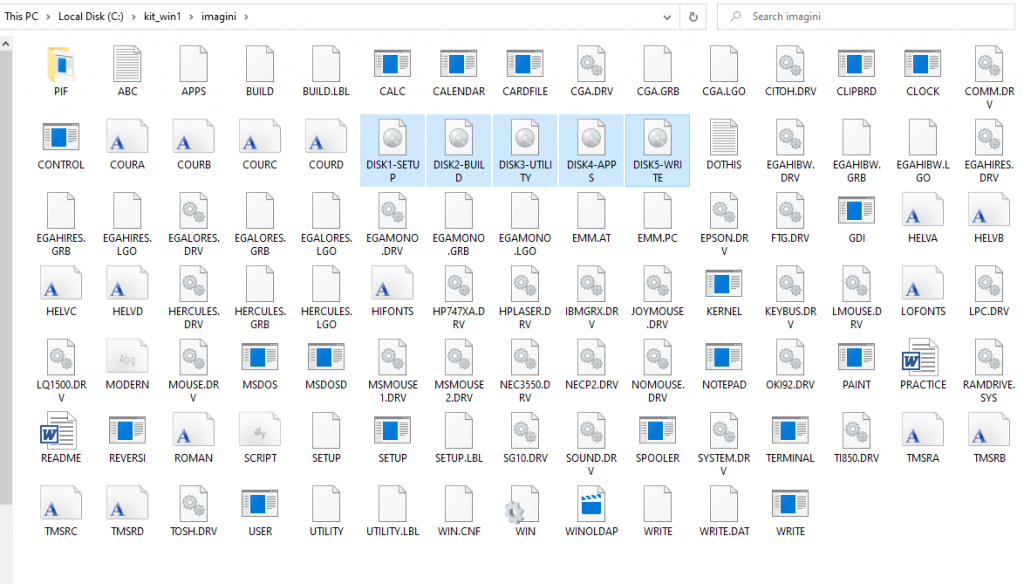
Our files are contained in 5 disk images. To make things extremely simple, 7zip lets us extract all the files from the floppy disk images in one place, using the Extract Here command .

Back to DOS
Because Windows 1.0 is more of a DOS extension and less of an operating system per se , since we have copied the installation files on a bootable DOS partition, we are good to go. Windows 1.0. uses a text interface for installation and we have to express our options using numbers or letters: C to Continue, Q to Quit, Y for Yes and N for N o etc.


Substitute command
To get to the wonderful screens above, we can’t run setup.exe if it’s in a folder with the letter C: (at least not on the first try). Let’s not forget: it’s 1985, and Microsoft is expecting us to start installation using the floppy drive, which is A:
So we are in a small stalemate, because a FAT 16 DOS partition will receive the letter C: when we boot from it. Fortunately, starting with DOS 5, there is the external command subst (external: because requires the subst.exe file) through which we can assign a drive letter to a folder, including the letter A. The syntax is as follows:
subst [<Drive1>: [<Drive2>:]<Path>] subst A: C: \ kit

For this command to work, just copy the subst.exe file to C: \ if we don’t have a full DOS installation, which includes all the utilities.)
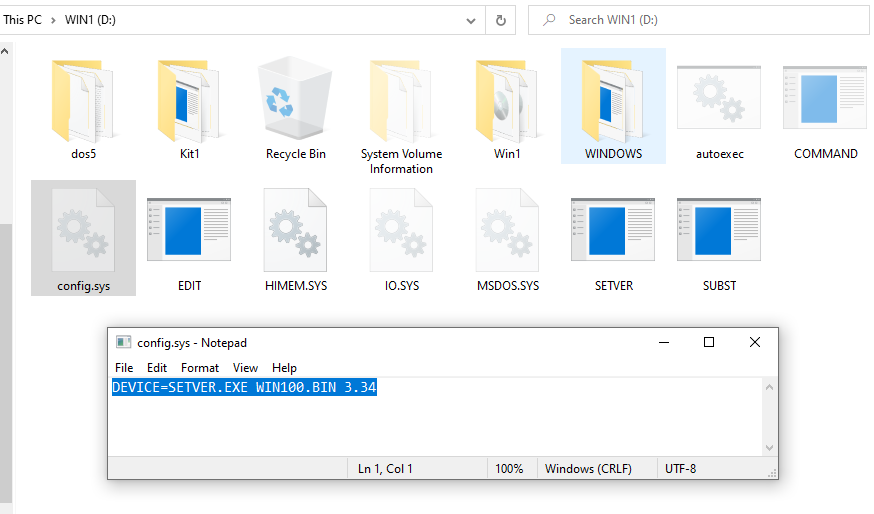
Let’s also set the DOS version with setver
Setver.exe, like subst.exe, is also part of the DOS 5 „Tricks task force” (and the following). Setver will make a program – which needs a specific version of DOS – believe that the current version of DOS is exactly what it needs. To get this trick we copy setver.exe to C: and add the following line in config.sys:
DEVICE = SETVER.EXE WIN100.BIN 3.34
Windows 1.0 will believe that it is using DOS 3.34 and will finally start.
It didn’t start? It’s time for VGASETUP.EXE!
Same here. In my case, the problem was with the RTX 2070 Super video card that did not want to start in EGA mode which is implemented in the EGAHIRES.DRV driver, respectively the best display mode to pick in 1985. Although RTX is compatible with the VGA standard (introduced in 1987) and implicitly with the previous EGA standard – simply it didn't want to work. The solution comes with the installation of a 640 × 480 VGA driver and running VGASETUP.EXE – the file that this utility creates.

To use this driver we must resume the installation process and copy WIN1VGA.EXE to the installation folder, it will patch some files and create a VGASETUP. EXE from which we will start the installation and we will be able to select as VGA video mode.
Victory! We have Windows 1.0 running at full speed!


Installation kit
How about we have all the Windows 1.0 installation files already unzipped in one folder including the mouse driver + the VGA driver already installed (we start the installation on vgasetup.exe) + subst.exe and setver.exe in one 554 KB archive?


1 Comments
Cool, got to try someday if the procedure can be adapted to Windows 2.something for which I have diskettes in the cellar. Used to run it at one time on a PC/AT clone.
ReplyDelete