
Folders, Windows & Finder Tabs
These days, the graphic user interface (icons, windows, trash cans) is standard. MacOS, Windows, Chrome OS, Android, iOS—every operating system is fundamentally the same, and a very long way from the lines of typed commands that defined the earliest computers.
That’s not to say that the graphic interface hasn’t evolved, though; it has. Herewith: a grand tour of the state of the art in computer desktops—the one in Catalina.
Getting into macOS
When you first turn on a Mac running macOS, an Apple logo greets you, soon joined by a skinny progress bar that lets you know how much longer you have to wait.
Logging In
What happens next depends on whether you’re the Mac’s sole proprietor or have to share it with other people in an office, school, or household.
If it’s your own Mac, a password box awaits you, as shown in the inset of Figure 1-1. Log in; you arrive at the macOS desktop.
If it’s a shared Mac, you may encounter a choice of accounts, as shown in Figure 1-1. It’s like a portrait gallery, set against a blurry version of your usual desktop picture. Click your icon.
Enter your password and then click Log In (or press Return). You arrive at the desktop. Or, if your Mac has a Touch Bar (“The Touch Bar + Fingerprint Reader”) and you’ve registered your fingerprint, just touch that finger to the sensor at the right end of the bar.
Chapter 12 offers much more on this business of accounts and logging in.
Note
In certain especially paranoid workplaces, you may not see the rogues’ gallery shown in Figure 1-1. You may just get two text boxes, where you’re supposed to type in your name and password. Without the icons of known account holders, an evil hacker’s job is that much more difficult.

Figure 1-1. On Macs used by multiple people, this is one of the first things you see upon turning on the computer. Click your name. (If the list is long, you may have to swipe the trackpad to find your name—or just type its first few letters.)
Inset: At this point, you’re asked to type in your password. Type it, and then click Log In (or press Return). If you type the wrong password, the box vibrates, in effect shaking its little dialog-box head, suggesting that you guess again.
The Elements of the macOS Desktop
The desktop is the shimmering, three-dimensional macOS landscape shown in Figure 1-2. On a new Mac, it’s covered by a photo of a spectacular rocky island off the coast of Long Beach, California: Catalina Island (get it?). If you upgraded from an earlier version of macOS, you keep whatever desktop picture you had before.
If you’ve ever used a computer before, most of the objects on your screen are nothing more than updated versions of familiar elements. Here’s a quick tour.
The Dock
This translucent row of colorful icons (Figure 1-2, bottom) is a launcher for the programs, files, folders, and disks you use often—and an indicator to let you know which programs are already open. They appear to rest on a sheet of transparent, smoked glass.
In principle, the Dock is very simple:
It has three sections. Programs are the left side. The icons of recently used programs live in the middle. Everything else goes on the right, including documents, folders, and disks.
 You can add a new icon to the Dock by dragging it there. Rearrange Dock icons by dragging them. Remove a Dock icon by dragging it away from the Dock.
Click something once to open it. When you click a program’s icon, a tiny black dot appears under it to let you know it’s open.
When you click a folder’s icon, you get a stack—an arcing row of icons, or a grid of them, that indicates what’s inside. See Figure 4-2 for more on stacks.
Each Dock icon sprouts a pop-up menu. To see the menu, hold the mouse button down on a Dock icon—or right-click or two-finger click it. A shortcut menu of useful commands pops right out.
If you have a trackpad, you can view miniatures of all open windows in a program by pointing to its Dock icon and then swiping down with three fingers. Details on how to turn on this feature are on “Exposé”.
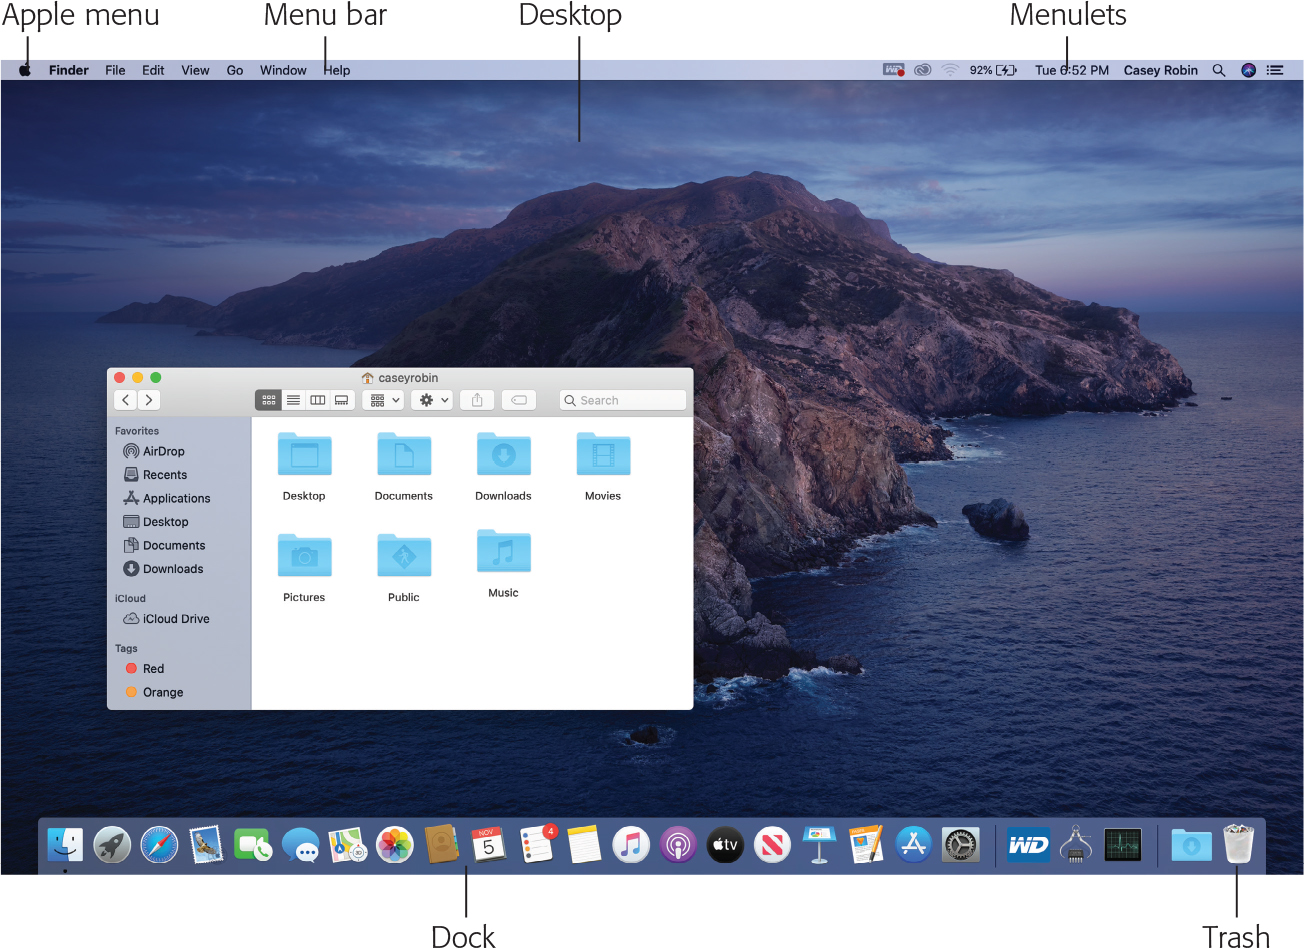
Figure 1-2. The macOS landscape looks like a more futuristic version of the operating systems you know and love. This is just a starting point, however. You can dress it up with a different background picture, adjust your windows in a million ways, and of course fill the Dock with only the programs, disks, folders, and files you need.
Because the Dock is such a critical component of macOS, Apple has decked it out with enough customization controls to keep you busy experimenting for months. You can change its size, move it to the sides of your screen, hide it entirely, and so on. Chapter 4 contains complete instructions for using and understanding the Dock.
The menu
The ![]() menu houses important Mac-wide commands like Sleep, Restart, and Shut Down. They’re always available, no matter which program you’re using.
menu houses important Mac-wide commands like Sleep, Restart, and Shut Down. They’re always available, no matter which program you’re using.
Disk icons on the desktop
For years, Apple has encouraged its flock to keep a clean desktop, to get rid of all the icons that many of us leave strewn around. Especially the hard drive icon, which had appeared in the upper-right corner of the screen since the original 1984 Mac.
Today, the Macintosh HD icon doesn’t normally appear on the screen. “Look,” Apple seems to be saying, “if you want access to your files and folders, just open them directly—from the Dock or your Home folder (Figure 2-1). Most of the stuff on the hard drive is system files of no interest to you, so let’s just get that icon out of your way.”
If you’d prefer that the disk icons return to your desktop, then choose Finder→Preferences, click General, and turn on the checkboxes of the disks whose icons you want on the desktop: hard disks, external disks, CDs, and so on.
Windows and How to Work Them
In designing macOS, one of Apple’s key goals was to address the window-proliferation problem. As you create more files, stash them in more folders, and launch more programs, it’s easy to wind up paralyzed before a screen awash with overlapping rectangles.
That’s the problem addressed by Mission Control, described on “Mission Control: Death to Window Clutter”. But some clutter and navigation controls are built into the windows themselves, too:
The Sidebar
The Sidebar (Figure 1-3) is the pane at the left side of every Finder window, unless you’ve hidden it. (It’s also at the left side of every Open dialog box and every full-sized Save dialog box.) It’s slightly translucent—your desktop picture shines through just a little bit.
The Sidebar has as many as four sections, each preceded by a collapsible heading.

Figure 1-3. Good things to put in the Sidebar: favorite programs, disks on a network you often connect to, a document you’re working on every day, and so on. You can drag a document onto a folder icon to file it there, drag a document onto a program’s icon to open it with the “wrong” program, and so on.
Tip
If you point to a heading without clicking, a tiny Hide or Show button appears. Click it to collapse or expand that heading’s contents.
Here are the headings you’ll soon know and love:
Favorites. This primary section of the Sidebar is the place to stash things for easy access. You can stock this list with the icons of disks, files, programs, folders, and the virtual, self-updating folders called saved searches. Click something to open it.
Here, too, you’ll find the icon for AirDrop, the instant file-sharing feature described on “AirDrop”. (The All My Files “folder” is gone; see the box below.)
iCloud. This heading offers the fantastic iCloud Drive, a Dropbox-like feature that’s described on “Revert”.
Locations. Here’s a complete list of containers: other computers on your network, hard drives, iPhones, iPads, CDs, DVDs, memory cards, USB flash drives, and so on. (Your main hard drive doesn’t usually appear, but you can drag it here, or turn it on in Finder→Preferences→Sidebar.) The removable ones (like memory cards, flash drives, and disks) bear a
 logo, which means Eject.
In Catalina, iPhones and iPads can show up here, too, so you can fiddle around with their contents. See “iMovie”.
Tags. This section lists all your Finder tags (color-coded keywords). See “Finder Tags” for more on tags.
Note
If you remove everything listed under one of these headings, the heading itself disappears to save space. It reappears the next time you put something in its category back into the Sidebar.
Fine-tuning the Sidebar
The beauty of this parking lot for containers is that it’s so easy to set up with your favorite places. For example:
Remove an icon by dragging it out of the Sidebar. It vanishes. You haven’t actually removed anything from your Mac; you’ve just unhitched its alias from the Sidebar.
Tip
If you drag a Locations item out of the list, you’ll have to choose Finder→Preferences→Sidebar and then turn on the appropriate checkbox to put it back in.
Rearrange the icons by dragging them up or down in the list. For example, hard drives don’t appear at the top of the Sidebar as in the olden days, but you’re free to drag them back into those coveted spots.
Rearrange the sections by dragging them up or down. For example, you can drag Favorites to the bottom but promote the Locations category.
Install a new icon by dragging it off your desktop (or out of a window) into any spot in the Favorites list of the Sidebar; a horizontal line shows where it will land after you let go. You can’t drag icons into any section of the Sidebar—just Favorites.
Tip
You can also highlight an icon wherever it happens to be and then choose File→Add to Sidebar, or just press Control-
 -T.
-T.Adjust the width of the Sidebar by dragging its right edge—either the skinny divider line or the extreme right edge of the vertical scroll bar, if there is one. You “feel” a snap at the point where the line covers up about half of each icon’s name. Any covered-up names sprout ellipses (…) to let you know there’s more (as in “Secret Salaries Spreadsh…”).
- Hide the Sidebar by pressing Option--S, which is the shortcut for the View→Hide Sidebar command. Bring the Sidebar back into view by pressing the same key combination (or by using the Show Sidebar command).
Tip
You can hide and show the Sidebar manually, too: To hide it, drag its right edge all the way to the left edge of the window. Unhide it by dragging the left edge of the window to the right again.
Then again, why would you ever want to hide the Sidebar? It’s one of the handiest navigation aids since the invention of the steering wheel. For example:
It takes a lot of pressure off the Dock. Instead of filling up your Dock with folder icons (all of which look frustratingly alike and are unlabeled), use the Sidebar to store them. You leave the Dock that much more room for programs and documents.
It’s better than the Dock. In some ways, the Sidebar is a lot like the Dock, in that you can stash favorite icons of any sort there. But the Sidebar reveals the names of these icons, and the Dock doesn’t until you use the mouse to point there.
It makes ejecting easy. Just click the
button next to any removable disk to make it pop out.You can drag onto its folders and disks. That is, you can drag icons onto Sidebar icons, just as though they were the real disks, folders, and programs they represent.
It simplifies connecting to networked disks. Park your other computers’ shared folder and disk icons here, to shave several steps off the usual connecting-via-network ritual.
Title Bar
The title bar (Figure 1-4) has several functions. First, when a bunch of windows are open, the darkened title bar, window name, mini-icon, and colored left-corner buttons tell you which window is active—in front. (In background windows, these elements appear dimmed and colorless.) Second, the title bar acts as a handle that lets you move the window around on the screen.
You can also move a window by dragging the solid gray strip on the bottom, assuming you’ve made it appear (choose View→Show Status Bar).
Tip
Here’s a nifty keyboard shortcut: You can cycle through the different open windows in one program without using the mouse. Just press ![]() (that is, the tilde key, to the left of the number 1 key on U.S. keyboards). With each press, you bring a different window forward within the current program. It works both in the Finder and in your everyday programs, and it beats the pants off using the mouse to choose a name from the Window menu. (Note the difference from
(that is, the tilde key, to the left of the number 1 key on U.S. keyboards). With each press, you bring a different window forward within the current program. It works both in the Finder and in your everyday programs, and it beats the pants off using the mouse to choose a name from the Window menu. (Note the difference from ![]() -Tab, which cycles through different open programs.)
-Tab, which cycles through different open programs.)
Figure 1-4. When Steve Jobs unveiled the new Mac operating system at Macworld Expo in 2000, he said his goal was to oversee the creation of an interface so attractive “you just want to lick it.” Desktop windows, with their juicy, fruit-flavored controls, are a good starting point.
After you’ve opened one folder that’s inside another, the title bar’s secret folder hierarchy menu is an efficient way to backtrack—to return to the enclosing window. Get into the habit of right-clicking (or two-finger clicking, or Control-clicking, or ![]() -clicking) the name of the window to access the menu shown in Figure 1-5. (You can release the Control or
-clicking) the name of the window to access the menu shown in Figure 1-5. (You can release the Control or ![]() key immediately after clicking.)
key immediately after clicking.)
By choosing the name of a folder from this menu, you open the corresponding window. When browsing the contents of the Users folder, for example, you can return to the main hard drive window by right-clicking or two-finger clicking the folder name “Users” and then choosing Macintosh HD from the menu.
Tip
![]() Keyboard lovers, take note. Instead of using the title bar menu, you can also jump to the enclosing window by pressing
Keyboard lovers, take note. Instead of using the title bar menu, you can also jump to the enclosing window by pressing ![]() (up arrow), which is the shortcut for the Go→Enclosing Folder command. Pressing
(up arrow), which is the shortcut for the Go→Enclosing Folder command. Pressing ![]() (down arrow) takes you back into the folder you started in, assuming that it’s still highlighted. (This makes more sense when you try it than when you read it.)
(down arrow) takes you back into the folder you started in, assuming that it’s still highlighted. (This makes more sense when you try it than when you read it.)
Once you’ve mastered dragging, you’re ready for these title bar tips:
Pressing the
key lets you drag the title bar of an inactive window—one that’s partly covered by a window in front—without bringing it to the front. (Drag any empty part of the title bar—not the title itself.)By the way, you can close, minimize, or full-screenize a background window without the help of the
key. Just click one of those three corresponding title-bar buttons normally, even if the window you’re working on is in front of it.Double-clicking the title bar is a special technique: It zooms the window, enlarging it enough to reveal all the icons inside it (or, in programs, large enough to reveal all the text, graphics, or music). If your monitor isn’t big enough to show all the icons in a window, then the window grows to show as many as possible.
With a quick visit to System Preferences→Dock, though, you can change things up. You can turn on “Double-click a window’s title bar to minimize.” Now double-clicking the title bar makes the window collapse into the Dock, exactly as though you had clicked the Minimize button.
Tip
If you’ve turned on that “minimize” option, then you can minimize all desktop windows, sending them flying to the Dock, when you double-click the title bar while pressing the Option key.
Close Button
As the tip of your cursor crosses the three buttons at the upper-left corner of a window, tiny symbols appear inside them: ![]() ,
, ![]() , and
, and ![]() . Ignore the gossip that these symbols were added to help color-blind people who can’t distinguish the colors red, yellow, and green. Color-blind people are perfectly capable of distinguishing the buttons by their positions, just as they do with traffic lights.
. Ignore the gossip that these symbols were added to help color-blind people who can’t distinguish the colors red, yellow, and green. Color-blind people are perfectly capable of distinguishing the buttons by their positions, just as they do with traffic lights.
But for people who aren’t paying attention to button position, these cues distinguish the buttons even further. They also signal when it’s time to click. For example, as described in the previous section, you can use these three buttons even when the window is not at the front. You know the buttons are ripe for the clicking when you see the little symbols appear under your cursor.
The most important window gadget is the Close button, the red, droplet-like button in the upper-left corner . Clicking it closes the window, which collapses back into the icon from which it came.
Tip
If, while working on a document, you see a tiny dot in the center of the Close button, macOS is trying to tell you that you haven’t yet saved your work. (It doesn’t appear in Auto Save programs like TextEdit.) The dot goes away when you save the document.
The universal keyboard equivalent of the Close button is ![]() -W (for window)—a keystroke well worth memorizing. If you get into the habit of dismissing windows with that deft flick of your left hand, you’ll find it far easier to close several windows in a row, because you won’t have to aim for successive Close buttons.
-W (for window)—a keystroke well worth memorizing. If you get into the habit of dismissing windows with that deft flick of your left hand, you’ll find it far easier to close several windows in a row, because you won’t have to aim for successive Close buttons.
In many programs, something special happens if you’re pressing the Option key when using the Close button or its ![]() -W equivalent: You close all open windows. This trick is especially useful in the Finder, where a quest for a particular document may have left your screen plastered with open windows for which you have no further use. Option-clicking the Close button of any one window (or pressing Option-
-W equivalent: You close all open windows. This trick is especially useful in the Finder, where a quest for a particular document may have left your screen plastered with open windows for which you have no further use. Option-clicking the Close button of any one window (or pressing Option-![]() -W) closes all of them.
-W) closes all of them.
The Option-key trick doesn’t close all windows in every program—only those in the current program. Option-closing a Microsoft Word document closes all Word windows, but your Finder windows remain open.
Moreover, Option-closing doesn’t work in all programs.
Minimize Button
Click this yellow dot to minimize any Mac window, sending it shrinking, with a genie-like animated effect, into the right end of the Dock, where it then appears as an icon. The window isn’t gone. It’s just out of your way for the moment, as though you’ve set it on a shelf. To bring it back, click the newly created Dock icon;
Minimizing is a great window-management tool. In the Finder, minimizing a window lets you see whatever icons were hiding behind it. In a web browser, minimizing lets you hide a window that has to remain open (because you’re waiting for some task to finish) so you can read something else in the meantime.
And now, some Minimize button micro-goodies:
If you enjoy the ability to roll up your windows in this way, remember that you actually have a bigger target than the tiny Minimize button. (You can make the entire title bar a giant Minimize button,
POWER USERS’ CLINIC ADJUSTING THE GENIE SPEED
Better yet, you can also minimize the frontmost window of almost any program (including the Finder) from the keyboard by pressing
-M. That’s a keystroke worth memorizing on your first day with the Mac.Option-clicking one minimized window on the Dock un-minimizes all a program’s windows.
Tip
MacOS can change menu commands as you press modifier keys. For example, open a couple of Finder windows and then click the Window menu. Focus on the Minimize Window command. Now press Option and watch both the wording and the listed keyboard equivalent change instantly to Minimize All (Option-
-M).The Option key works wonders on the File menu, too.
In the bad old days (up to late 2009), minimizing a bunch of documents could get really messy. Each one flew onto the Dock, putting a new icon there, creating a tighter and tighter squeeze, shrinking the Dock’s icons until they were the size of Tic Tacs.
Nowadays, your document windows can minimize themselves into their programs’ Dock icons, rather than creating new Dock icons for themselves. That way, your Dock doesn’t get any more crowded, and the icons on it don’t keep shrinking away to atoms.
To turn on this feature, choose System Preferences→Dock. Turn on “Minimize windows into application icon.”
So how do you get those windows back out of the Dock icon? You use Dock Exposé, which is described on “TROUBLESHOOTING MOMENT A Tedious Side Note About the Aluminum Apple Keyboards”.
Full-Screen Button
A click on the third dot, the green one, on every window’s title bar (in most programs, anyway), throws the window into Full Screen mode, in which the menu bars and window edges disappear, in the name of making your window fill your screen edge to edge.
As your cursor approaches this green dot, a little indicator appears inside it: ![]() . That’s the hint that you’re about to enter Full Screen mode.
. That’s the hint that you’re about to enter Full Screen mode.
And once you’re in Full Screen mode, you can push your cursor to the top of the screen to reveal the window controls. When it passes over the green dot, it changes to this: ![]() . That’s right: It’s the universal symbol for “Click me to exit Full Screen mode.”
. That’s right: It’s the universal symbol for “Click me to exit Full Screen mode.”
If you Option-click this button, your window grows just large enough to reveal all the icons inside it—or, in programs, large enough to reveal all the text, graphics, or music. It’s almost like Full Screen mode, except that you don’t lose your menu bar and all your other windows. A second Option-click restores the window to its previous size. (At the desktop, the Window→Zoom command does the same thing, and so does double-clicking the title bar of a Finder window.)
The Folder Proxy Icon
In the Finder, there’s a tiny icon next to the window’s name. It’s a stand-in—a proxy—for that window’s folder itself. By dragging this tiny icon, you can move or copy the folder into a different folder or disk, into the Sidebar, into the Trash, or into the Dock without having to first close the window.
Tip
You have to hold down the mouse button on the folder proxy icon until the icon darkens before dragging. (It darkens in a fraction of a second.)
When you drag this proxy icon to a different place on the same disk, the usual folder-dragging rules apply: Hold down the Option key if you want to copy the original disk or folder; ignore the Option key to move it. (You’ll find details on moving and copying icons in the next chapter.)
Many programs, including Microsoft Word, Preview, TextEdit, and others, offer the same mini-icon in open document windows. Once again, you can use it as a handle to drag a document into a new folder or onto a new disk. Sometimes, doing that really does move the document—but more often you just get an alias of it in the new location.
Two Clicks, One Window
Double-clicking a folder in a window doesn’t leave you with two open windows. Instead, it makes the contents of the original window disappear.
Tip
If you Option-double-click a folder, you don’t simply replace the contents of a fixed window that remains onscreen; you actually switch windows, as evidenced by their changing sizes and shapes.
So what if you’ve now opened Inner Folder B, and you want to backtrack to Outer Folder A? In that case, just click the tiny ![]() button—the Back button—in the upper-left corner of the window, or use one of these alternatives:
button—the Back button—in the upper-left corner of the window, or use one of these alternatives:
Choose Go→Back.
Press
-[ (left bracket).Press
 (up arrow).
Choose Go→Enclosing Folder.
Figure 1-8. To help you avoid window clutter, Apple has designed macOS windows so double-clicking a folder in a window (top) doesn’t actually open another window (bottom). Every time you double-click a folder in an open window (except in column view), its contents replace whatever was previously in the window. If you double-click three folders in succession, you still wind up with just one open window.
None of that helps you, however, if you want to move a file from one folder into the other, or to compare the contents of two windows. In that case, you probably want to see both windows open at the same time.
You can open a second window using any of these techniques:
Choose File→New Finder Window (
-N).Tip
What folder contents fill the “new” window that appears when you use this command? Usually, it’s the Recents folder —but it can be any window you want. Choose Finder→Preferences→General. Change the “New Finder windows show” pop-up menu to whatever folder you’d like to use as the starting point for your computing life. Your Home folder is a good choice. But you’re also free to choose your Documents folder, your iDisk, or any folder at all. Now every new Finder window shows you that specified folder, which is a useful arrangement.
Double-click a folder or disk icon on your desktop.
The Finder Toolbar
“The Finder Toolbar” describes this fascinating desktop-window element in great detail.
Scroll Bars
On the modern Mac, scroll bars don’t appear nearly as often as they used to. A scroll bar, of course, is the traditional window-edge slider that lets you move through a document that’s too big for the window. Without scroll bars, for example, you’d never be able to write a letter that’s taller than your screen.
On the very first Macs, scroll bars were a necessary evil; those computers were too underpowered to manage visibly moving the contents of the window. That’s why scroll bars were invented in the first place: to give you some feedback about how far you were moving into a document, because the window itself went pure white when you dragged the handle. Today, though, you can manipulate the contents of a window and see where you are. Nobody questions the absence of scroll bars on an iPad, right? Because you just push the contents of a window around with your fingers to scroll.
In macOS, you scroll by pushing two fingers up the trackpad (or one finger up the Magic Mouse) or by turning your mouse’s scroll wheel. You almost never use the antiquated method of dragging the scroll bar’s handle manually, with the mouse.
Tip
You can also scroll using the keyboard. Your Page Up and Page Down keys let you scroll up and down, one screen at a time, without ever having to take your hands off the keyboard. The Home and End keys are generally useful for jumping directly to the top or bottom of your document (or Finder window). And, if you’ve bought a mouse that has a scroll wheel on the top, you can use it to scroll windows without pressing any keys at all.
That’s a long-winded way of explaining why, in most programs, the scroll bars are hidden.
Note
If the missing scroll bars leave you jittery and disoriented, you can bring them back. Open System Preferences→General and then turn on “Show scroll bars: Always.”
And what if you’re such an old-timer that the modern Mac’s scrolling direction feels backward to you? When you slide your fingers upward on your laptop’s trackpad, you wish the page would scroll up, like it used to.
You can put things back to the way they used to be. Open System Preferences. Then:
For a trackpad: Click Trackpad, click Scroll & Zoom, and then turn off “Scroll direction: natural.”
For a Magic Mouse: Click Mouse, click Point & Click, and then turn off “Scroll direction: natural.”
Note
If you have a non-Apple mouse with a scroll wheel, the Mouse pane may not offer this scroll-direction option. You can still reverse the logic, though, if you’re handy in Terminal (macOS’s command line program).
Open Terminal and type defaults write ∼/Library/Preferences/.GlobalPreferences com.apple.swipescrolldirection -bool false. When you press Return and log out, you’ll find that the time-honored scroll directions have been restored.
Insta–Full Screen
Why drag a window manually? That’s so 2015! Let the software do the dragging for you.

Figure 1-10. Top: Suppose you’ve got a window. Hey—it could happen. You double-click the right edge of it, and boom: You’ve extended the window all the way to the right edge of the screen (middle).
Bottom: If you press Option at the same time, you extend the window all the way to both edges of the screen. This feature works in Apple’s own programs (Finder, Mail, TextEdit, and so on), but not in programs that have their own weird ways of doing things (Microsoft Word, for example).
Turns out that if you double-click any edge of a window, it snaps to the full width of your screen in that direction: left, right, top, or bottom. And if you double-click any edge while pressing Option, the window expands to the full height or width of the monitor in both directions .
Tip
In macOS Catalina, the green ![]() button at the top left of most windows offers a less hidden way to achieve these arrangements. When you point to it without clicking, you get not only the Enter Full Screen mode option, but also Tile Window to Left of Screen and, of course, Tile Window to Right of Screen.
button at the top left of most windows offers a less hidden way to achieve these arrangements. When you point to it without clicking, you get not only the Enter Full Screen mode option, but also Tile Window to Left of Screen and, of course, Tile Window to Right of Screen.
Old Finder Mode
Old Finder Mode (not its real name) was designed for people who came to the Mac from a much older version, like Mac OS 9, and lost half their hair when they discovered how different things were. In this mode, there are two big differences that make macOS more like its predecessors:
The Sidebar and the toolbar blink out of sight.
Double-clicking a folder now works like it did back in 2000. Every time you double-click a folder, you open a new window for it.
To invoke Old Finder Mode, press Option-![]() -T, the equivalent for the View→Hide Toolbar command. (Repeat that keystroke or command to turn Old Finder Mode off again.) This won’t work if your Finder window has multiple tabs open, but that’s not going to be a problem if you’re yearning for the days of yore.
-T, the equivalent for the View→Hide Toolbar command. (Repeat that keystroke or command to turn Old Finder Mode off again.) This won’t work if your Finder window has multiple tabs open, but that’s not going to be a problem if you’re yearning for the days of yore.
Resizable Edges
You can drag any edge of a window to change its shape. Just move the pointer carefully to the exact top, bottom, left, or right edge; once the pointer changes to a double-headed arrow, you can drag to move that window’s edge in or out.
Tip
There are a few cool, totally undocumented variations on the window-edge-dragging business. First, if you press the Option key while dragging, you resize the opposite edge simultaneously. For example, if you Option-drag the bottom edge upward, the top edge simultaneously collapses downward. If you press Shift as you drag, you resize the entire window, retaining its proportions. And if you Shift-Option-drag, you resize the window around its center, rather than from its edges.
Snappable Windows
It’s easy to position windows tightly against each other, side by side, for comparison or copying. As you slowly drag a window (by its title bar, for example), you’ll notice that its edge sticks momentarily to any other window edge it passes.
This feature works only in Apple’s own programs—and it doesn’t happen if you’re dragging quickly.
Tip
Pressing the Option key as you drag eliminates the moment of stickiness. Great when you’re in a hurry.
Path Bar
Choose View→Show Path Bar to see a tiny map at the bottom of the window, showing where you are in the folder hierarchy. If it says Casey→Pictures→Picnic, well, then, by golly, you’re looking at the contents of the Picnic folder, which is inside Pictures, which is inside your Home folder (assuming your name is Casey).
Tip
Each tiny folder icon in this display is fully operational. You can double-click it to open it, right-click or two-finger click it to open a shortcut menu, or even drag things into it.
Status Bar
MacOS hides yet another information strip at the bottom of a window: the status bar, which tells you how many icons are in the window (“14 items,” for example) and the free space remaining on the disk. To make it appear, choose View→Show Status Bar.
Tip
The status bar shows you disk-space information for the entire disk, but not how much disk space this particular window’s contents occupy.
To find out that piece of information, make sure no icon in the window is highlighted. Then choose File→Get Info (or press ![]() -I). The resulting Info window, which is described starting on Figure 2-14, shows the size of the folder or disk whose window you’re browsing, along with other useful statistics.
-I). The resulting Info window, which is described starting on Figure 2-14, shows the size of the folder or disk whose window you’re browsing, along with other useful statistics.
The Preview Pane
There’s even a way to park more information on the right side of any window, by choosing View→Show Preview; see “The Preview Pane”.
The Four Window Views
You can view the files and folders in a desktop window in any of four ways: as icons; as a single, tidy list; in a series of neat columns; or in gallery view, where you can flip through giant document icons like they’re CDs in a music-store bin. Figure 1-11 shows the four views.
Every window remembers its view settings independently. You might prefer to look over your Applications folder in list view (because it’s crammed with files and folders) but view the Pictures folder in icon or gallery view, where the larger icons serve as previews of the photos.
To switch a window from one view to another, just click one of the four corresponding icons in the window’s toolbar.
You can also switch views by choosing View→as Icons (or View→as List, or View→as Columns, or View→as Gallery), which can be handy if you’ve hidden the toolbar. Or, for less mousing and more hard-bodied efficiency, press ![]() -1 for icon view,
-1 for icon view, ![]() -2 for list view,
-2 for list view, ![]() -3 for column view, or
-3 for column view, or ![]() -4 for gallery view.
-4 for gallery view.
Or, if your Mac has a Touch Bar, you can install a View Options button onto it.
The following pages cover each of these views in greater detail.
Note
One common thread in the following discussions is the availability of the View Options palette, which lets you set up the sorting, text size, icon size, and other features of each view, either one window at a time or for all windows. To open View Options, choose View→Show View Options, or press ![]() -J, or choose Show View Options from the
-J, or choose Show View Options from the ![]() menu at the top of every window.
menu at the top of every window.
Icon View
In icon view, every file, folder, and disk is represented by a small picture—an icon. This humble image, a visual representation of electronic bits and bytes, is the cornerstone of the entire Mac religion. (Maybe that’s why it’s called an icon.)
Icon Previews
The Mac expands the notion that “an icon is a representation of its contents” to an impressive extreme. each icon actually looks like a miniature of the first page of the real document.
Because you can make icons so enormous, you can actually watch movies, or read PDF and text documents, right from their icons.
To check out this feature, point to an icon without clicking. A Play button (![]() ) appears on any movie or sound file; as shown in Figure 1-13,
) appears on any movie or sound file; as shown in Figure 1-13, ![]() and
and ![]() page buttons appear on multipage documents (like PDFs, Pages files, or even presentation documents like PowerPoint and Keynote). You can actually page through one of these documents right there on its icon without having to open the program!
page buttons appear on multipage documents (like PDFs, Pages files, or even presentation documents like PowerPoint and Keynote). You can actually page through one of these documents right there on its icon without having to open the program!
Tip
If you Option-click the little ![]() and
and ![]() buttons on a PDF, PowerPoint, or Keynote icon preview, you jump to the first or last page or slide in the document.
buttons on a PDF, PowerPoint, or Keynote icon preview, you jump to the first or last page or slide in the document.
Icon-View Options
MacOS offers a number of useful icon-view options, all of which are worth exploring. Start by opening any icon-view window, and then choose View→Show View Options (![]() -J). (You can put a View Options button onto your Touch Bar, if you have one, too;
-J). (You can put a View Options button onto your Touch Bar, if you have one, too;
The dialog box shown in Figure 1-14 appears.
Always open in icon view
It’s easy—almost scarily easy—to set up your preferred look for all folder windows on your entire system. With one click on the Use as Defaults button (described on “Use as Defaults”), you can change the window view of 20,000 folders at once—to icon view, list view, or whatever you like.
Note
The wording of this item in the View Options dialog box changes according to the view you’re in at the moment. In a list-view window, it says “Always open in list view.” In a gallery-view window, it’s “Always open in gallery view.” And so on. But the function is the same: to override the default (master) setting.
The “Always open in icon view” option lets you override that master setting, just for one window. For example, you might generally prefer a neat list view with large text. But for your Pictures folder, it probably makes more sense to set up icon view, so you can see a thumbnail of each photo without having to open it.
That’s the idea here. Open Pictures, change it to icon view, and then turn on “Always open in icon view.” Now every folder on your Mac is in list view except Pictures.
Browse in icon view
This option makes sure that any folders inside the current window open up into icon view, too, even if you’d previously set them to open into some other view. So if you’re looking at your Pictures folder in icon view and you open the Grand Canyon Jaw-Droppers folder inside it, then that folder also will be in icon view.
Group By, Sort By
For a discussion of these pop-up menus, see “Use as Defaults”.
Icon size
It’s super-easy to make all your icons bigger or smaller; just drag the “Icon size” slider in the lower-right corner of the window. (To make the slider appear, turn on View→ Show Status Bar.) But for the benefit of old-timers who expect to find that slider in the View Options window, well, there’s an identical slider there.
Grid spacing
You can control how closely icons are spaced in a window.
Text size
Your choices range only from 10 to 16 points, and you can’t choose a different font for your icons’ names. But using this pop-up menu, you can adjust the type size. And for people with especially big or especially small screens—or for people with aging retinas—this feature is much better than nothing.
In fact, you can actually specify a different type size for every window on your machine. (Why would you want to adjust the point size independently in different windows? Well, because you might want smaller type to fit more into a crammed list view without scrolling, while you can afford larger type in less densely populated windows.)
Label position
Click either Bottom or Right to indicate where you want an icon’s name to appear, relative to its icon. As shown in Figure 1-15 at bottom, this option lets you create, in effect, a multiple-column list view in a single window.
Show item info
While you’ve got the View Options palette open, try turning on “Show item info.” Suddenly you get a new line of information (in tiny blue type) for certain icons, saving you the effort of opening up the folder or file to find out what’s in it. For example:
Folders. The info line lets you know how many icons are inside each without having to open it up. Now you can spot empties at a glance.
Graphics files. Certain other kinds of files may show a helpful info line, too. For example, graphics files display their dimensions in pixels.
Sounds and QuickTime movies. The light-blue bonus line tells you how long the sound or movie takes to play. An MP3 file might say “03’ 08” ” (three minutes, eight seconds).
.zip files. On compressed archives like .zip files, you get to see an archive’s total size (like “48.9 MB”).
Show icon preview
This option is what makes icons display their contents. If you turn it off, then icons no longer look like miniature versions of their contents (tiny photos, tiny PDF files, and so on). Everything takes on generic icons.
You might prefer this arrangement when, for example, you want to be able to pick out all the PDF files in a window full of mixed document types. Thanks to the matching icons, it’s easy now.
Background
Here’s a luxury that other operating systems can only dream about: You can fill the background of any icon-view window on your Mac with a certain color—or even a photo.
Color coordinating or “wallpapering” certain windows is more than just a gimmick. In fact, it can serve as a time-saving visual cue. Once you’ve gotten used to the fact that your main Documents folder has a sky-blue background, you can look at a screen filled with open windows and pick it out like a sharpshooter. Color-coded Finder windows are also especially easy to distinguish at a glance when you’ve minimized them to the Dock.
Note
Background colors and pictures show up only in icon view.
Once a window is open, choose View→Show View Options (![]() -J). The bottom of the resulting dialog box offers three choices:
-J). The bottom of the resulting dialog box offers three choices:
Default. This is the standard option (white).
Color. When you click this button, you see a small rectangular button beside the word “Color.” Click it to open the Color Picker, which you can use to choose a new background color for the window (Figure 1-15, top). Unless it’s April Fools’ Day, pick a light color. If you choose a dark one—like black—you won’t be able to make out the lettering of the icons’ names.
Picture. If you choose this option, a “Drag image here” square appears. Now find a graphics file—one of Apple’s in the Desktop Pictures folder, or one of your own, whatever—and drag it into that “well.”You see that macOS has superimposed the window’s icons on the photo. As you can see in Figure 1-15, bottom, low-contrast or light-background photos work best for legibility.
Incidentally, the Mac has no idea what sizes and shapes your window may assume in its lifetime. Therefore, it makes no attempt to scale down a selected photo to fit neatly into the window. If you have a high-res digital camera, therefore, you may see only the upper-left corner of your photo in the window. For better results, use a graphics program to scale the picture down to something smaller than your screen resolution.
Use as Defaults
This harmless-looking button can actually wreak havoc on your kingdom—or restore order to it—with a single click. It applies the changes you’ve just made in the View Options dialog box to all icon-view windows on your Mac (instead of only the frontmost window). If you set up the frontmost window with a colored background, big icons, small text, and a tight grid, and then you click Use as Defaults, you’ll see that look in every disk or folder window you open. You’ve been warned.
Fortunately, there are two auxiliary controls that can give you a break from all the sameness:
First, you can set up individual windows to be exceptions to the rule; see Figure 1-13.
Second, you can remove any departures from the default window view—after a round of disappointing experimentation on a particular window, for example—using a secret button. Choose View→Show View Options to open the View Options dialog box. Now hold down the Option key. The Use as Defaults button magically changes to Restore to Defaults, which means “Abandon all the changes I’ve foolishly made to the look of this window.”
Tip
In the View Options for your Home folder, a checkbox appears: Show Library Folder. The Library folder is usually hidden, to prevent clueless newbies from wreaking havoc on important files. But macOS is willing to give it back to you—if you know about this sneaky little trick.
Group By and Sort By
You can wield two different kinds of control over the layout of files in a Finder window: grouping and sorting.
Note
You can perform all these obsessive reorganizations in any view: icon view, list view, column view, or gallery view.
Grouping
Grouping files means “Put my files into related clumps, separated by headings that identify them.” For example, you can arrange your documents into Application groups (meaning which program opens each one); now you can see at a glance which files will open in, say, Music when you double-click them. Or you can organize your Pictures folder into Date Added groups, with headings like “Today,” “Last 7 Days,” and “Earlier.”
To use groups, turn on View→Use Groups. Then use the View→Group By submenu to specify how you want your icons grouped. There are some incredibly useful options here; Figure 1-16 shows a few examples.
Tip
In icon view, the icons under each heading appear in a single row, scrolling off endlessly to the right. Use the usual sideways-scrolling gesture to flip through a row. (That is, swipe to the left on a trackpad with two fingers, or with one finger on a Magic Mouse.)
If you’re not into gestures, or if you don’t have a swipeable input device, then click the tiny Show All button at the right end of a row. Now you’ve turned off that one-row-per-heading thing, and all the icons under that heading appear in the usual rows and columns; scroll down to see them all.

Figure 1-16. You can view your Finder-window files in neat little groups, separated by headings.
Top: The Applications window, in icon view, grouped by Application Category.
Middle: The Documents folder, in list view, grouped by Application (meaning “which program opens this document”).
Bottom: A pictures folder, in column view, grouped by Date Added.
Apple wants to make extra, extra sure you’re aware of the Group commands. It gives you four different ways to find them:
Choose View→Group By. Choose one of the criteria from the submenu. Your options are Name (alphabetically); Kind (type of file, like Images, Movies, and Documents); Application (which program opens which documents); Date (Last Opened, Added [to the window], Modified, or Created); Size; or Tags (Finder Tag colors, described on “Finder Tags”). Marvel as the Finder puts your files into tidy categorized groups.
Choose from the
 icon. This icon appears in the toolbar of every Finder window. It contains the same options listed in the previous bullet.
Right-click or two-finger click an empty spot in an icon-view window; choose from the Group By shortcut menu. Yep, it’s those same commands again.
In the View Options palette (seen in Figure 1-14), use the Group By pop-up menu. Yes, it’s a fourth place to find the same options.
In each case, you can choose None to turn off the grouping altogether.
Tip
On the desktop, macOS offers a supercharged way to group your icons: desktop stacks, described on “Desktop Stacks”.
Remember, grouping (clumping) is not sorting. You can, in fact, sort the icons differently within each arranged group; read on.
Sorting
Sorting means just what it says: You can sort your files alphabetically (by Name), chronologically (by Date), in order of hugeness (by Size), and so on. See Figure 1-17.
You can sort a window whether or not you’ve also grouped it. You can even sort by different criteria. For example, you might have the programs in your Applications folder grouped by category but sorted alphabetically within each category.
Once again, Apple gives you four ways to sort:
Option-click the
icon in the toolbar of the Finder window.Choose View→Sort By.
Right-click or two-finger click an empty spot in an icon-view window.
In the View Options palette, use the Sort By pop-up menu.
In each case, you’ve opened a menu of sorting criteria: Name, Kind, Date, Size, and so on.
Tip
In icon view, you get an additional option: Snap to Grid. It means “Let me drag these icons into any sequence I want.” When you release each drag, the icon jumps into the nearest position on the underlying spacing grid (unless you press the ![]() key, which gives you full manual control over the icon’s position).
key, which gives you full manual control over the icon’s position).
In general, this option disappears if you’re using one of the Group By options. After all, if you’ve asked the Mac to arrange your icons into groups, then you’ve relinquished control of their grid spacing. (The exception: You can still move icons when they’re grouped by name—but only if you’re dragging into gaps that maintain alphabetical order.)
Free dragging—and grid spacing
Whenever you’ve applied a Group or Sort to an icon view, the icons remain rooted to an invisible underlying rows-and-columns grid. You can’t budge them.
Tip
You can, however, control how tight or loose that grid is, using the “Grid spacing” slider described on “Group By, Sort By”.
But there are two situations when you’re allowed to drag icons freely into any order you want:
Icons never snap to the grid. If both Group By and Sort By are set to None, then you can go nuts, freely dragging icons into sloppy, off-the-grid positions.
If, later, you become overwhelmed by shame at your untidiness, you can choose View→Clean Up. Now all the icons in the window jump to the closest positions on the invisible underlying grid.
This same command appears in the shortcut menu when you right-click or two-finger click anywhere inside an icon-view window, which is handier if you have a huge monitor. There’s even a Clean Up By submenu in the View menu and the shortcut menu. These commands don’t just put icons back onto the closest grid positions; they put the icons into their proper sorted positions among the other icons—by name, size, date, and so on.
Icons always snap to the grid. If Group By is set to None but Sort By is set to Snap to Grid, then you can drag icons into any order you like (that is, not in any particular sorted order)—but they’ll snap to the grid when you let go of the mouse button.
Tip
If you press the ![]() key as you release the drag, you can reverse the snapping logic. That is, the icons will snap to the grid if Sort By is set to None, but you can drag them freely if it’s set to Snap to Grid. (Don’t press the key until after you’ve begun to drag.)
key as you release the drag, you can reverse the snapping logic. That is, the icons will snap to the grid if Sort By is set to None, but you can drag them freely if it’s set to Snap to Grid. (Don’t press the key until after you’ve begun to drag.)
Although it doesn’t occur to most people, you can also apply any of the commands described in this section—Clean Up, Group, Sort—to icons lying loose on your desktop. Even though they don’t seem to be in any window at all, you can specify small or large icons, automatic alphabetical arrangement, and so on. Just click the desktop before using the View menu or the View Options dialog box.
Note
There’s only one View Options dialog box. Once it’s open, you can adjust the icon sizes or arrangement options of other windows just by clicking them. Each time you click inside a window, the View Options dialog box remains in front, changing to reflect the settings of the window you just clicked.
Incidentally, you can get rid of the View Options box the same way you summoned it: by pressing ![]() -J.
-J.
List View
In windows that contain a lot of icons, list view is a powerful weapon in the battle against chaos. It shows you a tidy table of your files’ names, dates, sizes, and so on (Figure 1-18). You get to decide how wide your columns should be, which of them should appear, and in what order (except that Name is always the first column). Here’s how to master these columns.
Sorting the List
Most of the world’s list-view fans like their files listed alphabetically. It’s occasionally useful, however, to view the newest files first, largest ones first, or whatever.
When a desktop window displays its icons in list view, a convenient strip of column headings appears. These headings aren’t just signposts; they’re buttons, too. Click Name for alphabetical order, Date Modified to view the newest first, Size to view the largest files at the top, and so on.
Don’t miss the tiny ![]() or
or ![]() that appears in the column you’ve most recently clicked. It shows you which way the list is being sorted. When it’s
that appears in the column you’ve most recently clicked. It shows you which way the list is being sorted. When it’s ![]() , then the oldest files, smallest files, or files beginning with numbers (or the letter A) appear at the top of the list, depending on which sorting criterion you selected (see Figure 1-18).
, then the oldest files, smallest files, or files beginning with numbers (or the letter A) appear at the top of the list, depending on which sorting criterion you selected (see Figure 1-18).
Tip
It may help you to remember that when the smallest portion of the triangle is at the top (![]() ), the smallest files are listed first when viewed in size order.
), the smallest files are listed first when viewed in size order.
To reverse the sorting order, click the column heading again. Now the ![]() shows you that the newest files, largest files, or files beginning with the letter Z appear at the top of the list.
shows you that the newest files, largest files, or files beginning with the letter Z appear at the top of the list.
Grouping the List
You can arrange your list view into groups by name, date, kind, and so on, with tidy headings that help you make sense of it all. This unsung feature is described under “Group By and Sort By” on “Use as Defaults”.
Flippy Triangles
One of the Mac’s most attractive features is the tiny triangle that appears to the left of a folder’s name in a list view. In its official documents, Apple calls these buttons disclosure triangles; internally, the programmers call them flippy triangles. (They don’t appear if you’ve sorted the window using the View→Group By menu.)
When you click one, the list view turns into an outline, showing the contents of the folder in an indented list, as shown in Figure 1-19. Click the triangle again to collapse the folder listing. You’re saved the trouble and clutter of opening a new window just to view the folder’s contents.
By selectively clicking flippy triangles, you can in effect peer inside two or more folders simultaneously, all within a single list-view window. You can move files around by dragging them onto the tiny folder icons.
GEM IN THE ROUGH FLIPPY TRIANGLE KEYSTROKES
Tip
Once you’ve expanded a folder by clicking its flippy triangle, you can even drag a file icon out of the folder so it’s loose in the list-view window. To do so, drag it directly upward onto the column headings area (where it says Name, for example). When you release the mouse, you see that the file is no longer inside the expanded folder.
Your Choice of Columns
Choose View→Show View Options. In the dialog box that appears, you’re offered on/off checkboxes for the different columns of information macOS can show you, as illustrated in Figure 1-20:
iCloud Status. This checkbox is dimmed for every folder except what’s in your iCloud Drive folder (“Revert”). If you turn it on, you’ll get a column that indicates whether or not each file has been downloaded from iCloud to your Mac.
Date Modified. This date-and-time stamp indicates when a document was last saved. Its accuracy, of course, depends on the accuracy of your Mac’s built-in clock.
Note
Many an up-to-date file has been lost because someone spotted a very old date on a folder and assumed that the files inside were equally old. That’s because the modification date shown for a folder doesn’t reflect the age of its contents. Instead, the date on a folder indicates only when items were last moved into or out of that folder. The actual files inside may be much older, or much more recent.
Date Created. This date-and-time stamp shows when a document was first saved.
Date Last Opened. Just what it sounds like.
Date Added. This option shows when a file was added to this folder or window.

Figure 1-20. The checkboxes you turn on in the View Options dialog box determine which columns of information appear in a list-view window. Many people live full and satisfying lives with only the three default columns—Date Modified, Size, and Kind—turned on. But the other columns can be helpful in special circumstances; the trick is knowing what information appears there.
Size. With a glance, you can tell from this column how much disk space each of your files and folders is taking up in kilobytes, megabytes, gigabytes, or terabytes—whichever the Mac thinks you’ll find most helpful.
Tip
For disks and folders, you see only dashes—at first. You can, however, instruct the Mac to reveal their sizes, as described on “FREQUENTLY ASKED QUESTION Calculate All Sizes”.
Kind. In this column, you can read what kind of file each icon represents. You may see, for example, Folder, JPEG Image, Application, and so on.
Version. This column displays the version numbers of your programs. For folders and documents, you just see dashes.
Comments. This rarely seen column (Figure 1-21) can actually be among the most useful. Suppose you’re a person who uses the Comments feature (highlight an icon, choose File→Get Info, type notes about that item into the Comments box). This column displays the first line of those comments about each icon, which comes in handy when tracking multiple versions of your documents.
Tag. Tags are colors and identifying phrases you can slap onto icons, wherever they appear, to help you categorize and group them. For details,
Even with this column turned off, you can still see an icon’s color, of course. But only by turning on this column do you get to see the text phrase you’ve associated with each label.
Other View Options
The View Options for a list view include several other useful settings; choose View→Show View Options or press ![]() -J.
-J.
Always open in list view. Turn on this option to override your system-wide preference setting for all windows. See Figure 1-13 for details.
Browse in list view. Ensures that any folder inside this one will also open up in list view, even if its regularly scheduled view is something else.
Icon size. These two buttons offer you a choice of icon sizes for the current window: either tiny or standard. Unlike icon view, list view doesn’t give you a size slider.
Fortunately, even the tiny icons aren’t so small that they show up blank. You still get a general idea of what they’re supposed to look like.
Text size. You can change the type size for your icon labels, either globally or one window at a time.
Show columns. Turn on the columns you’d like to appear in the current window’s list view, as described in the previous section.
Use relative dates. In a list view, the Date Modified, Date Added, Date Last Opened, and Date Created columns generally display information in a format like this: “December 24, 2018 at 11:01 AM.” (The Mac uses shorter date formats as the column gets narrower.) But when the “Use relative dates” option is turned on, it substitutes the words “Yesterday” or “Today” where appropriate, making recent files easier to spot.
Calculate all sizes. See the box below.
Show icon preview. Exactly as in icon view, this option turns the icons of graphics files into miniatures of the photos or images within.
Use as Defaults. Click to make your changes in the View Options box apply to all windows in that view on your Mac. (Option-click this button to restore a wayward window back to your defaults.)
Rearranging Columns
You’re stuck with the Name column at the far left of a window. However, you can rearrange the other columns just by dragging their gray column headers horizontally. If the Mac thinks you intend to drop a column to, say, the left of the column it overlaps, you’ll actually see an animated movement—indicating a column reshuffling—even before you release the mouse button.
Adjusting Column Widths
If you place your cursor carefully on the dividing line between two column headings, you’ll find that you can drag the divider line horizontally. Doing so makes the column to the left of your cursor wider or narrower.
What’s delightful about this activity is watching macOS scramble to rewrite its information to fit the space you give it. For example, as you make the Date Modified (or Created) column narrower, “March 7, 2020 at 2:22 PM” shrinks first to “Mar 7, 2020 at 2:22 PM,” then to “3/7/20, 2:22 PM,” and finally to a terse “3/7/20.”
If you make a column too narrow, macOS shortens the file names by removing text from the middle. An ellipsis (…) appears to show you where the missing text would have appeared. (Apple reasoned that truncating the ends of file names would hide useful information, like the numbers at the end of “Letter to Marge 1,” “Letter to Marge 2,” and so on. It would also hide the extensions, such as Thesis.doc, that may appear on file names in macOS.)
For example, suppose you’ve named a Word document “Kim Kardashian—A Major Force for Righteousness and Cure for Depression, Acne, and Migraine Headache.” (Yes, file names really can be that long.) If the Name column is too narrow, you might see only “Kim Kardashian—A Major…Migraine Headache.”
Tip
You don’t have to make the column mega-wide to read the full text of a file whose name has been shortened. Just point to the icon’s name without clicking. After a moment, a floating balloon appears—something like a tooltip in Microsoft programs—to identify the full name.
In fact, you can hover your mouse up or down a list over truncated file names, and their tooltip balloons appear instantaneously. (This trick works in list, column, and gallery views—and in Save and Open dialog boxes, for that matter.)
Column View
The goal of column view is simple: to let you burrow down through nested folders without leaving a trail of messy, overlapping windows in your wake. The solution is shown in Figure 1-22. It’s a list view that’s divided into vertical panes. The first pane (not counting the Sidebar) shows whatever disk or folder you first opened.
When you click a disk or folder in this list (once), the second pane shows a list of everything in it. Each time you click a folder in one pane, the pane to its right shows what’s inside. The other panes slide to the left, sometimes out of view. (Use the horizontal scroll bar to bring them back.) You can keep clicking until you’re looking at the file icons inside the most deeply nested folder.
If you discover that your hunt for a particular file has taken you down a blind alley, it’s not a big deal to backtrack, since the trail of folders you’ve followed to get here is still sitting before you on the screen. As soon as you click a different folder in one of the earlier panes, the panes to its right suddenly change, so you can burrow down a different rabbit hole.
The beauty of column view is that, first of all, it keeps your screen tidy. It effectively shows you several simultaneous folder levels but contains them within a single window. With a quick ![]() -W, you can close the window, panes and all. Second, column view provides an excellent sense of where you are. Because your trail is visible at all times, it’s much harder to get lost—wondering what folder you’re in and how you got there—than in any other window view.
-W, you can close the window, panes and all. Second, column view provides an excellent sense of where you are. Because your trail is visible at all times, it’s much harder to get lost—wondering what folder you’re in and how you got there—than in any other window view.
Column View by Keyboard
Efficiency fans can operate this entire process by keyboard alone. For example:
You can jump from one column to the next by pressing the
 or
or  keys.
keys.You can use the Go menu, or the icons in the Sidebar, to fill your columns with the contents of the corresponding folder—Home, Favorites, Applications, and so on.
The Back command (clicking the
 button on the toolbar, pressing -[, or choosing Go→Back) works as it does in a web browser: It retraces your steps backward. Once you’ve gone back, in fact, you can then go forward again; choose Go→Forward, click the
  button on the toolbar, or press -].
Within a highlighted column, press the
 or
or  keys to highlight successive icons in the list. Or type the first couple of letters of an icon’s name to jump directly to it.
When you finally highlight the icon you’ve been looking for, press
-O or  to open it (or double-click it, of course). You can open anything in any column; you don’t have to wait until you’ve reached the rightmost column.
Manipulating the Columns
The number of columns you can see without scrolling depends on the width of the window. That’s not to say, however, that you’re limited to four columns (or whatever fits on your monitor). You can make the columns wider or narrower—either individually or all at once—to suit the situation, according to this scheme:
To make a single column wider or narrower, drag the vertical dividing line at its right edge (see Figure 1-23). To adjust all the columns simultaneously, press the Option key as you drag the handle.

Figure 1-23. When you move your cursor close to the divider line between columns, you get a double-headed arrow. That’s a sign that you can now drag that line to adjust the width of the column to its left.
To make a column precisely as wide as necessary to reveal all the names of its contents, double-click the handle on its right side.
To make all columns as wide as required—when you absolutely, positively don’t want any names truncated—Option-double-click a column’s right-side handle.
Tip
If you’re having trouble remembering all those key and click combinations, you’re not alone. Fortunately, if you right-click or two-finger click the handle at the right side of a column, you get a shortcut menu that offers these commands: Right Size This Column (make it exactly as wide as necessary), Right Size All Columns Individually (make every column exactly as wide as necessary), and Right Size All Columns Equally (make all columns the same width, based on whatever width is necessary to see all the names in the narrowest one).
Grouping the Column Contents
The Group commands are available to column view, too; you can add those category headings to the clumps of files in each window. It all works exactly as described starting on “Use as Defaults”.
View Options
Just as in icon and list views, you can choose View→Show View Options to open a dialog box—a spartan one, in this case—offering additional control over your column views.
Always open in column view. Once again, this option lets you override your system-wide preference setting for all windows. See Figure 1-13 for details.
Browse in column view. Ensures that any folder inside this one will open up in column view when double-clicked.
Group By, Sort By. You can put column-view icons into arranged groups—and sort them within those groups—just as described starting on “Use as Defaults”.
Text size affects the type used for icons in all column views.
Show icons. For maximum speed, turn off this option. Now you see only file names—not the tiny icons next to them—in all column views. Weird!
Show icon preview. Turn off this option if you don’t want the tiny icons in column view to display their actual contents—photos showing their images, Word and PDF documents showing their first pages, and so on. You get generic, identical icons for each file type (text, photo, or whatever).
Show preview column. The far-right preview column can be handy when you’re browsing graphics, sounds, or movie files. Feel free to enlarge this final column when you want a better view of the picture or movie; you can make it really big.
The rest of the time, though, the preview column can get in the way, slightly slowing down the works and pushing other, more useful columns off to the left side of the window. If you turn off this checkbox, then the preview column will be empty.
Tip
No matter what view you’re in, remember this: If you ever start dragging an icon and then change your mind, just press the Esc key or ![]() -period, even while the mouse button is still down. The icon flies back to its precise starting place. Or, if you’ve already dragged something to a new window and now you regret it, press
-period, even while the mouse button is still down. The icon flies back to its precise starting place. Or, if you’ve already dragged something to a new window and now you regret it, press ![]() -Z (for Undo). Too bad real life doesn’t have a similar feature.
-Z (for Undo). Too bad real life doesn’t have a similar feature.
Gallery View
The old Cover Flow view has received a tweak. It still displays a jumbo preview of each icon as you arrow-key your way through the items in a folder. But now the icons themselves appear in a horizontal row instead of in a list view (Figure 1-24). And you no longer get to see the icons’ names (unless you’re pointing to one).
To fire up gallery view, open a window. Then click the Gallery button (![]() ) in the toolbar. Or choose View→as Gallery, or press
) in the toolbar. Or choose View→as Gallery, or press ![]() -4.
-4.
Now the window splits. On the bottom: a scrolling row of icons. On the top: the giant preview of whichever one is highlighted. It’s probably not something you’d want to set up for every folder, because browsing is a pretty inefficient way to find something. But in folders that contain photos or movies (and aren’t filled with hundreds of files), gallery view can be a handy and satisfying way to browse.
And now, notes on gallery view:
Multipage documents, presentation files, movies, and sounds are special. When you point to one, you get the
button and a scrubber bar. For a Keynote or PowerPoint file, you get a vertical scroll bar to move through the slides. If it’s a PDF document, you can use your trackpad or mouse wheel to move through the pages vertically.The previews are actual icons. When you’re looking at a gallery view minidocument, you can drag it with your mouse—you’ve got the world’s biggest target—anywhere you’d like: another folder, the Trash, wherever.
The Preview Pane
In any of the four Finder views, there’s yet another way to see instant previews of what’s in each file you highlight (the words in a Word file, the image in a JPEG photo, the numbers in an Excel spreadsheet, and so on). It’s called the preview pane.
To see it, choose View→Show Preview (or press Shift-![]() -P). Now there’s a full-height preview pane at the right side of the window. It shows the contents of the highlighted file, along with a dossier of details about it. Depending on the kind of file it is, you may see its name, date, and size; author (Word documents); number of pages and level of security (PDF files); album name, audio channels, and duration (music files); aperture, shutter speed, resolution, lens, and focal length (photos); and so on.
-P). Now there’s a full-height preview pane at the right side of the window. It shows the contents of the highlighted file, along with a dossier of details about it. Depending on the kind of file it is, you may see its name, date, and size; author (Word documents); number of pages and level of security (PDF files); album name, audio channels, and duration (music files); aperture, shutter speed, resolution, lens, and focal length (photos); and so on.
At the bottom, you’ll find Quick Actions buttons, relevant to the kind of file you’ve clicked. For a photo, the buttons are Rotate, Markup, and (when you click the More ![]() button) Create PDF. For a PDF document, it’s Markup and maybe Add Password. For an audio or video file, there’s a Trim button.
button) Create PDF. For a PDF document, it’s Markup and maybe Add Password. For an audio or video file, there’s a Trim button.
Tip
These Quick Actions commands also show up in the shortcut menu that appears when you right-click or two-finger click an icon. They’re also on the MacBook Pro’s Touch Bar, and in every Quick Look window.
In every case, the More ![]() menu offers a Customize command. In the resulting box, you’re treated to a master list of every Quick Actions button the preview pane can display. At the outset, it’s not such a big list: Rotate, Markup, Create PDF, and Trim.
menu offers a Customize command. In the resulting box, you’re treated to a master list of every Quick Actions button the preview pane can display. At the outset, it’s not such a big list: Rotate, Markup, Create PDF, and Trim.
Fortunately, other apps can add to this list, and so can you, if you’re handy with Automator. (See the Automator.pdf appendix on this book’s page at missingmanuals.com; when you create your new workflow in Automator, choose Contextual Workflow as the file type.)
In general, you’ll probably wind up using the preview pane, and those Quick Actions buttons, mostly for working through folders of photos, and maybe PDF files.
To turn off the pane, choose View→Hide Preview.
Quick Look
As the preceding several thousand pages make clear, there are lots of ways to view and manage the teeming mass of files and folders on a typical hard drive. Some of them actually let you see what’s in a document without having to open it—the preview column in column view, the giant icons in gallery, the preview pane, and so on.
Quick Look takes this idea to another level. It lets you open and browse a document at nearly full size—without switching window views or opening any new programs. You highlight an icon (or several) and then do one of these things:
Press the space bar. This is by far the best technique to learn. After all, unless you’re editing a file’s name, what has the space bar ever done for you in the Finder? Nothing. But in macOS, you can highlight any icon and then tap the space bar for an instant preview.
Choose File→Quick Look, or press
-Y, or click the  icon at the top of the window. The space bar is still better.
Right-click or two-finger click an icon; choose Quick Look.
Tap the
icon on your Touch Bar, if you have one.
You exit Quick Look in any one of these same ways.
Note
Whenever Quick Look appears in a menu or shortcut menu, its wording changes to reflect the name of the icon. For example, it might say “Quick Look ‘Secret Diary.doc.’ ”
In any case, the Quick Look window now opens, showing a gigantic preview of the document (Figure 1-26). Rather nice, eh?
You may even be able to edit your document right in the Quick Look pane. Tucked along the top of the window, you’ll find the same Quick Actions buttons described on “Quick Look”: for pictures, Rotate and Markup; for PDF documents, Markup; and so on.
Tip
You can use the usual “next page” gesture (two-finger swipe up or down on a trackpad, one-finger swipe on the Magic Mouse) to page through PDF or iWork documents, or to move among photos if you’ve highlighted a whole bunch.
It’s astonishing how few Mac fans are aware of this useful feature. Learn it!
What Quick Look Knows
Quick Look doesn’t recognize all documents. If you try to preview, for example, a Final Cut Pro video project, a sheet-music file, a .zip archive, or a database file, all you’ll see is a 6-inch-tall version of its generic icon. You won’t see what’s inside.
People can write plug-ins for those nonrecognized programs. For example, plug-ins that let you see what’s inside folders and .zip files await at quicklookplugins.com. In the meantime, here’s what Quick Look recognizes right out of the box:
Graphics files and photos. This is where Quick Look can really shine, because it’s often useful to get a quick look at a photo without having to haul Photos or Photoshop out of bed. Quick Look recognizes all common graphics formats, including TIFF, JPEG, GIF, PNG, RAW, and Photoshop documents.
PDF and text files. Using the scroll bar or a two-finger swipe, you can page through multipage documents, right there in the Quick Look window.
Audio and movie files. These begin to play instantly when you open them into the Quick Look window. Most popular formats work (MP3, AIFF, AAC, MPEG-4, H.264, and so on). A scroll bar appears so you can jump around.
Pages, Numbers, Keynote, and TextEdit documents. Naturally, since these are Apple programs, Quick Look understands the document formats.
Microsoft Word, Excel, and PowerPoint documents. Move through the pages using the vertical scroll bar or a two-finger swipe; switch to a different Excel spreadsheet page using the Sheet tabs at the bottom.
Fonts. Totally cool. When you open a font file in Quick Look, you get a crystal-clear, huge sampler that shows every letter of the alphabet in that typeface.
vCards. A vCard is an address-book entry that people can send by email to save time in updating their Rolodexes. When you drag a name out of Apple’s or Microsoft’s address books and onto the desktop, for example, it turns into a vCard document. In Quick Look, the vCard opens up as a handsomely formatted index card that displays all that person’s contact information.
HTML (web pages) and Safari archived pages. If you’ve saved some web pages to your hard drive, here’s a great way to inspect them without firing up your web browser.
In fact, Quick Look has started seeping into other programs—not just the Finder. For example, you can preview any of the following:
A link in a Mail message. In Mail, a tiny
 appears next to each web link when you hover your mouse over it. Click it to view the actual web page it leads to, right there in a pop-up bubble!
An address in Mail. If you ever see a street address in an email message, click the
that appears next to it when you hover your mouse. You’re offered the chance to add this person to your address book or to see a map of that address in Maps.Files in the Open dialog box. From within any program, whenever you choose File→Open to view the list of files and folders on your drive, you can tap the space bar to get an instant preview of each.
An address in Contacts. In the Contacts program, click the label for an address (like “Work” or “Home”); from the shortcut menu, choose Open in Maps.
Anything in Mission Control or a Dock menu. You can also tap the space bar to get a Quick Look preview of anything in the Mission Control view (“Mission Control: Death to Window Clutter”) or the stack, list, or grid of a Dock folder.
And you were alive to see the day!
The Quick Look Slideshow
The Mac is supposed to be all about graphics and other visual delights. No wonder, then, that it offers a built-in, full-screen slideshow feature.

Figure 1-27. Once the slideshow is underway, you can use this control bar. It lets you pause, move forward or backward, enlarge the “slide” to fill the screen, or end the show. The Index Sheet view ( ) is especially handy. (You can press -Return to “click” the Index Sheet button.) It displays an array of miniatures, all at once—a sort of Exposé for Quick Look. Click a thumbnail to jump directly to the Quick Look document you want to inspect.
It works like this: Highlight a bunch of icons, and then open Quick Look. Click the ![]() (Full Screen) button in the top-left corner. Click the Play button. The screen goes black, and the documents begin their slideshow. Each image appears on the screen for about three seconds before the next one appears. (Press the Esc key to end the show.) It plays all documents it recognizes, not just graphics. Use the control bar shown in Figure 1-27 to manage the playback.
(Full Screen) button in the top-left corner. Click the Play button. The screen goes black, and the documents begin their slideshow. Each image appears on the screen for about three seconds before the next one appears. (Press the Esc key to end the show.) It plays all documents it recognizes, not just graphics. Use the control bar shown in Figure 1-27 to manage the playback.
It’s a useful feature when you’ve just downloaded or imported a bunch of photos or Office documents and want a quick look through them.
Note
This same slideshow mechanism is available for graphics in Preview and Mail; Preview even offers crossfades between pictures.
Fun with Quick Look
Here are some stunts that make Quick Look even more interesting:
Full screen. When you click the Full Screen button (the gray
 ), the Quick Look window expands to fill your screen. Keep this trick in mind when you’re trying to read Word, Excel, or PDF documents, since the text is usually too small to read otherwise. (When you’re finished with the close-up, click the
  button in the control bar to restore the original Quick Look window, or the
  button to exit Quick Look altogether.)
Tip
How’s this for an undocumented shortcut? If you highlight an icon and then press Option-space bar, or Option-click the eyeball icon, you go straight into Full Screen mode without having to open the smaller Quick Look window first. Kewl.
(OK, this is actually part of the slideshow feature, but it’s also good for super-enlarging a single icon.)
Share it. Click the
 in the title bar to open the Share pop-up menu—a quick way to send this document on to somebody or to post it online.
Open with [program name]. This button shows up at the top-right corner of your Quick Look window. It might say, for example, Open with Preview.
Handy, really. It says: “Oh, so you’ve been Quick Looking to find a particular document, and this is the one you wanted? Click me to jump directly into the program that opens it, so you can get to work reading or editing. I’ve just saved your having to close the window and double-click the icon.”
Tip
Actually, you have a much bigger target than the “Open with” button in the corner. You can double-click anywhere in the Quick Look window to open the document (in whatever program is named on the “Open with” button).
Better yet: If you click and hold your cursor on that “Open with” button, then you get a secret pop-up menu of other programs that could open the file you’re looking at.
Keep it going. Once you’ve opened Quick Look for one icon, you don’t have to close it before inspecting another icon. Just keep clicking different icons (or pressing the arrow keys to walk through them); the Quick Look window changes instantly with each click to reflect the new document.
Fix the size. Quick Look tries to display an entire picture or document in a single small window. To view it at actual size, hold down the Option key.
Keep Folders on Top
Hiding away in Finder→Preferences→Advanced, “Keep folders on top” awaits. It turns out to be incredibly useful (see Figure 1-28).
In windows when sorting by name. When you’ve sorted a window’s contents alphabetically, all the folders now appear at the top of the list, in their own little alphabetical grouping. (Otherwise they appear mixed in with the loose files, all in one alphabetical list.) This “folders first” arrangement is how things work in Windows—and, although Apple may not have wanted to admit it for 30 years, it’s pretty handy.
On Desktop. This option applies the same idea to icons on your desktop: Folders appear first, and then loose files after them. (The checkbox has no effect if you have not opted to sort your desktop icons.)
Finder Tabs
The world discovered the miracle of tabs in web browsers years ago. It was a simple software design idea, modeled after the tabs of paper file folders, that let you keep multiple web pages open at once in a single window. What convenience! What cleanliness!
But it took until 2013 for someone to realize that tabs might be useful at the desktop, too. That’s when Apple added tabs to Finder windows.
They do exactly the same job they do in Safari: They let you keep open the windows of several different containers—folders or disks—in a single window frame. That makes it easy to move icons back and forth between them (Figure 1-29), or even to view the same window twice in different views.
As a convenience, Apple designed the commands, keystrokes, and clicks to work exactly as they do in Safari.
Creating Tabs
There are almost as many ways to open new tabs as there are people:
Press the
key as you open a folder or disk. (That shouldn’t come as a shock; you -click a link to open a new tab in Safari, too.)Tip
You can
-click the names of places in the Sidebar of a Finder window, too, like Documents or Pictures.Right-click or two-finger click a folder or disk. From the shortcut menu, choose Open in New Tab.
If you already have some tabs, then click the
 button at the far right. (Even if you haven’t created any tabs yet, that button appears if you’ve made the tab bar visible; choose View→Show Tab Bar.)
Drag a disk or folder icon onto the
button at the far right of the tab bar.Select a folder or disk (or several). From the
 menu, choose Open in New Tab(s)—or press Control--O.
Choose File→New Tab, or press
-T.Tip
And what will it show? Whatever you’ve chosen in the Finder→Preferences→General→“New Finder windows show” pop-up menu. It’s usually your Recents window, or maybe the desktop’s contents.
A New Tab button is also available to install onto your Touch Bar, if you have one of those on your MacBook Pro (“Customizing the Touch Bar”).
Using Tabs
So why bother opening tabs? Because you can perform a few power-usery stunts now that you couldn’t before. Like this:
Move files around. You can drag a file or folder icon into another tab, as shown in Figure 1-29.
View the same window twice. Put one copy of the window in list view, another in icon view. Or view different sections of a long list of files in two side-by-side tabs.
Live in a desktop-free world. Click the green
button (upper-left corner) to put your Finder window into Full Screen mode. (See Figure 5-8 for more on Full Screen mode.)Now you can work in tabs, manipulating your files, without ever seeing the desktop.
Tab Management
Once you’ve got some tabs adorning your window, you can operate them thusly:
To switch tabs, click one, or press Control-Tab. (Add the Shift key to cycle through the tabs in reverse.) If you forget these important keystrokes, they’re listed for you as commands in the Window menu.
Rearrange tabs by dragging them horizontally.
Turn a tab into a stand-alone window by dragging it away from the other tabs. (Or choose Window→Move Tab to New Window.)
Tip
There’s no built-in keyboard shortcut for the Window-menu commands like Move Tab to New Window and Merge All Windows. But it’s easy enough to add a shortcut of your own, as described on “Redefining a Keystroke”.
Move a tab into a different window by dragging it. That is, you can drag a tab from one window to another.
Round up a bunch of open windows into a single tabbed window: Choose Window→Merge All Windows. That’s a good one.
To close a tab, press the usual “close window” keystroke,
-W. (Or, if it’s a slow day at work, choose File→Close Tab. Or move your cursor onto the tab itself and click the tiny  that appears.)
To close all tabs, add the Option key. For example, press Option-
-W or Option-click the Close button on one of the tabs.
Tabs in Other Apps
Apparently, you just can’t keep a good idea down. Tabbed windows, which did so well in web browsers, eventually made their way to the Finder—and now they’re in six other Apple programs: Mail, Maps, TextEdit, Pages, Keynote, and Numbers. Some non-Apple apps that are “document-based” (you work in multiple windows, each containing a different document) also have tabs.
For one reason or another, you don’t get tabbed windowing in any other built-in Apple apps. And you don’t get it in Microsoft programs.
If you’re using one of the anointed apps, start by opening at least two windows. (Some apps, like Mail, create a new tab when you choose File→New Tab.) Choose Window→Merge All Windows to turn them into tabs. At this point, a ![]() button appears at the top right of the window, so you can create a new blank tab.
button appears at the top right of the window, so you can create a new blank tab.
Tip
If you like, those apps can open a new tab, rather than a separate window, every time you create a new document. In System Preferences→Dock, the “Prefer tabs when opening documents” pop-up menu offers three choices. “Always” means every new document will appear in a tab. “In Full Screen Only” means that new documents become tabs only when you’re in Full Screen mode (Figure 5-8). And “Manually” means that new tabs appear only when you use the New Tab command.
At that point, you can switch tabs, rearrange them, close them, and separate them exactly as described already.
Logging Out, Shutting Down
If you’re the only person who uses your Mac, finishing up a work session is simple. You can either turn off the machine or simply let it go to sleep, in any of several ways.
Sleep Mode
If you’re still shutting down your Mac every night, you may be doing a lot more waiting than necessary. Sleep mode consumes very little power, keeps everything you were doing open and available, and wakes up almost immediately.
To make your machine sleep, do one of the following:
Close the lid. (Hint: This works primarily on laptops.)
Press the power button (
 ) on your Mac. Tapping that button (for about a half-second) makes any kind of Mac drop off to sleep instantly.
Hold down the power button (
) for two seconds. You get the box shown in Figure 1-30; hit Sleep (or type S) or wait 60 seconds.Choose
→Sleep. Or press Option- .
.Press Control-
. In the dialog box shown in Figure 1-30, click Sleep (or type S).Tap the Sleep button on your Touch Bar, if you have one (and if you’ve installed the Sleep button there; see “Customizing the Touch Bar”).
Just walk away, confident that the Energy Saver setting in System Preferences will send the machine off to dreamland automatically at the specified time.
Tip
Ordinarily, closing your MacBook’s lid means cutting it off from the world. But the Power Nap feature lets your Mac stay connected to your network and to the internet, even while it’s otherwise sleeping. It can download email, back up your stuff, download software updates, and so on. For details, see “Checkbox Options”.
Restart
You shouldn’t have to restart the Mac very often—only in times of severe troubleshooting mystification, in fact. Here are a few ways to do it:
Choose
→Restart. A confirmation box appears; click Restart (or press Return).Tip
If you press Option as you release the mouse on the
→Restart command, you won’t be bothered by an “Are you sure?” confirmation box.Press Control-
.Press Control-
(or hold down the button) to summon the dialog box shown in Figure 1-30; click Restart (or type R).
Shut Down
To shut down your machine completely (when you don’t plan to use it for more than a couple of days, when you plan to transport it, and so on), do one of the following:
Choose
→Shut Down. A simple confirmation dialog box appears; click Shut Down (or press Return).Tip
Once again, if you press Option as you release the mouse, no confirmation box appears.
Press Control-Option-
. (It’s not as complex as it looks—the first three keys are all in a tidy row to the left of the space bar.)Press Control-
(or hold down the button) to summon the dialog box shown in Figure 1-30. Click Shut Down (or press Return).Wait. If you’ve set up the Energy Saver preferences (“Color Tab”) to shut down the Mac automatically at a specified time, then you don’t have to do anything.
The “Reopen Windows” Option
In Figure 1-30, you’ll notice a checkbox called “Reopen windows when logging back in.” That option does something very useful: The next time you start up your Mac, every running program, and every open window, will reopen exactly as they were at the moment you used the Restart or Shut Down command. This saves you a lot of reopening the next time you sit down to work.
If you turn off that checkbox when you click Restart or Shut Down, then your next startup will take you to the desktop, with no programs running, as though this were still some year between 1984 and 2010. And if you want the Mac to stop asking—if you never want your programs and windows to reopen—then open System Preferences→General, and turn on “Close windows when quitting an app.”
Log Out
If you share your Mac, then you should log out when you’re done. Doing so ensures that your stuff is safe from the evil and the clueless, even when you’re out of the room. To do it, choose ![]() →Log Out [your name], or press Shift-
→Log Out [your name], or press Shift-![]() -Q.
-Q.
When the confirmation dialog box appears, click Log Out (or press Return) or just wait for one minute (a message performs the countdown for you). The Mac hides your world from view and displays the Log In dialog box, ready for its next victim.
Tip
One more time: If you press Option as you release the mouse on the ![]() →Log Out command, you squelch the “Are you sure?” box.
→Log Out command, you squelch the “Are you sure?” box.
Logging out is described in much more detail starting on “Logging Out”.
Getting Help in macOS
It’s a good thing you’ve got a book about macOS in your hands, because the only manual you get with it is the Help menu, a browser-like program that reads a set of help files that reside in your System→Library folder.
Note
In fact, you may not even be that lucky. The general-information help page about each topic is on your Mac, but thousands of the more technical pages reside online and require an internet connection to read.
You’re expected to find the topic you want in one of these three ways:
Use the search box. The first “command” in the Help menu in any window is, in fact, a search box (Figure 1-31). You can type a few words here to specify what you want help with: “setting up printer,” “disk space,” whatever.
Tip
You can also hit Shift-
-/ (that is, -?) to open the Help search box. And you can change that keystroke, if you like, in System Preferences→Keyboard→Shortcuts→App Shortcuts.After a moment, the menu becomes a list of topics pertaining to your search. Click one to open the Help browser; you’ve just saved some time and a couple of steps.
Tip
The results menu doesn’t show all of Help’s results—only the ones Apple considers relevant. If you choose Show All Help Topics, the Help browser opens with a more complete list of Help search results.
Drill down. Alternatively, you can begin your quest for assistance the old-fashioned way: by opening the Help browser first. To do that, choose Help→macOS Help. (In other programs, it might say, for example, “Mail Help.” Either way, this command appears only when nothing is typed in the search box.)
After a moment, you arrive at the Help browser shown at top in Figure 1-32. The starting screen offers several “quick click” topics like “Everyday tasks made easy” and “Protect your data and your Mac”—presumably the issues that trigger the most help-hotline calls to Apple. Keep clicking text headings until you find a topic you want to read.
Or click “Table of Contents” to see the left-side list of topics, which you can use to drill down to the subject you need (Figure 1-32, bottom).You can backtrack by clicking the
button at the top of the window.Tip
Annoyingly, the help window insists on floating in front of all other windows; you can’t send it to the back like you can any normal program. Therefore, consider making the help window tall and skinny, so you can put it alongside the program you’re working in. Drag any edge of the box to change the window’s shape.
Use the search box in the Help program. Type the phrase you want, like printing or switching applications, into the search box at the top of the window, and then press Return. As you type, a list of proposed matches drops down from the search box. When you click the closest match, you’re shown a list of help-screen topics that may pertain to what you need.


0 Comments